作者:matrix
发布时间:2019 年 6 月 21 日
分类:Python 兼容并蓄
之前不太理解ISO8601时间格式,后来看了下网上文章,其实是没有固定的单一格式。
按照下面这些其实都属于ISO8601时间格式:
2019-03-25T16:00:00.000111Z
2019-03-25T16:00:00.111Z
2019-03-25T16:00:00Z
2019-03-25T16:00:00
...
Z表示祖鲁时间Zulu time 即+0时区,若去掉不写Z则采用系统本地时区。
ISO8601时间还有很多其他扩展格式。
下面代码处理的也就是普通格式
python
import datetime,pytz
def iso2timestamp(datestring, format='%Y-%m-%dT%H:%M:%S.%fZ',timespec='seconds'):
    """
    ISO8601时间转换为时间戳

    :param datestring:iso时间字符串 2019-03-25T16:00:00.000Z,2019-03-25T16:00:00.000111Z
    :param format:%Y-%m-%dT%H:%M:%S.%fZ;其中%f 表示毫秒或者微秒
    :param timespec:返回时间戳最小单位 seconds 秒,milliseconds 毫秒,microseconds 微秒
    :return:时间戳 默认单位秒
    """
    tz = pytz.timezone('Asia/Shanghai')
    utc_time = datetime.datetime.strptime(datestring, format)  # 将字符串读取为 时间 class datetime.datetime

    time = utc_time.replace(tzinfo=pytz.utc).astimezone(tz)

    times = {
        'seconds': int(time.timestamp()),
        'milliseconds': round(time.timestamp() * 1000),
        'microseconds': round(time.timestamp() * 1000 * 1000),
    }
    return times[timespec]


def timestamp2iso(timestamp, format='%Y-%m-%dT%H:%M:%S.%fZ',exact_sec_type = 3):
    """
    时间戳转换到ISO8601标准时间(支持微秒级输出 YYYY-MM-DD HH:MM:SS.mmmmmm)
    :param timestamp:时间戳 int值,支持 秒,毫秒,微秒级别
    :param format:输出的时间格式  默认 iso=%Y-%m-%dT%H:%M:%S.%fZ;其中%f表示微秒6位长度
    :param exact_sec_type: %f表示的单位  3|6  默认 6微秒,3毫秒

    此函数特殊处理,毫秒/微秒部分 让其支持该部分的字符格式输出
    :return:
    """
    format = format.replace('%f','{-FF-}')#订单处理微秒数据 %f
    assert exact_sec_type in [3,6]
    length = min(10+exact_sec_type, len(str(timestamp)))#最多取到微秒级

    #获取毫秒/微秒 数据
    sec = '0'
    if length != 10:#非秒级
        sec = str(timestamp)[:10+exact_sec_type][-(length - 10):]#最长截取16位长度 再取最后毫秒/微秒数据
    if exact_sec_type == 6:
      sec = '{:0<6}'.format(sec)#长度位6,靠左剩下的用0补齐
    elif exact_sec_type == 3:
      sec = '{:0<3}'.format(sec)#长度位3,靠左剩下的用0补齐
    timestamp = float(str(timestamp)[:10])#转换为秒级时间戳
    return datetime.datetime.utcfromtimestamp(timestamp).strftime(format).replace('{-FF-}',sec)
说明:
之前别个写的iso到时间戳的转换方法简直蛋疼,无参数说明和无法精确到秒级别。
两个函数都可以相互转换和处理。
参考:
https://en.wikipedia.org/wiki/ISO_8601
https://docs.Python.org/zh-cn/3.7/library/datetime.html?highlight=isoformat#strftime-strptime-behavior
https://www.w3.org/TR/NOTE-datetime
https://www.cryptosys.net/pki/manpki/pki_iso8601datetime.html
作者:matrix
发布时间:2019 年 6 月 11 日
分类:Python
修改递归函数用于遍历目录中文件。
普通操作
def recursive_open_file(path):
    rel = []
    path_dir = os.listdir(path)  # 获取当前路径下的文件名,返回List
    for s in path_dir:
        new_dir = os.path.join(path, s)  # 将文件命加入到当前文件路径后面
        if os.path.isfile(new_dir):  # 如果是文件
            if os.path.splitext(new_dir)[1] == ".txt":  # 判断是否是txt
                rel.append(new_dir)
        else:
            rel = rel + recursive_open_file(new_dir)
    return rel

# print(type(recursive_open_file(dir))) # <class 'list'>
调试yield
想用协程目的是为了想让程序找到相关文件之后中断挂起然后返回数据,避免一次性加载全部资源在内存中。
之前是想的太简单,没用过果真是不知道。
错误版本
def recursive_open_file(path):
    path_dir = os.listdir(path)  # 获取当前路径下的文件名,返回List
    for s in path_dir:
        new_dir = os.path.join(path, s)  # 将文件命加入到当前文件路径后面
        if os.path.isfile(new_dir):  # 如果是文件
            if os.path.splitext(new_dir)[1] == ".txt":  # 判断是否是txt
                yield new_dir
        else:
            yield recursive_open_file(new_dir)

#执行
for i in recursive_open_file(dir):
    print(i) #无法获取文件路径
说明:
yield recursive_open_file(new_dir)返回给外部调用层的数据为<generator object recursive_open_file at 0x10f7765e8> ,不是想要的String!!
正常版本
内部再迭代下就好了 🙈
def recursive_open_file(path):
    path_dir = os.listdir(path)  # 获取当前路径下的文件名,返回List
    for s in path_dir:
        new_dir = os.path.join(path, s)  # 将文件命加入到当前文件路径后面
        if os.path.isfile(new_dir):  # 如果是文件
            if os.path.splitext(new_dir)[1] == ".txt":  # 判断是否是txt
                yield new_dir
        else:
            for i in recursive_open_file(new_dir):
                yield i
PHP协程递归同理
function openDirectory($path)
{
    $dir = dir($path);
    while (false != ($entry = $dir->read())) {
        if ($entry != "." && $entry != "..") {
            $n_path = $path . DIRECTORY_SEPARATOR . $entry;
            if (is_dir($n_path)) {
                foreach (openDirectory($n_path) as $i){
                    yield $i;
                }
            } else {
                yield $n_path;
            }
        }
    }
}

//调用执行
$dir = '/Users/panc/Desktop/Python/testfile';
foreach (openDirectory($dir) as $item){
    print_r($item);
    print_r("\n");
}
协程send操作
按照廖雪峰的协程教程的生产者-消费者模式:
def consumer():
    r = ''
    while True:
        n = yield r
        if not n:
            return
        print('[CONSUMER] Consuming %s...' % n)
        r = '200 OK'

def produce(c):
    c.send(None)#启动
    n = 0
    while n < 5:
        n = n + 1
        print('[PRODUCER] Producing %s...' % n)
        r = c.send(n)
        print('[PRODUCER] Consumer return: %s' % r)
    c.close()#关闭

c = consumer()
produce(c)
笔记:
c = consumer()不会执行consumer函数,因为内部有yield关键字,consumer函数是生成器generator对象。
通过多个断点调适可以看到yield处的代码会中断执行,然后切换到起调函数的位置继续执行
yield r相似于return返回数据,返回给send()方法返回值。
send(n)操作是把n发送给yield r的返回值
c.send(None)用于启动consumer函数,程序会进入while True循环,在yield处中断
这里yield操作相比较递归遍历那头来说更加麻烦些,因为执行的时候会在两个函数之间相互切换,互相发送数据,需要send方法来启动生成器generator对象。consumer内部因为是while true,所以记得要关闭c.close()
参考:
https://www.liaoxuefeng.com/wiki/1016959663602400/1017968846697824
https://github.com/Earthson/RecGen
https://blog.csdn.net/mieleizhi0522/article/details/82142856
https://blog.51cto.com/xtceetg/1874982
PEACE~
作者:matrix
发布时间:2019 年 5 月 23 日
分类:Python
之前使用vagrant来在虚拟机环境中把所有Python模块安装,但是也有一些问题。比如个别时候连接到vagrant虚拟机内部比较慢,还有就是pip3 install安装模块有时候会失败,不能更好的管理依赖包分发项目。
每个项目模块分开管理安装,不会污染本地系统的全局环境,测试和生产的模块都可以用这个来管理分发。
pipenv会在项目中创建相关联的虚拟环境信息以及依赖信息pipfile文件,一起开发的同事可以执行pipenv install操作来安装以及初始化好的pipenv项目,系统会默认安装所需要的依赖环境。
测试环境:pycharm 2018.3.5 for MacOS
安装pipenv
$ pip3 install pipenv
初始化项目
项目目录中执行操作
$ pipenv --python 3.7#指定项目运行python版本 需要系统已经安装好该版本
会创建python虚拟环境所在目录
✔ Successfully created virtual environment!
Virtualenv location: /Users/用户名/.local/share/virtualenvs/untitled-RaU-esYo
查看虚拟环境信息:
$ pipenv --venv
安装模块
$ pipenv install requests
#也可以指定安装版本 :pipenv install requests==2.22
指定开发环境才安装的模块
$ pipenv install --dev nose2#安装测试环境才用的开发包
项目克隆
项目需要让其他同事克隆就可以直接install来操作
$ pipenv install
#或者使用 pipenv install –dev#安装所有依赖项,包括测试开发包
pycharm配置
1.添加python解释器
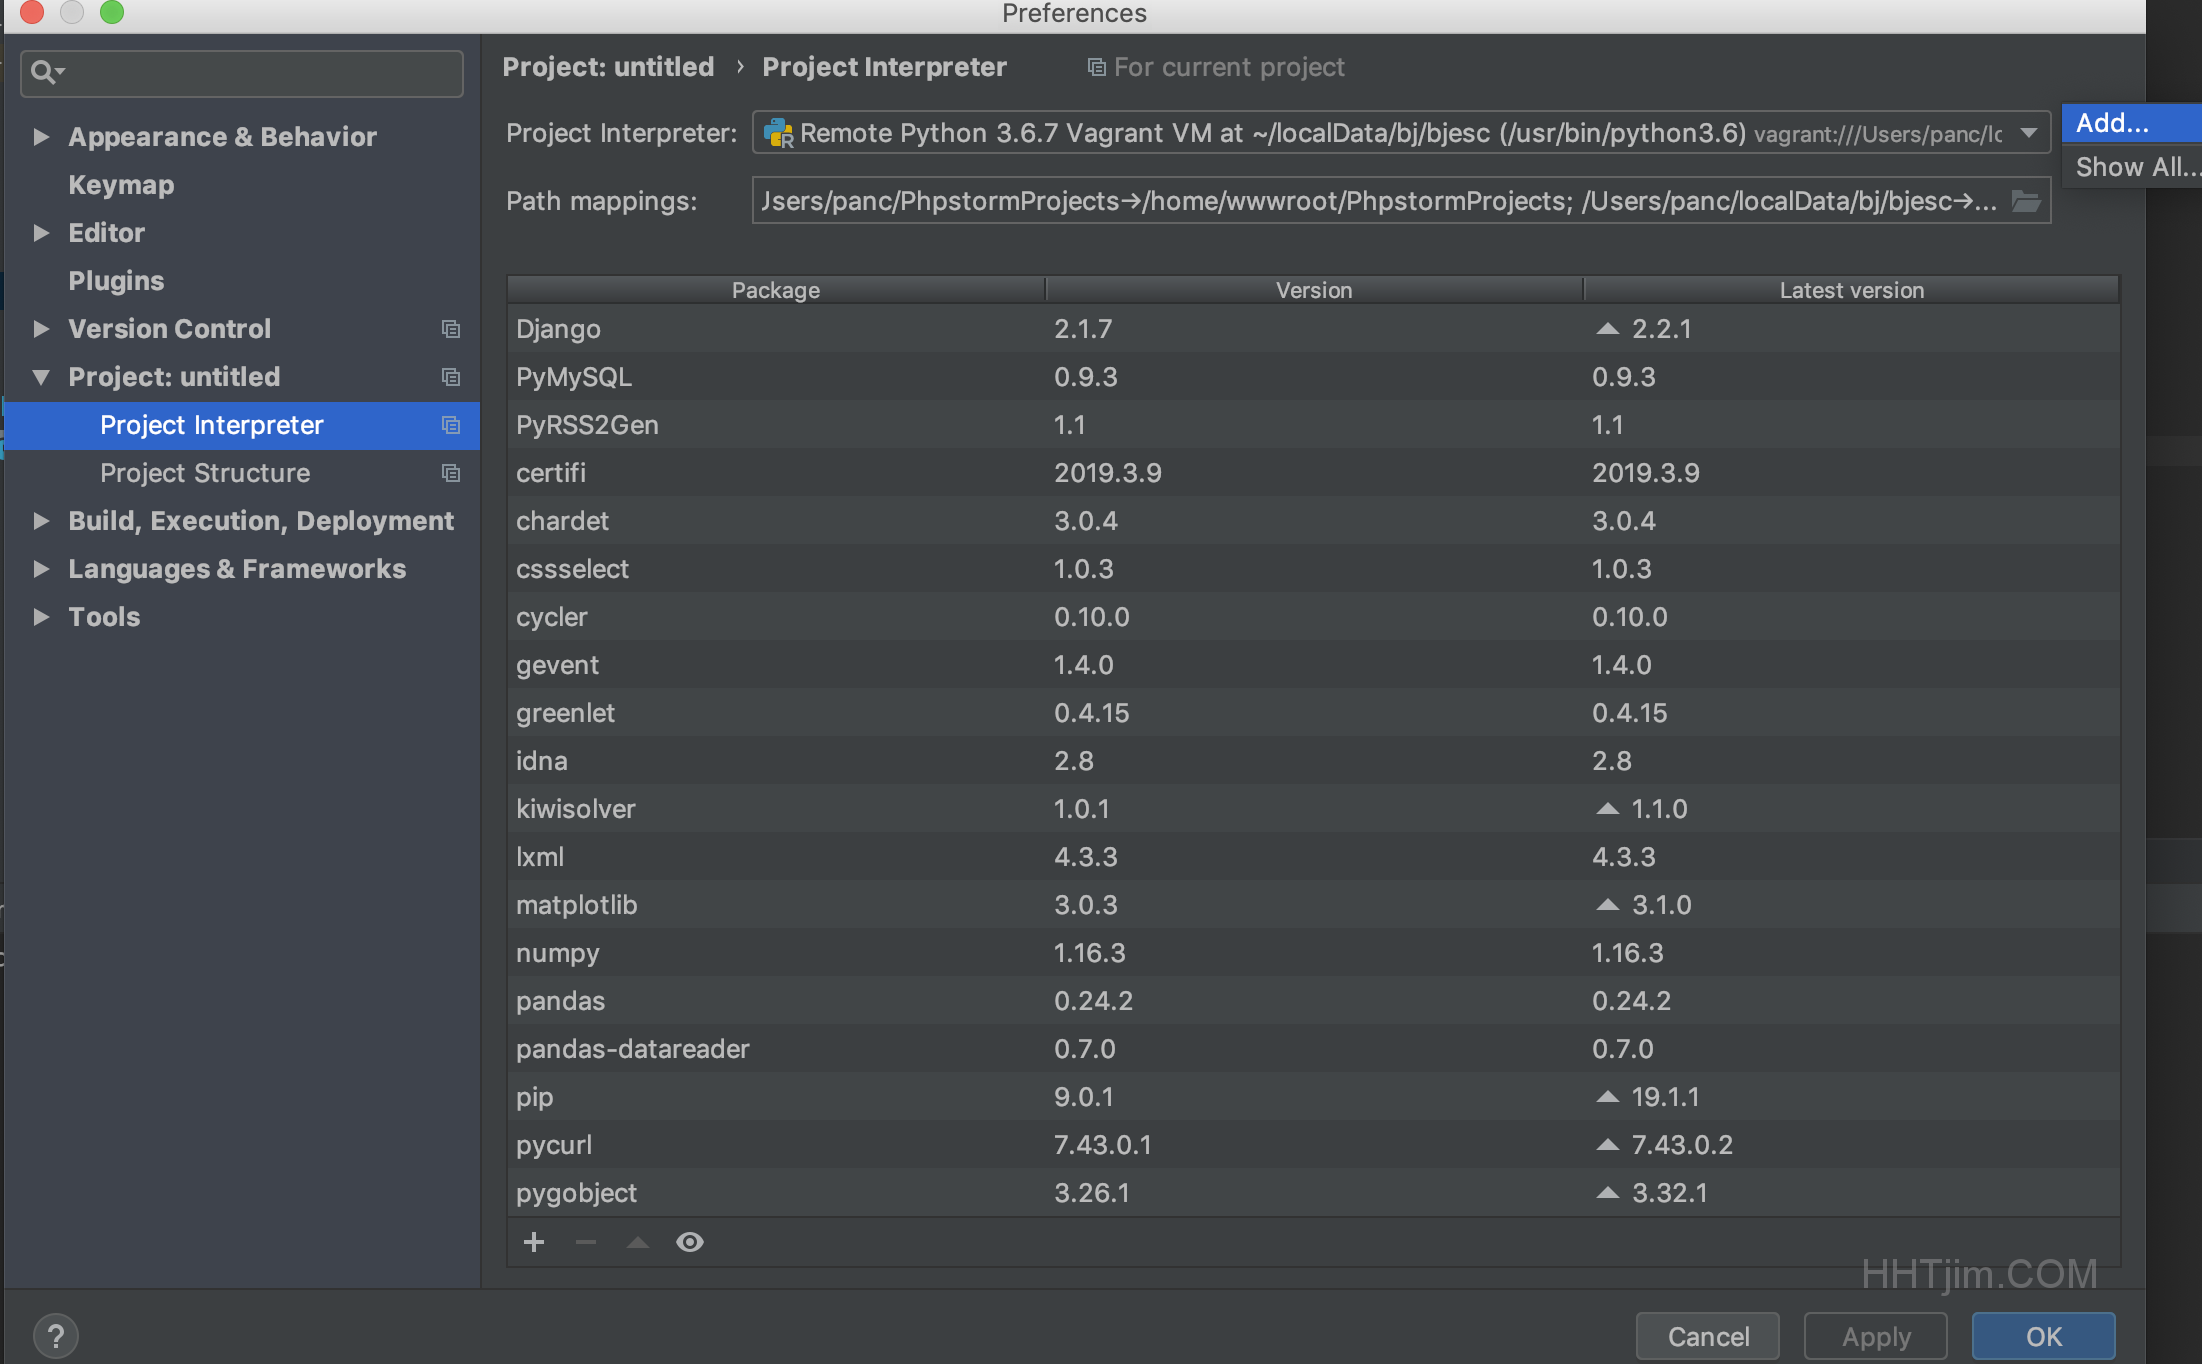
2.选择Pipenv 虚拟环境
Base interpreter为本机系统中的python解释器路径
Pipenv executable表示pipenv,命令的环境变量路径
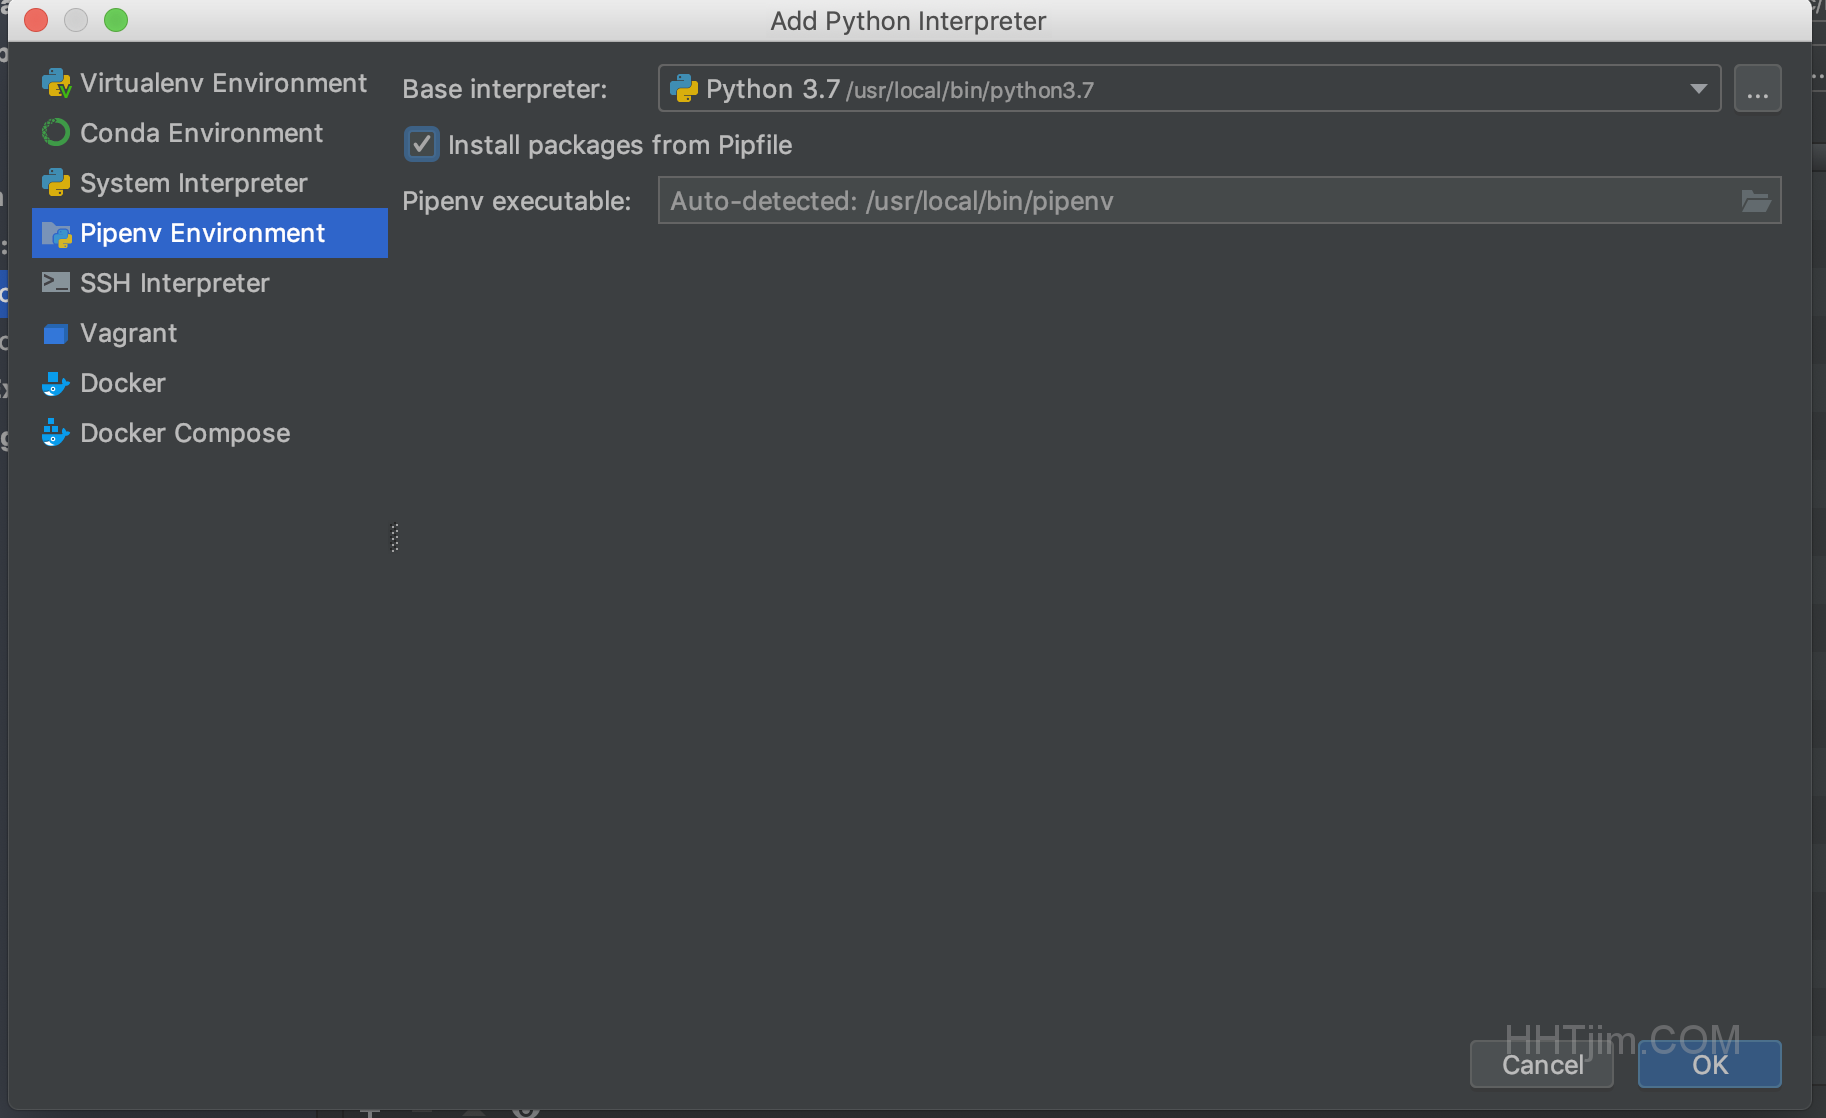
3.之后在项目下选择刚刚新建好的Pipenv名称

测试运行
配置好pipenv后直接点击右上角的运行图标即可看到命令行窗口的显示
pipenv命令收集
pipenv shell #进入虚拟环境命令行
pipenv --venv#查看虚拟环境路径
pipenv --py#获取虚拟环境python解释器路径
pipenv graph#查看依赖关系
pipenv run python Main.py#使用Pipenv虚拟环境运行Main.py
报错
- 克隆pipenv环境的时候报错
OSError: mysql_config not found
centos下确保安装mysql-devel等依赖环境
$ yum install mysql-devel gcc gcc-devel python-devel
如果已经安装则考虑是否为软连接不存在导致的not found
ln -s /usr/local/mysql/bin/mysql_config /usr/local/bin/mysql_config
参考:
一条命令解决mysql_config not found
https://blog.csdn.net/weiliu0626/article/details/8444644
pydev debugger: process 37807 is connecting
删掉项目中隐藏的的.idea目录,然后重启pycharm即可调试变量
参考:
https://www.jianshu.com/p/00af447f0005
https://www.jetbrains.com/help/pycharm/pipenv.html
https://intellij-support.jetbrains.com/hc/en-us/community/posts/205967904-pydev-debugger-is-not-connecting
https://blog.51cto.com/2681882/2164134
作者:matrix
发布时间:2019 年 5 月 16 日
分类:Python 零零星星
Django默认模板中如果想要调用变量的属性值只能点.字符,也就是value.arg,等同于value["arg"]的调用,不能使用方括号的语法操作,这样的就会导致无法取value[arg]这种变量属性值。
解决办法
1.更换模版引擎。
2.使用自定义template filters模版过滤器
使用模版过滤器setup
1.创建templatetags目录
在项目的模块目录下创建templatetags文件夹(和路由配置urls.py同级)
目录下需要创建__init__.py空白文件
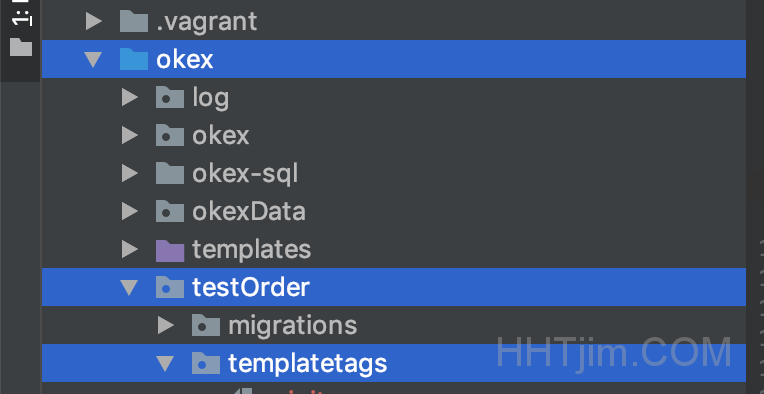
2.创建过滤器py文件
自定义过滤器:dict_value
val.py
from django import template
register = template.Library()

@register.filter(name='dict_value')
def dict_value(value, arg):
    """
    模版变量过滤器 用于调用变量属性的值
    如:$value[$arg]
    :param value:
    :param arg:
    :return:
    """
    return value[arg]
3.模版中使用
模版中需要load操作:
{% load val %} #载入过滤器文件val.py
{{ params_data|dict_value:item|dict_value:'title' }}#使用过滤器
如上调用形式等同于:
params_data[item]['title']
参考:
https://www.v2ex.com/t/66772
https://docs.Djangoproject.com/en/dev/howto/custom-template-tags/
https://blog.csdn.net/lagelangzhi/article/details/54620061
PEACE~
作者:matrix
发布时间:2019 年 3 月 12 日
分类:Python
虚拟机ubuntu中自带了Python2,但是想要使用python3需要单独安装。使用add-apt-repository来添加ppa源安装提示command not found,之后进行安装操作sudo apt-get install software-properties-common,错误继续:
$ sudo apt-get install software-properties-common
Reading package lists... Done
Building dependency tree... 50%
Building dependency tree
Reading state information... Done
You might want to run 'apt-get -f install' to correct these:
The following packages have unmet dependencies:
 libmysql++-dev : Depends: libmysqlclient-dev but it is not going to be installed
 software-properties-common : Depends: python3:any (>= 3.3.2-2~)
                              Depends: python3 but it is not going to be installed
                              Depends: python3-gi but it is not going to be installed
                              Depends: gir1.2-glib-2.0 but it is not going to be installed
                              Depends: python-apt-common (>= 0.9) but it is not going to be installed
                              Depends: python3-dbus but it is not going to be installed
                              Depends: python3-software-properties (= 0.96.20.8) but it is not going to be installed
E: Unmet dependencies. Try 'apt-get -f install' with no packages (or specify a solution).
继续apt-get update & upgrade & 更换国内源,后面使用apt-get install python3也是相同错误,无济于事。
错误跟踪到libmysql++-dev依赖问题,遂重新安装sudo apt-get install libmysqlclient-dev:
$ sudo apt-get install libmysqlclient-dev
Reading package lists... Done
Building dependency tree
Reading state information... Done
The following NEW packages will be installed:
  libmysqlclient-dev
0 upgraded, 1 newly installed, 0 to remove and 163 not upgraded.
4 not fully installed or removed.
Need to get 0 B/1,167 kB of archives.
After this operation, 7,040 kB of additional disk space will be used.
debconf: delaying package configuration, since apt-utils is not installed
(Reading database ... 51891 files and directories currently installed.)
Preparing to unpack .../libmysqlclient-dev_5.7.25-0ubuntu0.16.04.2_amd64.deb ...
Unpacking libmysqlclient-dev (5.7.25-0ubuntu0.16.04.2) ...
dpkg: error processing archive /var/cache/apt/archives/libmysqlclient-dev_5.7.25-0ubuntu0.16.04.2_amd64.deb (--unpack):
 unable to install new version of '/usr/include/mysql/mysql/plugin_ftparser.h': No such file or directory
Errors were encountered while processing:
 /var/cache/apt/archives/libmysqlclient-dev_5.7.25-0ubuntu0.16.04.2_amd64.deb
E: Sub-process /usr/bin/dpkg returned an error code (1)
尝试手动安装deb:sudo dpkg -i /var/cache/apt/archives/libmysqlclient-dev_5.7.25-0ubuntu0.16.04.2_amd64.deb失败:
unable to install new version of '/usr/include/mysql/mysql/plugin_ftparser.h': No such file or directory
根源问题
/usr/include/mysql/mysql/plugin_ftparser.h不存在
开始手动查找
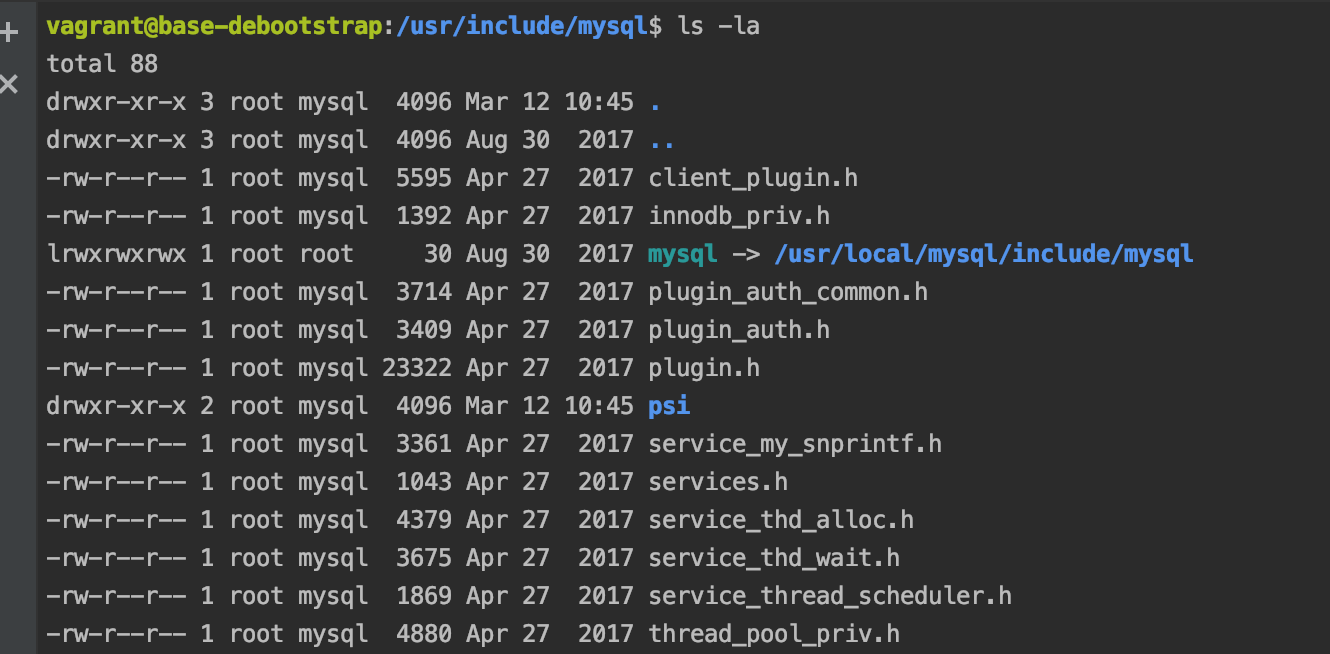
$ sudo find / | grep plugin_ftparser.h

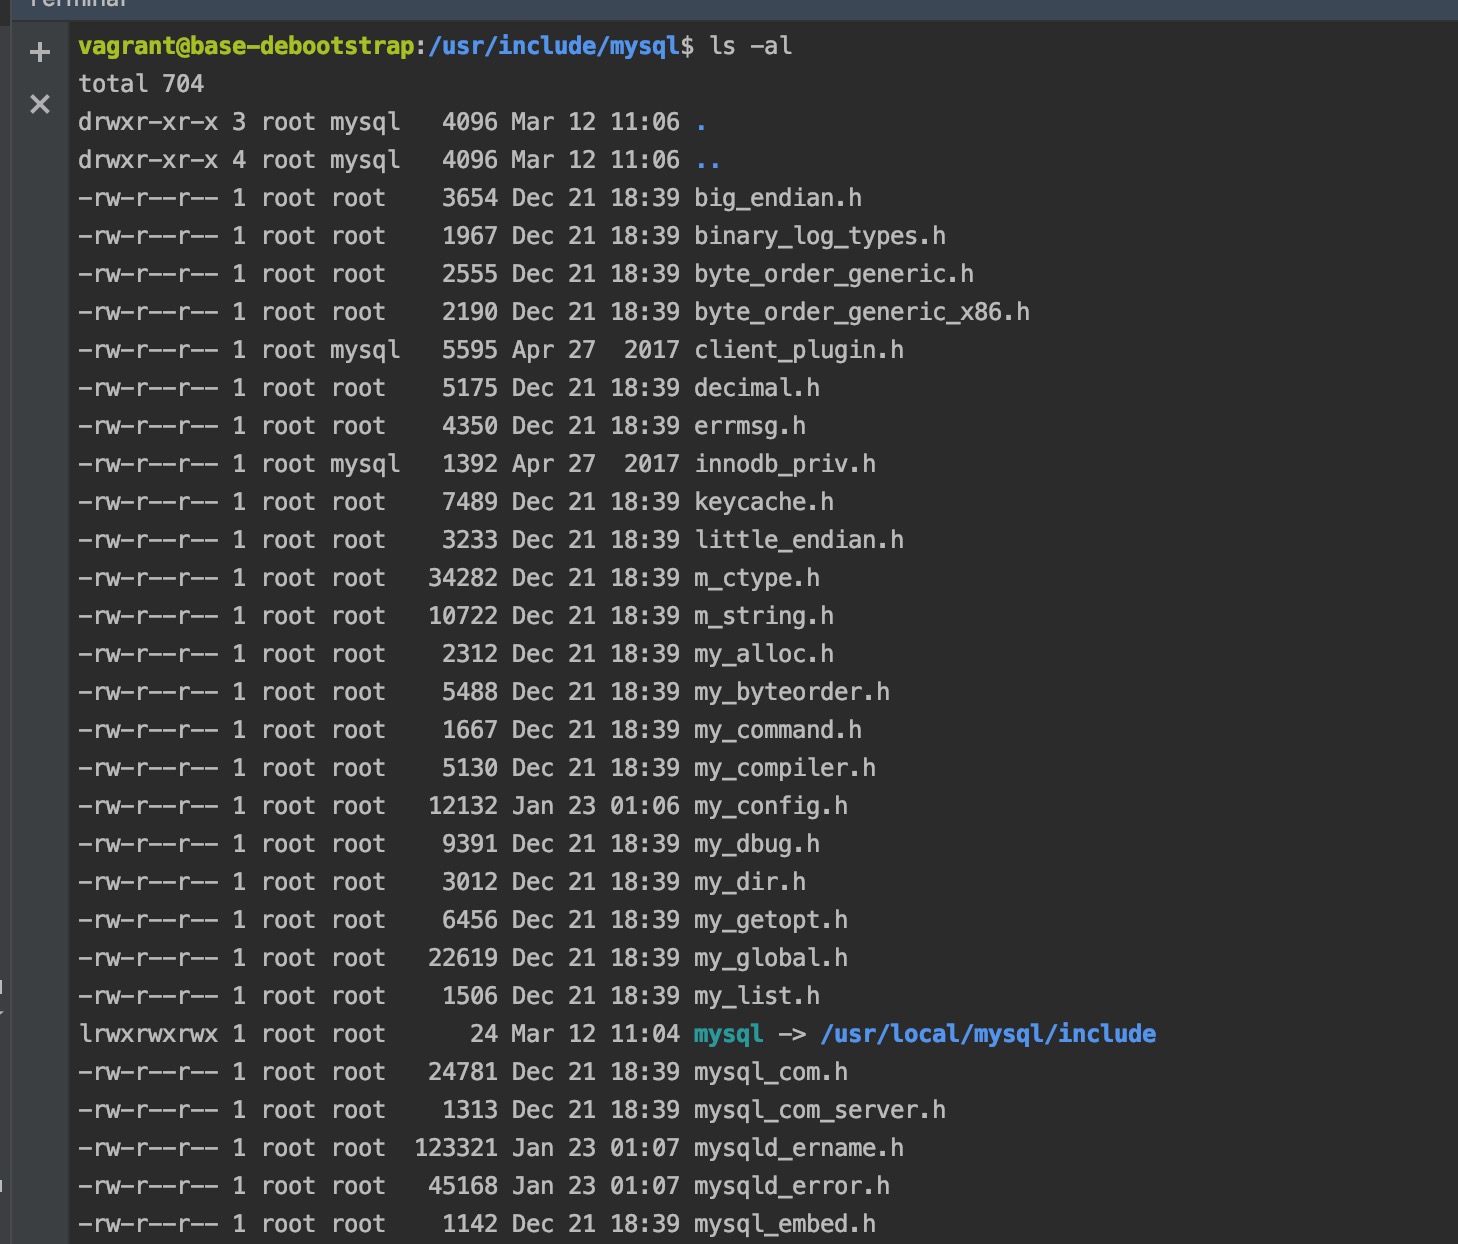
该文件只存在与/usr/local/mysql/include/目录中,ls /usr/include/mysql -al查看列表就会发现mysql的软链接出现问题导致的。
解决
重新生成mysql include软连接
$ ln -s /usr/local/mysql/include /usr/include/mysql/mysql #重新生成软连接
此虚拟机中的mysql是之前安装LNMP搭建PHP环境而创建的,很有可能和这个有关系。
参考:
https://askubuntu.com/questions/629448/file-mysql-h-cant-be-found
https://askubuntu.com/questions/773079/fixing-broken-packages-in-ubuntu-repost
PEACE~
作者:matrix
发布时间:2014 年 9 月 1 日
分类:Python
初玩Python很不习惯那个md5函数。还好有人分享了相关代码,非常感谢。
import hashlib
def md5 (s, raw_output = False):
    res = hashlib.md5 (s)
    if raw_output:
        return res.digest ()
    return res.hexdigest ()
如果是python2.5 :
# Python 2.5+
import hashlib
hashlib.md5("welcome").hexdigest()
# pre-2.5, removed in Python 3
import md5
md5.md5("welcome").hexdigest()
参考:Python 实现PHP内置MD5函数方法
- 1
- 2


