macOS+Proxifier实现终端的外网访问
作者:matrix 发布时间:2019-03-22 分类:零零星星
有时候使用终端clone操作或者其他install访问外网的时候会造成超级延迟,以至于无法使用,网络需要符合国情,毕竟有个大号防火墙。使用Proxifier可以间接实现全局的外网访问。
windows端可以使用SSTap
测试环境:macOS + ss + Proxifier
方案1.使用Proxifier
Proxifier下载:http://www.proxifier.com/download/
注册软件:
用户名称随意:Anything
注册码:P427L-9Y552-5433E-8DSR3-58Z68
- 设置本地代理端口和地址
添加本地代理Proxies

-
添加
Rules规则
我这里只是需要给终端shell设置外网访问所以添加一个shell程序就好了
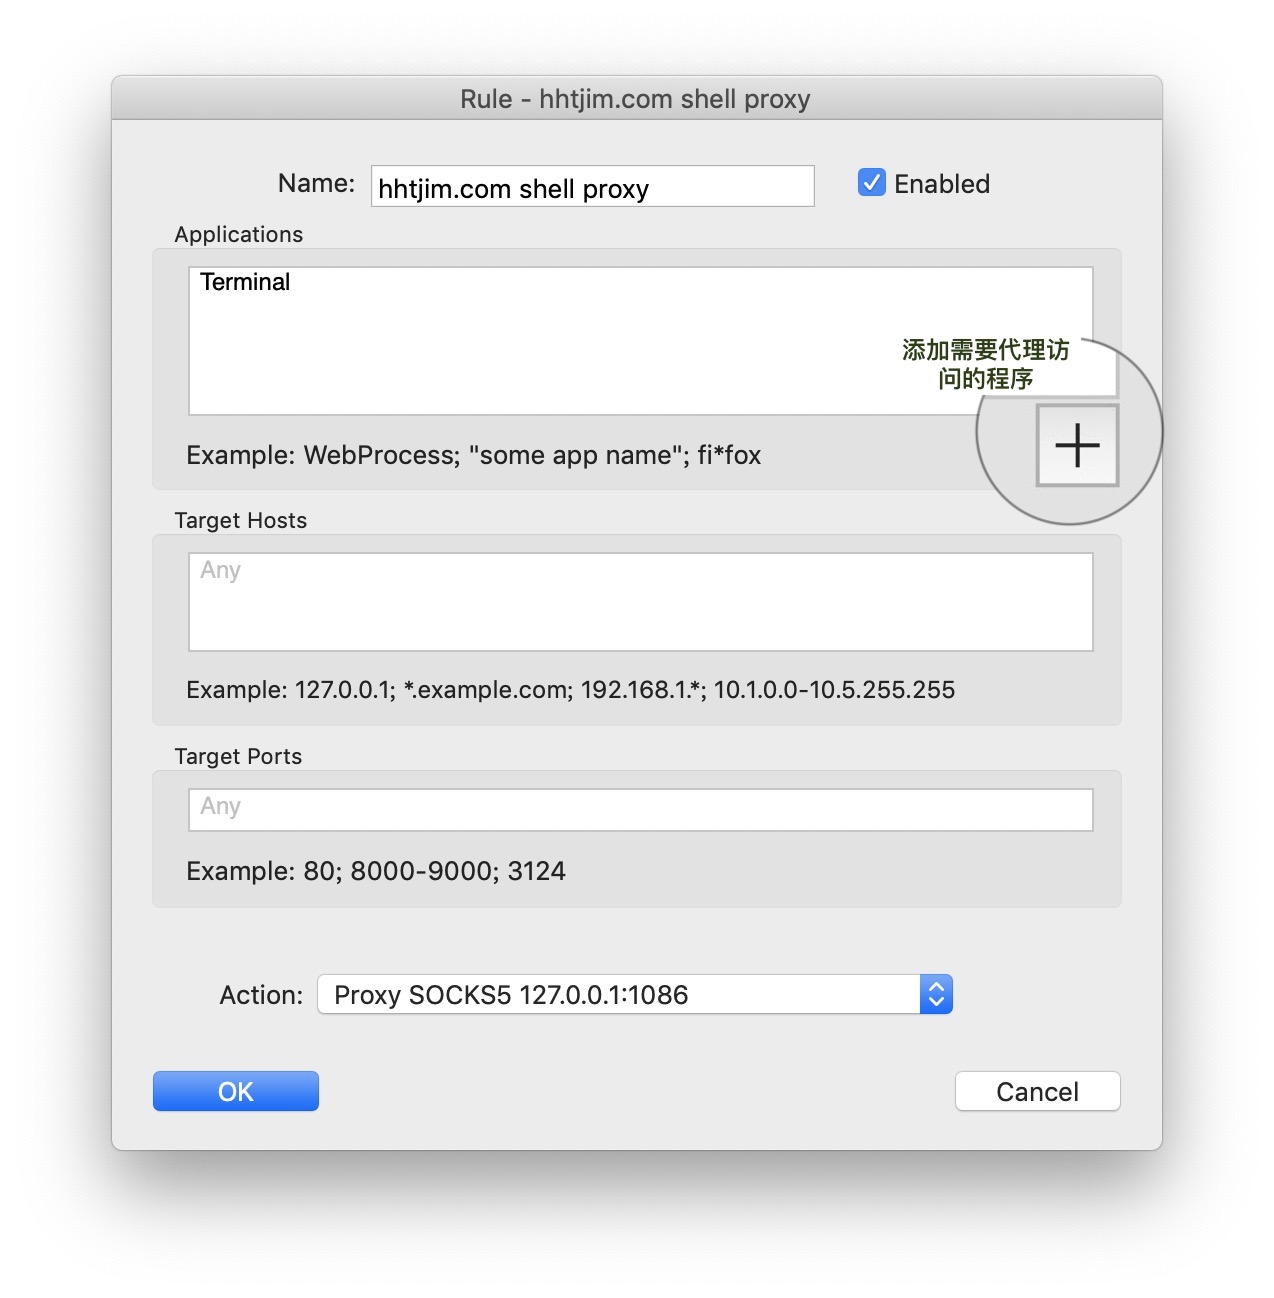


程序添加完成之后,下方的Action选择刚刚添加的Proxies,点击ok
之后控制台界面就能看到程序访问外网的情况

终端测试:
$ curl https://ip.cn
方案2.设置全局export变量
$ `vi ~/.bash_profile` #编辑环境变量配置
#添加如下内容

# proxy list
alias proxy='export all_proxy=socks5://127.0.0.1:1086' #需要开启ss
alias unproxy='unset all_proxy'
应用
$ source ~/.bash_profile
之后命令行中使用proxy和unproxy来手动开启和关闭代理
参考:
https://www.v2ex.com/t/269997
https://www.ljjjustin.xyz/2018/03/21/macos-system-proxies/
http://yangzq007.com/2017/03/29/%E7%BB%88%E7%AB%AF%E7%BF%BB%E5%A2%99/
新浪微博 URL Scheme 收集
作者:matrix 发布时间:2019-03-22 分类:零零星星
新浪微博ios app的scheme 测试可用
#打开首页
sinaweibo://gotohome

#新发微博
sinaweibo://share?content=[微博内容 URL Encode]

#消息页面
sinaweibo://discover

#指定搜索
sinaweibo://searchall?q=[URL Encode]

#微博扫一扫
sinaweibo://qrcode

#微博详情页
如https://weibo.com/1613133581/HlVM69RR9中mblogid为HlVM69RR9

sinaweibo://detail?mblogid=[mblogid]

#指定用户的全部微博
containerid可以根据https://m.weibo.cn/u/1613133581中查找

sinaweibo://cardlist?containerid=[containerid]

#和指定用户聊天
sinaweibo://messagelist?uid=[uid]

#指定用户资料页
sinaweibo://userinfo?uid=[uid]
参考:
https://www.ryannn.com/archives/url-schemes-share
https://www.v2ex.com/t/163755
https://www.jianshu.com/p/d64b9be5ad64
个人微博插件页面:
http://service.weibo.com/widget/widget_blog.php?uid=1613133581&height=1700&skin=wd_01&showpic=1
pycharm中vagrant的基本配置使用
作者:matrix 发布时间:2019-03-14 分类:零零星星
使用vagrant做开发可以将环境全部运行于虚拟机中,避免本机安装各种环境模块造成问题也是为了完全和宿主机分离。
测试:macOS + pycharm + Django项目
配置vagrant的初始化文件
pycharm设置中搜索Vagrant
配置Vagrant的基本运行程序

Vagrant executable为Vagrant程序路径
Instance folder表示Vagrant box配置的初始化目录。我这里也就直接将就以前init的目录。默认位置为当前项目路径
设置好就可以启动虚拟机环境:tools->Vagrant->up
打开虚拟机ssh:tools->Start SSH Session
配置python解释器
点击右上角绿色▶️箭头或者Control+R按键运行,提示失败是由于使用vagrant项目代码是在本机修改编写在虚拟机中运行,默认的项目启动会调用本机的python环境来运行,项目中的所有module亦同 所以修改下运行的python环境。
pycharm设置中搜索Project Interpreter进行配置修改

点击右侧设置图标add新加一个vagrant环境的Interpreter

添加完成后重新选择新加的虚拟机中的python解释器

之后列表中的可用包名就都是虚拟机中已经安装了的。重新run也就会成功执行。
配置run
如果运行Django项目还需要给简单编辑一下运行选项Edit Configurations...

打开之后选择新添加的Pyhton Interpreter,设置Parameters为Django项目的运行参数runserver 为runserver 0.0.0.0:8080

然后▶️运行项目就OK了。
ssh://vagrant@127.0.0.1:2222/usr/bin/python3.6 -u /pythonWork/okex/okex/manage.py runserver 0.0.0.0:8080
Performing system checks...
...
March 14, 2019 - 07:56:04
Django version 2.1.7, using settings 'okex.settings'
Starting development server at http://0.0.0.0:8080/
Quit the server with CONTROL-C.
解决Unresolved reference错误
编辑器很多提示导包的Unresolved reference 'XXX' more....错误 在于py文件目录定位错误导致的 需要手动修改下
重新选择import倒包的包名py文件的目录即可

设置项目的Project Structure,先选中报错 提示的python文件的目录,再点击上面的Sources,之后右侧的Source Folders就会出现刚刚选中的目录,保存应用即可。
若没有马上生效需要清空缓存且重启File->Invalidate Caches / Restart...,之后编辑器也就不会提示导包的错误提示Unresolved reference
参考:
https://blog.csdn.net/u013088062/article/details/50346181
https://blog.csdn.net/u013088062/article/details/50346719
https://blog.csdn.net/wqwqwqwq403/article/details/78861255
https://www.cnblogs.com/xiaohuamao/p/6903030.html
PEACE~
无法安装python3的连续报错-mysql include软链接问题
作者:matrix 发布时间:2019-03-12 分类:Python
虚拟机ubuntu中自带了Python2,但是想要使用python3需要单独安装。使用add-apt-repository来添加ppa源安装提示command not found,之后进行安装操作sudo apt-get install software-properties-common,错误继续:
$ sudo apt-get install software-properties-common
Reading package lists... Done
Building dependency tree... 50%
Building dependency tree
Reading state information... Done
You might want to run 'apt-get -f install' to correct these:
The following packages have unmet dependencies:
 libmysql++-dev : Depends: libmysqlclient-dev but it is not going to be installed
 software-properties-common : Depends: python3:any (>= 3.3.2-2~)
                              Depends: python3 but it is not going to be installed
                              Depends: python3-gi but it is not going to be installed
                              Depends: gir1.2-glib-2.0 but it is not going to be installed
                              Depends: python-apt-common (>= 0.9) but it is not going to be installed
                              Depends: python3-dbus but it is not going to be installed
                              Depends: python3-software-properties (= 0.96.20.8) but it is not going to be installed
E: Unmet dependencies. Try 'apt-get -f install' with no packages (or specify a solution).
继续apt-get update & upgrade & 更换国内源,后面使用apt-get install python3也是相同错误,无济于事。
错误跟踪到libmysql++-dev依赖问题,遂重新安装sudo apt-get install libmysqlclient-dev:
$ sudo apt-get install libmysqlclient-dev
Reading package lists... Done
Building dependency tree
Reading state information... Done
The following NEW packages will be installed:
  libmysqlclient-dev
0 upgraded, 1 newly installed, 0 to remove and 163 not upgraded.
4 not fully installed or removed.
Need to get 0 B/1,167 kB of archives.
After this operation, 7,040 kB of additional disk space will be used.
debconf: delaying package configuration, since apt-utils is not installed
(Reading database ... 51891 files and directories currently installed.)
Preparing to unpack .../libmysqlclient-dev_5.7.25-0ubuntu0.16.04.2_amd64.deb ...
Unpacking libmysqlclient-dev (5.7.25-0ubuntu0.16.04.2) ...
dpkg: error processing archive /var/cache/apt/archives/libmysqlclient-dev_5.7.25-0ubuntu0.16.04.2_amd64.deb (--unpack):
 unable to install new version of '/usr/include/mysql/mysql/plugin_ftparser.h': No such file or directory
Errors were encountered while processing:
 /var/cache/apt/archives/libmysqlclient-dev_5.7.25-0ubuntu0.16.04.2_amd64.deb
E: Sub-process /usr/bin/dpkg returned an error code (1)
尝试手动安装deb:sudo dpkg -i /var/cache/apt/archives/libmysqlclient-dev_5.7.25-0ubuntu0.16.04.2_amd64.deb失败:
unable to install new version of '/usr/include/mysql/mysql/plugin_ftparser.h': No such file or directory
根源问题
/usr/include/mysql/mysql/plugin_ftparser.h不存在
开始手动查找
$ sudo find / | grep plugin_ftparser.h

该文件只存在与/usr/local/mysql/include/目录中,ls /usr/include/mysql -al查看列表就会发现mysql的软链接出现问题导致的。

解决
重新生成mysql include软连接
$ ln -s /usr/local/mysql/include /usr/include/mysql/mysql #重新生成软连接

此虚拟机中的mysql是之前安装LNMP搭建PHP环境而创建的,很有可能和这个有关系。
参考:
https://askubuntu.com/questions/629448/file-mysql-h-cant-be-found
https://askubuntu.com/questions/773079/fixing-broken-packages-in-ubuntu-repost
PEACE~
wordpress修改默认的媒体播放器
作者:matrix 发布时间:2019-03-07 分类:Wordpress 零零星星
本来几乎少有在blog上放置音乐,但是看到之前的帖子的哪个音频播放UI简直难受的很,已经记不起WP是从多少版本开始有这种协调默认的媒体播放界面。刚开始应该是使用html5的默认audio播放界面,后面就使用MediaElement.js的播放器且覆盖了样式,默认都是黑色调的蓝/白色进度条的那种。

音频播放界面如上图样子,早就该改了的 实在难受 😱 😱
下面的代码来自@Vassilis Mastorostergios
,style很好看 也就照教程搬过来用了。
修改后的样式:

添加样式文件
主题css目录下新建文件my-theme-player.css
/* Media Element Player styles */

/* Player background */
.mytheme-mejs-container.mejs-container,
.mytheme-mejs-container .mejs-controls,
.mytheme-mejs-container .mejs-embed,
.mytheme-mejs-container .mejs-embed body {
    background-color: #efefef;
}

/* Playmejs-time-floater controls */
.mytheme-mejs-container .mejs-button > button {
    background-image: url(images/mejs-controls-dark.svg);
}

.mytheme-mejs-container .mejs-time {
    color: #888888;
}

/* Progress and audio bars */

/* Progress and audio bar background */
.mytheme-mejs-container .mejs-controls .mejs-horizontal-volume-slider .mejs-horizontal-volume-total,
.mytheme-mejs-container .mejs-controls .mejs-time-rail .mejs-time-total {
    background-color: #fff;
}

/* Track progress bar background (amount of track fully loaded)
  We prefer to style these with the main accent color of our theme */
.mytheme-mejs-container .mejs-controls .mejs-time-rail .mejs-time-loaded {
    background-color: rgba(219, 78, 136, 0.075);
}

/* Current track progress and active audio volume level bar */
.mytheme-mejs-container .mejs-controls .mejs-horizontal-volume-slider .mejs-horizontal-volume-current,
.mytheme-mejs-container .mejs-controls .mejs-time-rail .mejs-time-current {
    background: #db4e88;
}

/* Reduce height of the progress and audio bars */
.mytheme-mejs-container .mejs-time-buffering,
.mytheme-mejs-container .mejs-time-current,
.mytheme-mejs-container .mejs-time-float,
.mytheme-mejs-container .mejs-time-float-corner,
.mytheme-mejs-container .mejs-time-float-current,
.mytheme-mejs-container .mejs-time-hovered,
.mytheme-mejs-container .mejs-time-loaded,
.mytheme-mejs-container .mejs-time-marker,
.mytheme-mejs-container .mejs-time-total,
.mytheme-mejs-container .mejs-horizontal-volume-total,
.mytheme-mejs-container .mejs-time-handle-content {
    height: 3px;
}

.mytheme-mejs-container .mejs-time-handle-content {
    top: -6px;
}

.mytheme-mejs-container .mejs-time-total {
    margin-top: 8px;
}

.mytheme-mejs-container .mejs-horizontal-volume-total {
    top: 19px;
}

/* WordPress audio playlist styles */

.wp-playlist-light {
    box-shadow: 3px 3px 0 #e2e2e2;
}

/* Captions - Track titles / subtitles, time */
.wp-playlist-light .wp-playlist-caption,
.wp-playlist-light .wp-playlist-item-length {
    color: #787878;
}

/* Captions - Current track */
.wp-playlist-light .wp-playlist-current-item .wp-playlist-item-title {
    font-size: 16px;
}

.wp-playlist-light .wp-playlist-item-album {
    font-style: normal;
}

.wp-playlist-light .wp-playlist-item-artist {
    text-transform: none;
    opacity: .8;
}

/* Playlist items */
.wp-playlist-light .wp-playlist-item {
    padding: 10px 0;
    border-bottom-color: #efefef;
}

.wp-playlist-light .wp-playlist-item:last-child {
    padding-bottom: 0;
}

.wp-playlist-light .wp-playlist-playing {
    font-weight: normal;
    border-bottom-color: #db4e88;
}

.wp-playlist-light .wp-playlist-item-length {
    top: 10px;
}

/*调整优化*/
.mejs-time-float,.mejs-time-float-current,.mejs-time-float-corner{
    border:none ;
    color: #888888; /*设置文字颜色*/
}
.wp-audio-shortcode a,.wp-playlist a{
    border-bottom:none; /*去除主题的a标签全局下划线*/
}
说明:
调整优化部分是我自行添加的,主要是避免和本主题的样式冲突
添加svg播放图标
mejs-controls-dark.svg放置在主题css/images目录下css/images/mejs-controls-dark.svg
下载:
https://d.pr/f/Y83MD
https://pan.baidu.com/s/14P4TOe1StJQfoRHgAmMrkg#提取码: 4pjf
挂载脚本
functions.php适当位置添加css和js加载的钩子
//加载之前新建的my-theme-player.css文件
//判断启用wp-mediaelement才会加载  避免多余的资源请求
add_action( 'wp_footer', 'ci_theme_footer_scripts' );

function ci_theme_footer_scripts() {
    if ( wp_style_is( 'wp-mediaelement', 'enqueued' ) ) {
        wp_enqueue_style( 'my-theme-player', get_template_directory_uri() . '/css/my-theme-player.css', array(
            'wp-mediaelement',
        ), '1.0' );
    }
}

//给MediaElementJs播放器添加自定义样式mytheme-mejs-container  用于重写系统自带css
/**
 * Add an HTML class to MediaElement.js container elements to aid styling.
 *
 * Extends the core _wpmejsSettings object to add a new feature via the
 * MediaElement.js plugin API.
 */
add_action( 'wp_print_footer_scripts', 'mytheme_mejs_add_container_class' );

function mytheme_mejs_add_container_class() {
    if ( ! wp_script_is( 'mediaelement', 'done' ) ) {
        return;
    }
    ?>
    <script>
        (function() {
            var settings = window._wpmejsSettings || {};
            settings.features = settings.features || mejs.MepDefaults.features;
            settings.features.push( 'exampleclass' );
            MediaElementPlayer.prototype.buildexampleclass = function( player ) {
                player.container.addClass( 'mytheme-mejs-container' );
            };
        })();
    </script>
    <?php
}
PEACE~
参考:
https://www.cssigniter.com/css-style-guide-for-the-default-WordPress-media-player/
https://codex.WordPress.org/Playlist_Shortcode