作者:matrix
发布时间:2023 年 4 月 28 日
分类:Python
安装构建工具
首先确保安装了setuptools 和wheel。如果没有就运行以下命令安装:
$ pip3 install setuptools wheel twine
配置项目
目录结构可参考:
https://github.com/Hootrix/text-box-wrapper
项目中包含以下文件:
setup.py:包含项目的元数据和依赖关系。
README.md:项目的描述文件。
LICENSE:选择一个许可证并将其放在此文件中。
wrapper.py:自己定义的文件,包含功能代码
__init__.py 包定义,以及可引入的方法
配置setup.py
setup.py可配置作者、readme、仓库等信息
import os
from setuptools import setup, find_packages

with open(os.path.join(os.path.dirname(__file__), "README.md"), encoding="utf-8") as f:
    long_description = f.read()

setup(
    name="text-box-wrapper",
    version="0.1.5",
    description="A simple package to wrap text with ASCII art",
    author="Ho",
    author_email="wdzxnwo2r@mozmail.com",
    packages=find_packages(),
    install_requires=[
        "wcwidth"
    ],
    classifiers=[
        "Development Status :: 3 - Alpha",
        "Intended Audience :: Developers",
        "License :: OSI Approved :: MIT License",
        "Programming Language :: Python :: 3",
        "Programming Language :: Python :: 3.6",
        "Programming Language :: Python :: 3.7",
        "Programming Language :: Python :: 3.8",
        "Programming Language :: Python :: 3.9",
    ],

    long_description=long_description,
    long_description_content_type="text/markdown",
    url="https://github.com/Hootrix/text-box-wrapper",

)
构建
$ python3 setup.py sdist bdist_wheel
说明:
将在dist的新文件夹中生成源代码和二进制分发文件
上传到Pypi
确保已经注册了PyPI账户
$ twine upload dist/*
正常操作输入pypi账户和密码即可完成推送
如果账户设置了两步验证可能需要使用api token
保存你的api token到~/.pypirc文件中,如果没有就自己新建
[pypi]
  username = __token__
  password = pypi-A1************bQ
执行推送后类似下面内容,就是完成了
$ twine upload dist/*

Uploading distributions to https://upload.pypi.org/legacy/
Uploading text_box_wrapper-0.1.0-py3-none-any.whl
100% ━━━━━━━━━━━━━━━━━━━━━━━━━━━━━━━━━━━━━━━━ 8.4/8.4 kB • 00:01 • 777.3 kB/s
Uploading text-box-wrapper-0.1.0.tar.gz
100% ━━━━━━━━━━━━━━━━━━━━━━━━━━━━━━━━━━━━━━━━ 8.3/8.3 kB • 00:00 • 799.3 kB/s

View at:
https://pypi.org/project/text-box-wrapper/0.1.0/
正常安装
$ pip3 install text-box-wrapper
作者:matrix
发布时间:2022 年 7 月 31 日
分类:Python
Django可以一句话生成后端数据表CURD控制器以及对应界面。默认只包含用户授权AUTHENTICATION AND AUTHORIZATION模块

想根据此默认界面做简单修改,但是又不想完全自定义。仅基于此页面最小化开发添加自定义模块和url
最终效果图
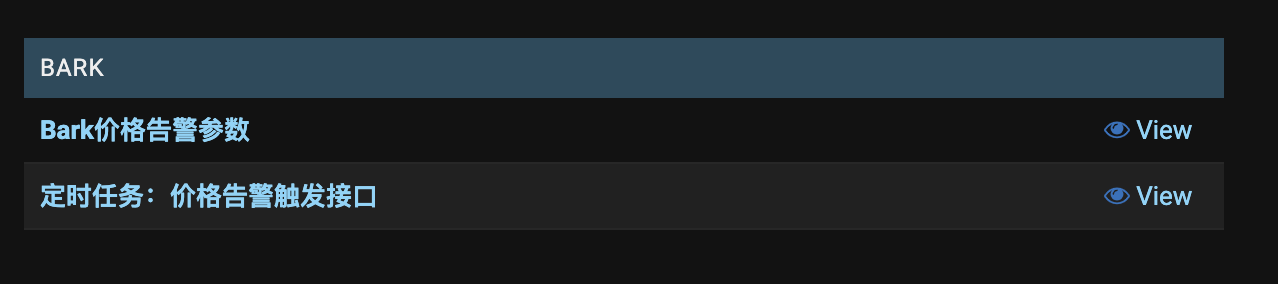
新增模块bark,且不添加数据表。新模块下添加自定义名称url
新增文件
bark/apps.py
此文件留空
bark/models.py
from django.db import models

class price_tips_index(models.Model):
    pass
    class Meta:
        verbose_name_plural = 'bark价格告警参数' # 定义管理端页面读取的模型名称

class cron_notice_price_warning(models.Model):
    pass
    class Meta:
        verbose_name_plural = '定时任务:价格告警触发接口'
price_tips_index、cron_notice_price_warning类无实际数据表
Meta子类用于设置模型数据信息
verbose_name_plural属性新模块中直接显示,url为此类名
bark/admin.py
from django.contrib import admin
from django.contrib.auth.models import Group
from .models import price_tips_index,cron_notice_price_warning

class UndefinedBlank(admin.ModelAdmin):
    def has_add_permission(self, request, obj=None):
        return False
    def has_change_permission(self, request, obj=None):
        return False

admin.site.register(price_tips_index,UndefinedBlank)
admin.site.register(cron_notice_price_warning,UndefinedBlank)

admin.site.site_header = "Dashboard" # 替换控制面板顶部title
has_add_permission、has_change_permission方法重写右侧的Add、Change按钮显示
admin.site.register 执行模块项目注册
配置INSTALLED_APPS
INSTALLED_APPS = [
    ...
    'bark',
]
根据新增模块的bark目录,配置初始化路径
配置路由url
from django.urls import path,re_path
from .bark import bark_params

urlpatterns = [
    ...
    re_path(r'^admin/price_tips_param/?', bark_params.price_tips_param),# 价格报警设置
    re_path(r'^admin/bark/price_tips_index/?', bark_params.price_tips_index),
    ...
]
说明:
引入的bark_params为自定义的控制器文件
price_tips_param,price_tips_index分别为入口函数。若需要登录校验可以使用@login_required装饰器
设置路由,拦截请求到指定控制器入口。
否则会经过数据表models查询,报错 表不存在django (1146, 'Unknown error 1146')
参考:
https://docs.Djangoproject.com/zh-hans/3.2/ref/contrib/admin/
https://docs.djangoproject.com/zh-hans/3.2/ref/models/options/
https://docs.djangoproject.com/zh-hans/3.2/topics/auth/default/#the-login-required-decorator
https://www.learnfk.com/question/django/2156114.html
作者:matrix
发布时间:2022 年 1 月 7 日
分类:Python
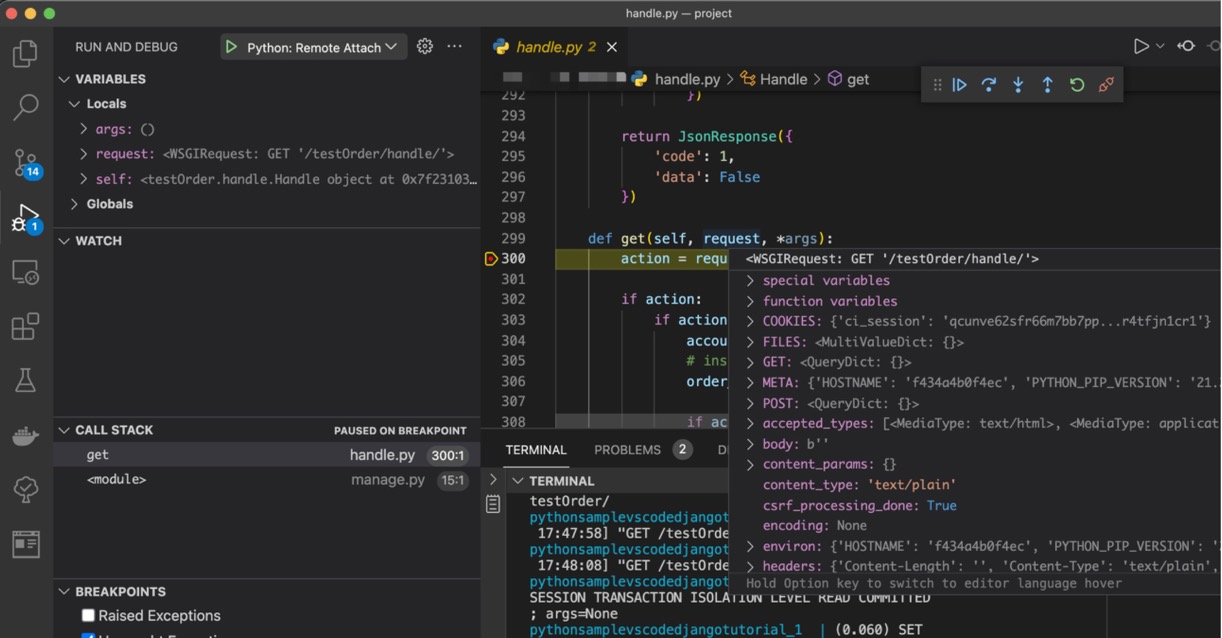
之前是本地Python环境安装Django项目直接运行和断点,现在尝试切换到vscode~
vscode插件
https://marketplace.visualstudio.com/items?itemName=ms-vscode-remote.remote-containers
https://marketplace.visualstudio.com/items?itemName=ms-Python.python
Dockerfile配置
用于创建docker镜像
项目根目录中创建Dockerfile文件
# syntax=docker/dockerfile:1
FROM python:3.10

#设置容器中环境变量
ENV RUN_ENV='develop'
WORKDIR /data

COPY requirements.txt .
RUN pip install -i https://pypi.douban.com/simple/ -r requirements.txt

# 方式2.安装依赖
# RUN pip install -i https://pypi.douban.com/simple/ django pytz pymysql mysqlclient requests numpy python-dateutil matplotlib pandas_datareader scipy sklearn
根目录中需要有requirements.txt
docker-compose配置
用于开启容器,挂载开发目录以及端口
项目根目录中创建docker-compose.debug.yml文件
version: '3.4'

services:
  pythonsamplevscodedjangotutorial:
    image: django-dev:1.1
    build:
      context: .
      dockerfile: ./Dockerfile
    volumes:
      - ./:/data
    # command: ["sh", "-c", "pip install -i https://pypi.douban.com/simple/ debugpy -t /tmp && python /tmp/debugpy --wait-for-client --listen 0.0.0.0:5678  /data/manage.py runserver 0.0.0.0:8000 --nothreading --noreload"]
    command: ["sh", "-c", "python /tmp/debugpy --listen 0.0.0.0:5678  /data/manage.py runserver 0.0.0.0:8000 --nothreading --noreload "]
    ports:
      - 8000:8000
      - 5678:5678
说明:
volumes表示 映射本地路径./-->容器路径/data
5678为断点监听端口
8000为项目访问端口
配置debug
配置vscode DEBUG
项目根目录中编辑或创建.vscode/launch.json
{
  "configurations": [
    {
       "name": "Python: Remote Attach",
       "type": "python",
       "request": "attach",
       "port": 5678,
       "host": "localhost",
       "pathMappings": [
           {
               "localRoot": "${workspaceFolder}",
               "remoteRoot": "/data"
           }
       ]
   }
  ]
}
启动容器
$ docker-compose -f ./docker-compose.debug.yml up
添加断点后,浏览器访问127.0.0.1:8000即可调试
参考:
https://code.visualstudio.com/docs/containers/docker-compose#_python
https://docs.docker.com/compose/compose-file/compose-file-v3/#build
https://www.youtube.com/watch?v=x7lZAmMVo2M
作者:matrix
发布时间:2021 年 11 月 30 日
分类:Python
用的pipenv但是lock时间有点太长了,所以到poetry试试水...
poetry安装
curl -sSL https://raw.githubusercontent.com/python-poetry/poetry/master/get-poetry.py | python -
项目设置poetry虚拟环境
poetry init
按照选项默认就好
给虚拟环境安装依赖
poetry add requests=3.6
poetry add requests@last
安装之后系统会自动生成pyproject.toml,poetry.lock文件
删除依赖
poetry remove requests
显示依赖信息
poetry show

poetry show --tree
使用三方源
pyproject.toml 末尾:
[[tool.poetry.source]]
name = "tsinghua"
url = "https://pypi.tuna.tsinghua.edu.cn/simple/"
用熟悉了基本命令也就清楚,不用翻文档。但是vscode上兼容性不好,还要自己配置解析器😭
参考:
https://Python-poetry.org/docs/basic-usage/
https://greyli.com/poetry-a-better-choice-than-pipenv/
作者:matrix
发布时间:2020 年 8 月 31 日
分类:Python 零零星星
第一次drop超过GB的数据表,没想到竟然会执行的这么慢。尝试过TRUNCATE和DROP都不满意。
后来就直接找到数据库储存的文件来删除,这样比起使用sql语句操作会快得多,但也是危险操作,无法找回。
删除操作脚本
运行环境 python3.7,依赖pymysql,根据自身情况配置变量mysql_data_dir,db_config,table_names,condition_save
fast_drop_table.py
#codeing=utf-8
"""
快速清空超大数据表 保留想要数据
"""
import pymysql
import os

mysql_data_dir = '/mnt/mysql_data/db_name/' #数据库文件所在路径

# 数据库连接配置
db_config = {'host': '127.0.0.1', 'port': 3306, 'user': 'user', 'password': 'password', 'db': 'db_name', 'charset': 'utf8'}

# 需要清空操作的数据表
table_names = [
"com_hhtjim_badata_trades_eos_this_quarter",
"com_hhtjim_badata_trades_eth_this_quarter",
  ]

# 数据表保留的查询条件
condition_save = "timestamp  >  '2020-02-20T00:00:00Z'"
# condition_save = False# 不保留


class Db:
    '''
    简单数据库连接操作类
    '''
    def __init__(self,**kwargs):
        self.connection = pymysql.connect(**kwargs)
        self.cursor = self.connection.cursor()


if __name__ == "__main__":
  mysql = Db(**db_config)
  for table_name in table_names:
    os.link('{}{}.frm'.format(mysql_data_dir,table_name), '{}{}.frm.h'.format(mysql_data_dir,table_name))
    os.link('{}{}.ibd'.format(mysql_data_dir,table_name), '{}{}.ibd.h'.format(mysql_data_dir,table_name))


    mysql.cursor.execute('CREATE TABLE {0}_back like {0}'.format(table_name))
    mysql.connection.commit()


    if condition_save:
      mysql.cursor.execute("INSERT INTO {0}_back SELECT * FROM {0}  WHERE {1} ;".format(table_name,condition_save))
      mysql.connection.commit()


    mysql.cursor.execute("drop table {}".format(table_name))
    mysql.connection.commit()

    mysql.cursor.execute("alter table  {0}_back rename to  {0};".format(table_name))
    mysql.connection.commit()


    os.unlink('{}{}.frm.h'.format(mysql_data_dir,table_name))
    os.unlink('{}{}.ibd.h'.format(mysql_data_dir,table_name))

    print('succeed: {}'.format(table_name))
具体步骤
### 找到frm,ibd文件

根据数据库存储路径找到需要删除的表名的frm,ibd文件。

### 建立硬连接
$ ln mytable.ibd  mytable.ibd.h
$ ln mytable.frm  mytable.frm.h


### 备份表结构
CREATE TABLE mytable_back like mytable;

### 备份想要保留的数据
INSERT INTO mytable_back SELECT * FROM mytable  WHERE timestamp  >  '2020-02-27T00:00:00Z' ;

### 删除旧表
drop table mytable;

### 修改备份表名字
alter table  mytable_back rename to  mytable;


### 删除硬连接
$ rm -f  mytable.frm.h  mytable.ibd.h
参考:
https://blog.csdn.net/weixin_34034261/article/details/86250223
作者:matrix
发布时间:2020 年 2 月 25 日
分类:Python
Python中单个地址进行请求我都是使用header的cookie中添加会话信息,简单干脆。但是多个域名跳转请求的时候就出现了问题,多域名的话需要按照域名host作为key来缓存,这岂不是很麻烦?
requests.Session()也很少使用,这次正好试试。requests.Session()可以作为全局变量来保存请求的cookies会话信息。这样在脚本的单次执行中可以很好的关联请求会话信息,避免要求多次登录的情况出现。
环境:Python 3.7
Session 单次会话
这里所谓单次会话其实就是单次运行脚本的一种效果
如果想要下次重新运行脚本依旧使用之前的cookies就必须要持久化处理。
import requests

session = requests.Session()
response1 = session.post('https://passport.baidu.com/v2/?login&tag=hhtjim.com')
response2 = session.get('http://www.baidu.com/?tag=pang)
response1请求会返回Set-Cookie的响应头,Session会记录Set-Cookie的值然后在response2中携带Cookie的请求头。这些都是会话处理的效果,也就是requests自动完成。这样如果response1登录成功,则后续请求就可以直接进行,避免手动携带Cookie
Session本地持久化
现在需求是本地保存cookies信息,避免重新执行脚本的时候还要求登录。
本来没找到现成的方法只能自己序列化存储cookies数据,然后载入的时候反序列化就好了。但是后面看到http.cookiejar.MozillaCookieJa这些函数可以处理目前的问题。
import requests,os
http.cookiejar import MozillaCookieJar


session = requests.Session() #作为全局变量使用

#载入cookies
path = 'cookies.txt' #设置cookies文件保存路径
s = MozillaCookieJar(path)
os.path.isfile(path) and s.load(path, ignore_discard=True, ignore_expires=True)#存在文件则载入
session.cookies = s #使用MozillaCookieJar进行会话管理

response1 = session.post('https://passport.baidu.com/v2/?login&tag=hhtjim.com')

#触发保存会话到本地文件
session.cookies.save(ignore_discard=True, ignore_expires=True)

response2 = session.get('http://www.baidu.com/?tag=pang)
上面操作就可以实现本地持久化存储,如果过期则会自动使用过期的Session请求续签。相对于单次会话其实就多了load和save操作,知道这基本原理也能够自己实现。
⚠️注意:
ignore_discard=True参数确保有开启,否则使用save方法不会保存到本地,load()处也是一致,避免无法读取。
如果想要清空会话使用clear()方法即可,再save()方法执行文件保存。
Note that the save() method won’t save session cookies anyway, unless you ask otherwise by passing a true ignore_discard argument.
参考:
https://stackoverflow.com/questions/13030095/how-to-save-requests-python-cookies-to-a-file
https://zhuanlan.zhihu.com/p/42950252
作者:matrix
发布时间:2019 年 11 月 26 日
分类:Python
asyncio异步操作需要关键字async,await。
async用来声明方法函数,await用来声明耗时操作。
但是await关键字后面要求为awaitable对象 且只能在async方法内部使用,不能在外部入口中使用。asyncio的语法其实是系统内部实现了yield from协程。
aiohttp用来代替requests的请求库,且支持异步操作。
主要优点体现在并发请求多个耗时任务时,自动安排耗时时的操作,避免cpu等待一个一个请求。
单个请求操作
import aiohttp
import asyncio

#get 请求
async def get():
  async with aiohttp.request('GET','https://api.github.com/users/Ho',params={'arg1':123}) as response:
    # response.request_info # 请求信息
    return await response.json()

rel = asyncio.run(get())

# 或者使用下面方式 手动关闭异步事件循环
# loop = asyncio.get_event_loop()
# rel = loop.run_until_complete(get())
# loop.close()

print(rel)
多个并发请求操作
主要区别在于异步任务的添加操作,运行。
请求测试url:
http://link/await/1 # delay 1sec
http://link/await/2 # delay 2sec
...
请求测试:
import aiohttp
import asyncio

#get 请求
async def get():
  async with aiohttp.request('GET','http://link/await/1') as response:
    return await response.text()

# 所有请求任务
async def all_req():
#async with asyncio.Semaphore(5): 设置并发的连接数
# https://docs.python.org/zh-cn/3/library/asyncio-sync.html#asyncio.Semaphore

  task = []
  #添加请求任务
  for i in range(5):
    task.append(asyncio.create_task(get()))
  #create_task 方法等同于  ensure_future()方法
  #手册建议首选 create_task方法
  # https://docs.python.org/zh-cn/3/library/asyncio-future.html?highlight=ensure_future#asyncio.ensure_future

  return await  asyncio.gather(*task)#传入参数 tuple类型 作为位置参数
  # 等同于 asyncio.gather(get(),get())
  # gather()方法用于收集所有任务完成的返回值,如果换成wait()方法会返回任务tuple对象,(done,pending)

rel = asyncio.run(all_req())
print(rel)

# 总共5个请求任务返回:
# 总耗时1秒多,相比同步的5秒+好N多。
"""
['sleep 1 second is done', 'sleep 1 second is done', 'sleep 1 second is done', 'sleep 1 second is done', 'sleep 1 second is done']

[Done] exited with code=0 in 1.955 seconds
"""
tell why??
测试发现Semaphore方法设置的请求并发数量跟本不起作用,nginx的access.log以及Proxifier看到的一次性请求量都不是代码中设置的数量。
使用uvloop优化异步操作
uvloop用于提升协程的速度。
uvloop使用很简单,直接设置异步策略就好了。
import asyncio
import uvloop

#声明使用 uvloop 事件循环
asyncio.set_event_loop_policy(uvloop.EventLoopPolicy())
测试遇到很多报错,基本上都是await和async使用的问题。
异步请求的分块chunk并发控制
自行chunk操作
自己按照所有任务的list列表进行chunk切割,然后分块进行请求,每块中固定chunk数量的任务。基本可以实现想要的并发限制操作
async def _bulk_task(num,current_page = 1):
  """批量创建异步任务
  """
  task = []
  for i in range(num):# 每次10个连接并发进行请求
    task.append(asyncio.create_task(get(current_page)))
    current_page += 1
  return await asyncio.gather(*task)

# 主要进行chunk操作的函数
def run_task(total,chunk,offset_start_page = 1):
    """运行分块处理的批量任务

    Arguments:
        total int 总请求数
        chunk int 每次并发请求数
        offset_start_page int 初始分块开始的页数(偏移页数),正常默认为1

    Yields:
        返回收集的异步任务运行结果
    """

    length = math.ceil(total/chunk)
    for i in range(length):
        start_page = i * chunk + offset_start_page # 当前分块开始的页数
        haldle_num = chunk# 当前需要并发处理的数量

        #处理结尾的块
        if i == length - 1:
            # print(':::',chunk,start_page + chunk - offset_start_page)
            haldle_num = min(chunk,total + offset_start_page - start_page)

        # print('当前分块下标:{},当前分块需要处理的总数:{},当前分块开始页数:{}'.format(i,haldle_num,start_page))
        rel = asyncio.run(_bulk_task(haldle_num,start_page))
        yield rel


rel  = run_task(123,10)# 123总任务 每10条并发请求
for i in rel:
  print(i)
独立封装
封装为async_curl类,以后可以直接import使用
https://raw.githubusercontent.com/Hootrix/com.gllue.portal/master/async_curl.py
参考:
https://www.cnblogs.com/Summer-skr--blog/p/11486634.html
https://hubertroy.gitbooks.io/aiohttp-chinese-documentation/content/aiohttp%E6%96%87%E6%A1%A3/ClientUsage.html#%E6%84%89%E5%BF%AB%E5%9C%B0%E7%BB%93%E6%9D%9F
https://docs.Python.org/zh-cn/3/library/asyncio-eventloop.html#asyncio.get_running_loop
https://segmentfault.com/q/1010000008663962
http://www.ruanyifeng.com/blog/2019/11/python-asyncio.html
https://blog.csdn.net/qq_37144341/article/details/89471603
https://www.jianshu.com/p/8f65e50f39b4
作者:matrix
发布时间:2019 年 10 月 14 日
分类:Python
搜索结果一大堆但都没有找到支持url和local path两种读取方式的操作。
留着便于以后直接使用。
gits: https://gist.github.com/Hootrix/cf3e75b1fa6d3d404bc99787f89687f1
import requests,tempfile, zipfile,os
def read_file_for_zip(zip_url, callback=None):
    """
    读取zip包内的文件
    :param zip_url:zip路径/url
    :param callback:读取操作的回调函数 若函数返回false 则不会读取下一个文件
    :return:
    """
    with tempfile.TemporaryFile('w+b') as tmpfile:  # 生成临时文件

        # 判断是否为本地文件
        if os.path.isfile(zip_url):
            #进行本地复制。没必要
            # with open(zip_url,'rb') as f:
            #     while True:
            #         chunk = f.read(1024)
            #         if not chunk:
            #             break
            #         tmpfile.write(chunk)
            tmpfile = zip_url
        else:#进行http请求
            r = requests.get(zip_url, stream=True)
            for chunk in r.iter_content(chunk_size=1024):
                if chunk:
                    tmpfile.write(chunk)
        assert zipfile.is_zipfile(tmpfile), '不是zip文件'
        zf = zipfile.ZipFile(tmpfile)
        for name in zf.namelist():  # list e.g. ['Brave Browser.url', 'Express VPN.url', 'ssl.txt', 'What is my IP.url']
            if callable(callback):
                # zf.read(name) #读取
                if callback(name, zf) is False:# 函数返回false 会终止下一个文件的读取
                    break


### 例子

def cb(filename,context):
    if filename.endswith('.txt'):
        print(context.read(filename).decode('utf-8'))
    # print( context.read(filename))
        return False #终止下一个文件的读取

read_file_for_zip('https://cdn-01.openload.cc/S9Y7m488n8/22c3c58b-1571037628/ssl_proxies.zip',cb)
具体使用见上面例子
兼容大文件url的下载处理
p.s.
在线压缩包读取:
https://extract.me/cn/
参考:
http://www.liujiangblog.com/course/Python/62
https://docs.Python.org/2/library/tempfile.html
- 1
- 2


