作者:matrix
发布时间:2013 年 8 月 9 日
分类:Wordpress 兼容并蓄
以前在“ 更换主题-七彩之家BLUE2.0以及后续的修改 ”中的functions.php添加了很多内容,稍微有点差池就导致WordPress无法打开。

幸好WordPress很人性化的支持无限扩展-include all php script功能,可以实现更自由的添加自定义功能,避免了直接修改模板函数functions.php导致的各类风险~ 阅读剩余部分 »
作者:matrix
发布时间:2013 年 8 月 7 日
分类:Wordpress 兼容并蓄
中国电信短地址服务平台:189.io

api接口:http://d.hhtjim.com/ioapi.php?url=http://www.baidu.com
这里再留个官方的api接口:http://api.189.cn/EMP/shorturl/long2short?access_token=8723a2ce797824056e66cc3091a354711375933538509&app_id=120032470000032374&longurl=https://www.hhtjim.com
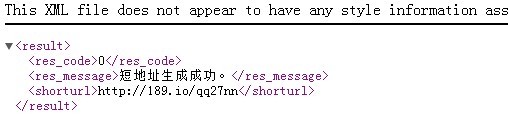
参数longurl=就是你需要转换的地址。
申请到了这个api肯定不能浪费,这就琢磨着与WordPress的整合。
由于本人对于php还是小白 ,所以找了很多的函数和方法, 这里留个很有用的做个记录(这代码给LZ折腾惨了 😡 ):
1.函数模板functions.php中添加:
<?php
function ecurl($getur){
$xml = new DOMDocument();
$xml->load('http://api.189.cn/EMP/shorturl/long2short?access_token=13f1efe925d93f1bd1f2f9e2f30883e9&app_id=699556960000031989&longurl='.$getur);
foreach($xml->getElementsByTagName('shorturl') as $shorturl)
$value = $shorturl->firstChild->nodeValue;
echo $value;
}
?>
说明:ecurl()为增加的自定义函数,用来读取api返回的xml值,也就是那短地址。
参考:http://www.jb51.net/article/25853.htm
ecurl($getur)中的参数为变量$getur,是用来读取WordPress的当前页面或者文章的url(下面有介绍)
2.文章页面模板single.php相关位置处中添加自定义函数ecurl()的调用。我这里是显示本文的固定连接 so 在content结束前位置处添加:
本文连接:
<a href="<?php  ecurl(wp_get_shortlink( $post->ID ) ); ?> "><?php  ecurl(wp_get_shortlink( $post->ID ) ); ?>
注意:ecurl()的参数不能用WordPress的the_permalink()函数,若使用the_permalink()会直接显示文章的原地址,而且ecurl()也无法调用the_permalink()函数作为参数。大致原因网上说是只能读取 没搞懂~
后来无意中找到wordpress短接接函数的调用<?php wp_get_shortlink( $post->ID ); ?> 神奇的解决了问题! 
短地址还可以延伸到QR码的显示:
<div id="currentPageCode" style="cursor: pointer; position: fixed; bottom: 30px; left: 10px;"><img style="border: 2px;" width="100" height="100" src="http://api.qrserver.com/v1/create-qr-code/?size=100x100&data=<?php ecurl(wp_get_shortlink( $post->ID ) ); ?>" alt="QR: <?php the_title(); ?>" title="扫描二维码即可访问本页"/></div>
参考:http://www.wjzhb.com/?p=388
中国电信189.io短地址转换API详情:http://open.189.cn/index.php?m=api&c=index&a=show&id=400#6
作者:matrix
发布时间:2013 年 8 月 1 日
分类:Wordpress 兼容并蓄 零零星星
偶尔在文章里面也要添加添代码,用插件的话就有点鸡肋。所以弄个完美解决此问题的办法。
这需要你的主题支持此功能,若没有也很好添加。
1.在主题的style.css中添加highlight.css的代码内容,或者自己加载highlight.css也行。
2.之后转换代码就能在blog中显示了。
在线转换地址:在线代码高亮转换
支持java/xml/sql/jscript/css/cpp/c#/python/vb/perl/php/ruby/delphi的代码显示
当然,输入代码转换的时候要先选择语言。复制html代码框的内容到博客非可视化中即可。
工具来自:CodeRenderUnmi
参考:http://zmingcx.com/WordPress-code-highlight.html
作者:matrix
发布时间:2013 年 7 月 31 日
分类:Wordpress 兼容并蓄 零零星星
PhilNa2之自说ME话扩展版 v1.5.1 留个图。 强大的小墙、强大的功能、更是辛苦了的自说Me话
图片有点不科学,打开的时候要注意啦 同学~

无意中发现个好看的cms主题BLUE2.0之后就果断跟换,然后就一连串的修改调整。。。真是闲着蛋疼~

然后就开始记录修改主题的细节部分,方便以后的查找~
1.后台添加html按钮
toggle伸缩、mp3短代码、分隔符、文章分页样式
functions.php中上部添加 代码:
// 自定义HTML编辑器按钮

add_action('admin_print_scripts', 'my_quicktags');

function my_quicktags() {

    wp_enqueue_script(

        'my_quicktags',

        get_stylesheet_directory_uri().'/my-quicktags.js',

        array('quicktags')

    );

}
主题目录内添加my-quicktags.js文件:
QTags.addButton( '<', '<', '<', '' ); //快捷输入<的html代码
QTags.addButton( '>', '>', '>', '' );
QTags.addButton( 'hr', '分隔线', "\n<hr />\n", '' );  //快捷输入一个hr横线,点一下即可
QTags.addButton( 'nextpage', '文章分页', "\n<!--nextpage-->\n", '' ); //添加文章分页按钮
QTags.addButton( 'h1', 'h1', "\n<h1>", "</h1>\n" );  //快捷输入h1标签
QTags.addButton( 'h2', 'h2', "\n<h2>", "</h2>\n" );
QTags.addButton( 'h3', 'h3', "\n<h3>", "</h3>\n" );
QTags.addButton( 'mp3', 'mp3 auto1自动播放', '\n[mp(占位符)3 auto=1]', '[/mp3]\n' ); //mp3按钮
QTags.addButton( 'toggle', 'toggle伸缩', '\n[t(占位符)oggle]', '[/toggle]\n' ); //toggle伸缩按钮

//QTags.addButton( 'my_id', 'my button', '\n</span>', '</span>\n' );
//这儿共有四对引号,分别是按钮的ID、显示名、点一下输入内容、再点一下关闭内容(此为空则一次输入全部内容),\n表示换行。
2.functions.php中添加访问计数代码
//访问计数
function record_visitors()
{
    if (is_singular()) {
        global $post;
        $post_ID = $post->ID;
        if ($post_ID) {
            $post_views = (int)get_post_MEta($post_ID, 'views', true);
            if (!update_post_MEta($post_ID, 'views', ($post_views + 1))) {
                add_post_meta($post_ID, 'views', 1, true);
            }
        }
    }
}

add_action('wp_head', 'record_visitors');
function post_views($before = '(点击 ', $after = ' 次)', $echo = 1)
{
    global $post;
    $post_ID = $post->ID;
    $views = (int)get_post_meta($post_ID, 'views', true);
    if ($echo) echo $before, number_format($views), $after;
    else return $views;
}
single.php、blog.php中添加被围观次数显示:
被围观: <?php post_views(' ', ' 次'); ?>
3.添加toggle伸缩功能
functions.php中添加toggle伸缩函数:
/*
* 文章内容部分文字toggle伸缩,源代码取自林木木博客
*自己稍加修改,添加后台编辑器按钮,方便朋友们添加
*/

function single_toggle($atts, $content=null){

    extract(shortcode_atts(array("title"=>' 点击此处展开↑ '),$atts));

    return '<p class="tg_t">'.$title.' ↓ </p><p class="tg_c" style="display:none;">'.$content.'</p>';

}

add_shortcode('toggle','single_toggle');
参考:自说ME话 & http://immmmm.com/WordPress-shortcodes-toggle.html
\js\jquery.js中添加控制语句:
/*************************** Toggle伸缩 就少了”jQuery(document).ready(function(){“这句ready的话 TMD 给老子弄惨了 ***************************/

jQuery(document).ready(function(){

jQuery(".tg_t").click(function(){$(this).next('.tg_c').slideToggle(400)});

});
之前就少了ready的语句,害得我弄了大半天都没效果~ 不懂代码真是恼火啊
4.添加播放mp3的功能
从自说Me话扩展版 v1.5.1拷贝\swf\player.swf
functions.php中添加mp3短代码:
/*
* mp3短代码
*/
function mp3player($atts, $content=null,$auto = false){
    extract(shortcode_atts(array("auto"=>'0'),$atts));
    $autostart=$auto?'yes':'no';
    return '<embed src="'.get_bloginfo('template_directory').'/swf/player.swf?soundFile='.$content.'&autostart='.$autostart.'&animation=yes&encode=no&initialvolume=80&remaining=yes&noinfo=no&buffer=5&checkpolicy=no&rtl=no&bg=E5E5E5&text=333333&leftbg=CCCCCC&lefticon=333333&volslider=666666&voltrack=FFFFFF&rightbg=B4B4B4&rightbghover=999999&righticon=333333&righticonhover=FFFFFF&track=FFFFFF&loader=009900&border=CCCCCC&tracker=DDDDDD&skip=666666" type="application/x-shockwave-flash" wmode="transparent" allowscriptaccess="always" width="290" height="30">';
}
add_shortcode('mp3','mp3player');
参考:http://isayme.com/2011/05/shortcode-enable-mp3player.html
作者:matrix
发布时间:2013 年 6 月 22 日
分类:Wordpress 兼容并蓄
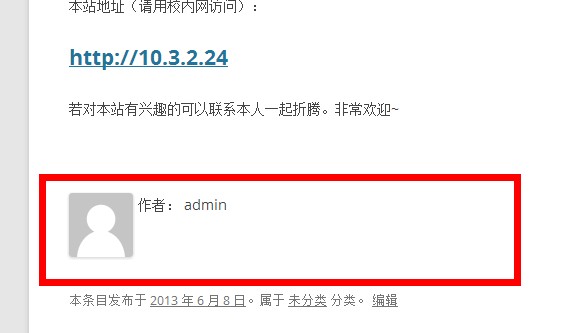
WordPress显示作者信息适用于多作者的博客。在文章末尾显示作者信息 效果不错。
只需要在函数模版functions.php里添加下面代码:
add_filter('the_content','webzty_author_meta');
 function webzty_author_meta($content){
 if(is_singular()){
 $id=get_the_author_meta('ID');
 $avatar='<div style="float:left;margin-right:5px;">'.get_avatar($id,64).'</div>';
 $author='<div style="float:left"><div>作者: '.get_the_author_meta('display_name').'</div>';
 $des='<div>'.get_the_author_meta('user_description').'</div></div><div style="clear:both"></div>';
 $content=$content.$avatar.$author.$des;
 }
 return $content;
 }
效果如图,会在文章末尾显示。带有头像,不错~
参考:http://www.ztyhome.com/wordpress-author-detail
作者:matrix
发布时间:2013 年 5 月 22 日
分类:Wordpress 兼容并蓄
WordPress 有五个预定义的角色: 管理员, 编辑, 作者, 投稿者 和 订阅者。各个角色的权限也都不同。

官方说明:
角色摘要
- Super Admin - Someone with access to the blog network administration features controlling the entire network (See Create a Network).
- Administrator - Somebody who has access to all the administration features
- Editor - Somebody who can publish and manage posts and pages as well as manage other users' posts, etc.
- Author - Somebody who can publish and manage their own posts
- Contributor - Somebody who can write and manage their posts but not publish them
- Subscriber - Somebody who can only manage their profile
订阅者:只有阅读权限,可以修改个人资料。
投稿者:具有订阅者的所有权限。可以发表文章,但需要经过管理员审核后才能在博客上显示出来;对待审中的文章可以编辑,但对已通过审核的文章不能编辑。 阅读剩余部分 »
作者:matrix
发布时间:2013 年 4 月 25 日
分类:Wordpress 兼容并蓄
上次更新主题是在 更新PhilNa2主题-自说Me话扩展版 v1.4 2月22日。
依然感谢自说ME分享的v1.5版本。
v1.5.1相对于v1.4 更新了读者墙,还原了导航栏样式...... 阅读剩余部分 »
作者:matrix
发布时间:2013 年 4 月 24 日
分类:Wordpress 兼容并蓄
在WordPress后台HTML编辑器中加入自定义按钮的方法之一。
不用折腾/wp-includes/js/quicktags.js文件。适用WordPress 3.5.1的版本。
步骤:
- 在主题目录内创建my-quicktags.js文件,写入:
QTags.addButton( '<', '<', '<', '' ); //快捷输入<的html代码
QTags.addButton( '>', '>', '>', '' );
QTags.addButton( 'hr', 'hr', "\n<hr />\n", '' ); //快捷输入一个hr横线,点一下即可
QTags.addButton( 'nextpage', 'nextpage', "\n<!--nextpage-->\n", '' ); //添加文章分页按钮
QTags.addButton( 'h1', 'h1', "\n<h1>", "</h1>\n" ); //快捷输入h1标签
QTags.addButton( 'h2', 'h2', "\n<h2>", "</h2>\n" );
QTags.addButton( 'h3', 'h3', "\n<h3>", "</h3>\n" );
//QTags.addButton( 'my_id', 'my button', '\n</span>', '</span>\n' );
//这儿共有四对引号,分别是按钮的ID、显示名、点一下输入内容、再点一下关闭内容(此为空则一次输入全部内容),\n表示换行
- 在主题目录内的functions.php中添加如下代码:
<?php
//自定义HTML编辑器按钮
add_action('admin_print_scripts', 'my_quicktags');
function my_quicktags() {
wp_enqueue_script(
'my_quicktags',
get_stylesheet_directory_uri().'/my-quicktags.js',
array('quicktags')
);
}
?>
效果图:

来自:Mr.ZIYI | 私人后花园
ps:有些主题functions.php中添加代码后会出现error,甚至后台都不能访问(把最近使用过的主题文件夹换为其他名字即可解决)
修改代码要慎重!
- 1
- 2
- 3
- 4
- 5
- 6
- 7
- 8
- 9


