作者:matrix
发布时间:2014 年 1 月 29 日
分类:Wordpress 零零星星
此功能可以由WP keyword Link Plugin插件实现的,不过要非插件化只有另找。
网上一大把代码我这都不能用。不知道为何。
像豆腐君扒的代码,真心没法用。幸好懂点正则。自己慢慢改。
改的时候发现网上的代码跟WP keyword Link Plugin插件的wp_keywordlink.php部分有9成相似。参照wp_keywordlink.php那该好多了。
代码:
/**
 * TAG Category自动添加链接 by 不懂. 20140129 修改
 */
add_filter('the_content', 'Category_tag_link', 1);
function tag_sort($a, $b)
{
    if ($a->name == $b->name) return 0;
    return (strlen($a->name) > strlen($b->name)) ? -1 : 1;
}
function Category_tag_link($content)
{
    /**
     * --------------------------------------配置处--------------------------------------------
     */
    $match_num_from = 1; //配置:一个关键字少于多少不替换
    $match_num_to = 2; //配置:一个关键字最多替换,建议不大于2
    $case = true ? "i" : ""; //配置:忽略大小写 true是开,false是关
    $get_the_category=is_array(get_the_category())?get_the_category():array();
    $get_the_tags=is_array(get_the_tags())?get_the_tags():array();
    $posttags = array_merge($get_the_tags, $get_the_category); //合并TAG & CAT数组 (array)强制转换数组,防止报错
    if ($posttags)
    {
        usort($posttags, "tag_sort"); //重新排序 回调函数tag_sort
        foreach($posttags as $tag)
        {
            $link = $tag->category_count ? esc_url(get_category_link($tag->term_id)) : esc_url(get_tag_link($tag->term_id)); //TAG & CAT 合并URL
            $keyword = $tag->name; //TAG name
            $cleankeyword = stripslashes($keyword);
            $url = "<a href=\"$link\" title=\"" . str_replace('%s', addcslashes($cleankeyword, '$'), __('View all posts in %s')) . "\""; //查看 %s 中的全部文章。__()函数WordPress本地化翻译。
            $url .= 'target="_blank"';
            $url .= ">" . addcslashes($cleankeyword, '$') . "</a>";
            $limit = rand($match_num_from, $match_num_to);
            $ex_word = preg_quote($cleankeyword, '\'');
            $content = preg_replace("'(<a[^>]+>)(.*)($ex_word)(.*)(</a[^>]*>)'U" . $case, '$1$2*&%*$4$5', $content); //a标签,免混淆处理
            $content = preg_replace('|(<img)(.*?)(' . $ex_word . ')(.*?)(>)|U' . $case, '$1$2*&%*$4$5', $content); //img标签
            $cleankeyword = preg_quote($cleankeyword, '\'');
            $regEx = '"(?!((<.*?)|(<a.*?)))(' . $cleankeyword . ')(?!(([^<>]*?)>)|([^>]*?</a>))"s' . $case; //正则匹配
            $content = preg_replace($regEx, $url, $content, $limit);
            $content = str_replace('*&%*', stripslashes($ex_word), $content); //免混淆还原处理
        }
    }
    return $content;
}
说明:代码放到WordPress主题functions.php文件的?>前面。
配置信息在15-17行处。
此版本增加Category(文章分类)链接,忽略大小写功能。比网上传的好点。哈哈。ok 丢掉WP keyword Link Plugin
示例见本站任意文章页面。或者这里:免插件
不方便copy的php下载地址:
http://www.400gb.com/file/55854122
折腾完觉得正则真TM牛逼。好菜鸟啊
记:
遇到Warning : preg_replace() [function.preg-replace ]: Unknown modifier 'a'这类问题。实质是正则的边界符没弄好的缘故。
一般的边界符号是用 | 或者 /,是在开头和结尾出现的。然而正则表达式里也出现了边界符,系统会把它当做边界,这样边界后面出现的以a开头的不明字符串就会成为正则修正符,自然是不会别识别的。也就导致报错。
错误例:
$content = preg_replace("/(<a[^>]+>)(.)($ex_word)(.)(</a[^>]>)/U" . $case, '$1$2&%*$4$5', $content);
改成:/(<a[^>]+>)(.)($ex_word)(.)(<\/a[^>]*>)/U
|(<a[^>]+>)(.)($ex_word)(.)(</a[^>]*>)|U
'(<a[^>]+>)(.)($ex_word)(.)(</a[^>]*>)'U
都ok啦。边界符也不是固定的,'、"照样可以用。
Warning: array_merge() [function.array-merge]: Argument #1报错, array_merge()的参数不是数组就会导致此类ERROR。
可在参数前面加(array)来强制转换为数组,建议在 array_merge() 前判断是否为数组,否则以空数组输出到array_merge()中解决。
正则入门级教程:http://www.oschina.net/question/12_9507 很实用的~
正则表达式 问号 冒号 ?:使用 http://blog.csdn.net/hoping23/article/details/8479700
php正则表达式中的修正符说明:http://blog.csdn.net/taipingliebeiluo/article/details/5872878
WordPress中的()和_e()函数的作用:http://demon.tw/software/WordPress--_e.html
零宽断言:http://jjdoor.blog.163.com/blog/static/184780342012318917389/
参考:http://bbs.csdn.net/topics/90492431
http://blog.csdn.net/sunking18/article/details/6415705
作者:matrix
发布时间:2014 年 1 月 26 日
分类:Wordpress
WordPress是可以像论坛那样设置回复可见。代码也不需要多少
仿DZ效果:

步骤:
1.functions.php的?>前面添加代码:
/*
* 隐藏部分内容 评论后可见
*/
function reply_to_read($atts, $content=null) {
        extract(shortcode_atts(array("notice" => '<p class="reply-to-read">提示: 此处内容需要<a href="#respond" title="评论本文">评论本文</a>后才能查看.</p>'), $atts));//notice默认值
        $email = null;
        $user_ID = (int) wp_get_current_user()->ID;
        if ($user_ID > 0) {
            $email = get_userdata($user_ID)->user_email;
            $admin_email = "XXXX@email.tk"; //博主Email
            if ($email == $admin_email) {//若是博主则直接显示内容
                return '<p class="reply-to-read" style="background:no-repeat">'.$content.'</p>';
            }
        } else if (isset($_COOKIE['comment_author_email_' . COOKIEHASH])) {
            $email = str_replace('%40', '@', $_COOKIE['comment_author_email_' . COOKIEHASH]);
        } else {
            return strpos($notice,'提示: 此处内容需要')  ? $notice : '<p class="reply-to-read" title="此处内容需要评论本文后才能查看.">提示: '.$notice.'</p>';//未检测到评论信息(昵称、网站等)。不是博主,且未评论
        }
        if (empty($email)) {
            return 'TEST CODE:111'.$notice;//无email
        }
        global $wpdb;
        $post_id = get_the_ID();
        $query = "SELECT `comment_ID` FROM {$wpdb->comments} WHERE `comment_post_ID`={$post_id} and `comment_approved`='1' and `comment_author_email`='{$email}' LIMIT 1";
        if ($wpdb->get_results($query)) {
            return '<p class="reply-to-read" style="background:no-repeat">'.do_shortcode($content).'</p>';//若已评论
        } else {
            return strpos($notice,'提示: 此处内容需要')  ? $notice : '<p class="reply-to-read" title="此处内容需要评论本文后才能查看.">提示: '.$notice.'</p>';//已评论其他,未评论此文章
        }
    }
    add_shortcode('reply', 'reply_to_read');
说明:使用前将第10行的email地址改为自己的
阅读剩余部分 »
作者:matrix
发布时间:2014 年 1 月 25 日
分类:Wordpress
WordPress后台的小工具可随意拖动,在前台实现相应的功能。自定义的话更加强大。
我这正好使用了非插件添加文章浏览次数统计的代码:
/* 访问计数 */
function record_visitors()
{
    if (is_singular())
    {
      global $post;
      $post_ID = $post->ID;
      if($post_ID)
      {
          $post_views = (int)get_post_meta($post_ID, 'views', true);
          if(!update_post_meta($post_ID, 'views', ($post_views+1)))
          {
            add_post_meta($post_ID, 'views', 1, true);
          }
      }
    }
}
add_action('wp_head', 'record_visitors');

/// 函数名称:post_views
/// 函数作用:取得文章的阅读次数
function post_views($before = '(点击 ', $after = ' 次)', $echo = 1)
{
  global $post;
  $post_ID = $post->ID;
  $views = (int)get_post_meta($post_ID, 'views', true);
  if ($echo) echo $before, number_format($views), $after;
  else return $views;
}
就利用上面的非插件统计功能在侧边栏添加个文章TOP列表,列出浏览次数最多的文章。
过程: 阅读剩余部分 »
作者:matrix
发布时间:2014 年 1 月 16 日
分类:Wordpress
用百度站长工具的时候看到评论列表的头像没有alt属性,很疑惑。找到wp_list_comments相关函数调用的文件地方,的确是默认没有开启。

方法一
若硬要有alt的话就得修改WordPress系统文件wp-include/comment-template.php。
notepad++打开,查找
<?php if ($args['avatar_size'] != 0) echo get_avatar( $comment, $args['avatar_size'] ); ?>
将其改为:
<?php if ($args['avatar_size'] != 0) echo get_avatar( $comment, $args['avatar_size'],"","$comment->comment_author" ); ?>
之后评论者头像就有作者名的alt属性。
方法二
建议使用此办法,functions.php中的?>之前添加代码
function mytheme_get_avatar_alt($avatar) {
global $comment;
$avatar = str_replace("alt=''",'alt="'.$comment->comment_author.'"',$avatar);//添加alt信息
    return $avatar;
}
add_filter( 'get_avatar', 'mytheme_get_avatar_alt', 10, 3 );
参考:
http://moper.me/WordPress-comment-avatar-add-alt.html
http://cnzhx.net/blog/WordPress-avatar-hook
作者:matrix
发布时间:2014 年 1 月 11 日
分类:Wordpress 零零星星
快速填写评论框信息
拖动上面到书签栏,点击comment测试,
javascript代码:
javascript:
var n='Pang';
e='adminI@Iyban.tk';
u='http://www.hhtjim.com';
wp_ar = a('author');
wp_em = a('email') || a('mail');
wp_url = a('url');
ds_ar = a('ds-dialog-name');
ds_em = a('ds-dialog-email');
ds_url = a('ds-dialog-url');
uyan_ar = a('uyan_uname') || a('uyan_l_uname');
uyan_em = a('uyan_email') || a('uyan_l_email');
uyan_url = a('uyan_l_ulink');
dlu_ar = a('idenglu_name');
dlu_em = a('idenglu_email');
dlu_url = a('idenglu_homepage');
em_ar = b('comname');
em_em = b('commail');
em_url = b('comurl');
if(wp_ar){wp_ar.value = n;
wp_em.value = e;
wp_url.value = u;
}if(ds_ar){ds_ar.value = n;
ds_em.value = e;
ds_url.value = u;
}if(uyan_ar){uyan_ar.value = n;
uyan_em.value = e;
uyan_url.value = u;
}if(dlu_ar){dlu_ar.value = n;
dlu_em.value = e;
dlu_url.value = u;
}if(em_ar){em_ar.value = n;
em_em .value = e;
em_url.value = u;
}
function a(i) {
var i = document.getElementById(i);
return i;
}function b(i) {
var i = document.all(i);
return i;
}
void(0);
说明:
第2、3和4行分别自己的昵称,邮箱,网址。
由于代码太长,所以方便到emblog、WordPress、typecho、多说、灯鹭、有言都可以一键填写信息。
不知道代码源自哪里了,到处都飞。只是我这更加强了些。
由于ID或name的不同或许不会达到满意的效果,仅供测试。 阅读剩余部分 »
作者:matrix
发布时间:2013 年 12 月 26 日
分类:Wordpress
rss输出错误一般都是由于主题导致的,自己DIY主题就很容易出现此类问题(修改freshwp主题时发现)
以前打开/feed地址经常看到 Below is a rendering of the page up to the ffirst error.都没管。
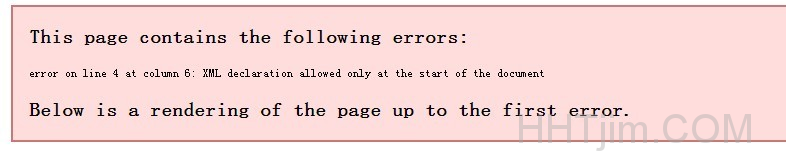
解决办法还是有的,不过造成此类的原因很多,仅仅是其中之一。
解决:删除空白行
使用Notepad++打开主题内的所有php文件,Ctrl+H替换(使用正则匹配)^\s*\n 为空。点击在所有打开文件中替换
之后也就把所有^\s*\n匹配到的空白行删除了。
说明:
正则表达式:^\s*\n表示匹配所有空白行,包括有空格的行。
参考:http://xiaoke.name/125.html
http://zhidao.baidu.com/question/270423631.html
作者:matrix
发布时间:2013 年 12 月 10 日
分类:Wordpress 兼容并蓄
邮件通知,每当有评论回复时系统会发送一封邮件告知被评论者。
WordPress上免插件实现的方法:http://www.cmhello.com/wordpress-comments-email-code.html
我选的第一种:所有回复都发送邮件通知。
$message='发送的邮件内容以及样式代码';
上面为邮件内容。
样式如上图,把发送的邮件内容以及样式代码改为下面代码:
<TABLE cellSpacing="0" cellPadding="0" width="618" align="center">
<TBODY>
<TR>
<TD style="FONT-FAMILY: Tahoma,Helvetica,Arial,sans-serif; ">
<TABLE style="FONT-SIZE: 12px; MARGIN: 0px auto; OVERFLOW: hidden; HEIGHT: auto" cellSpacing="0"
cellPadding="0">
<TBODY>
<TR>
<h1 id="logo">'.get_option('blogname').'</h1>
</TR>
<TR>
<TD style="OVERFLOW: hidden; BORDER-TOP-STYLE: none; PADDING-TOP: 0px; BORDER-RIGHT-STYLE: none; BORDER-LEFT-STYLE: none; HEIGHT: auto; BORDER-BOTTOM-STYLE: none">
<TABLE style="PADDING-RIGHT: 25px; MARGIN-TOP: 0px; PADDING-LEFT: 0px; PADDING-BOTTOM: 0px; MARGIN-LEFT: 27px; WIDTH: 588px; BORDER-TOP-STYLE: none; PADDING-TOP: 0px; BORDER-RIGHT-STYLE: none; BORDER-LEFT-STYLE: none; BORDER-BOTTOM-STYLE: none"
cellSpacing="0" cellPadding="0" border="0">
<TBODY>
<TR>
<TD style="BACKGROUND: url(http://a.xnimg.cn/imgpro/mail/edm-hot-bg-middleLeft.png); WIDTH: 17px"></TD>
<TD style="BACKGROUND: #fff">
<DIV><IMG
style="DISPLAY: block; BORDER-TOP-STYLE: none; BORDER-RIGHT-STYLE: none; BORDER-LEFT-STYLE: none; BORDER-BOTTOM-STYLE: none"
src="http://a.xnimg.cn/imgpro/mail/edm-hot-bg-middleTop.png"></DIV>
<TABLE style="MARGIN-TOP: 10px; MARGIN-LEFT: 13px; WIDTH: 500px" cellSpacing="0"
cellPadding="0" border="0">
<TBODY>
<TR>
<TD style="BACKGROUND: #fff" width="500"><H2
style="MARGIN-TOP: 10px; FONT-WEIGHT: bold; FONT-SIZE: 14px; MARGIN-LEFT: 0px">
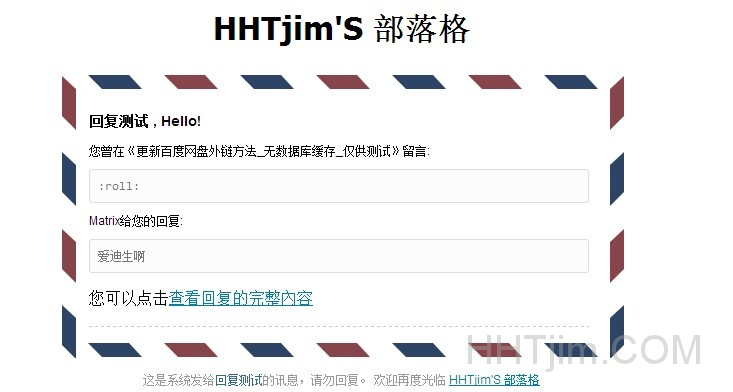
'.trim(get_comment($parent_id)->comment_author).' , Hello!</H2>
<P style="PADDING-RIGHT: 0px; PADDING-LEFT: 0px; FONT-SIZE: 12px; PADDING-BOTTOM: 0px; MARGIN-LEFT: 0px; LINE-HEIGHT: 12px; PADDING-TOP: 0px">
您曾在《'.get_the_title($comment->comment_post_ID).'》留言:</P>
<p style="color: #777;border: 1px solid #DDD;padding: 5px 8px 5px 8px;background-color: #FCFCFC;border-radius: 3px 3px 3px 3px;font-size: 12px;line-height: 22px;font-family: Consolas,Courier,minispace,Lucida Console;">
'.trim(get_comment($parent_id)->comment_content).'
</p>
<P style="PADDING-RIGHT: 0px; PADDING-LEFT: 0px; FONT-SIZE: 12px; PADDING-BOTTOM: 0px; MARGIN-LEFT: 0px; LINE-HEIGHT: 12px; PADDING-TOP: 0px">
'.trim($comment->comment_author).'给您的回复:
</P>
<p style="color: #777;border: 1px solid #DDD;padding: 5px 8px 5px 8px;background-color: #FCFCFC;border-radius: 3px 3px 3px 3px;font-size: 12px;line-height: 22px;font-family: Consolas,Courier,minispace,Lucida Console;">
'.trim($comment->comment_content).'
</p>
您可以点击<a href="'.htmlspecialchars(get_comment_link($parent_id)) .'"
target="_blank">查看回复的完整內容</a>
</TR>
<TR>
<TD style="PADDING-RIGHT: 0px; PADDING-LEFT: 0px; PADDING-BOTTOM: 15px; PADDING-TOP: 15px"
colSpan="2"><IMG
style="DISPLAY: block; BORDER-TOP-STYLE: none; BORDER-RIGHT-STYLE: none; BORDER-LEFT-STYLE: none; BORDER-BOTTOM-STYLE: none"
src="http://a.xnimg.cn/imgpro/mail/edm-hot-line.png"></TD>
</TR>
</TBODY>
</TABLE>
<DIV><IMG
style="DISPLAY: block; BORDER-TOP-STYLE: none; BORDER-RIGHT-STYLE: none; BORDER-LEFT-STYLE: none; BORDER-BOTTOM-STYLE: none"
src="http://a.xnimg.cn/imgpro/mail/edm-hot-bg-middleTop.png"></DIV>
</TD>
<TD style="BACKGROUND: url(http://a.xnimg.cn/imgpro/mail/edm-hot-bg-middleRight.png); WIDTH: 17px"></TD>
</TR>
</TBODY>
</TABLE>
</TD>
</TR>
<TR>
<TD style="PADDING-RIGHT: 0px; PADDING-LEFT: 0px; PADDING-BOTTOM: 15px; OVERFLOW: hidden; WIDTH: 100%; COLOR: #999; LINE-HEIGHT: 14px; PADDING-TOP: 15px; TEXT-ALIGN: center">
这是系统发给<A style="COLOR: #336699; TEXT-DECORATION: none">'.trim(get_comment($parent_id)->comment_author).'</A>的讯息,请勿回复。
欢迎再度光临 <a href="'.get_option('home') .'">'.get_option('blogname') .'</a>
</TD>
</TR>
</TBODY>
</TABLE>
</TD>
</TR>
</TBODY>
</TABLE>
<style type="text/css">
body {
font-size: 14px;
font-family: arial, verdana, sans-serif;
line-height: 1.666;
padding: 0;
margin: 0;
overflow: auto;
white-space: normal;
word-wrap: break-word;
min-height: 100px
}
td, input, button, select, body {
font-family: Helvetica, \'Microsoft Yahei\', verdana
}
pre {
white-space: pre-wrap;
white-space: -moz-pre-wrap;
white-space: -pre-wrap;
white-space: -o-pre-wrap;
word-wrap: break-word
}
th, td {
font-family: arial, verdana, sans-serif;
line-height: 1.666
}
img {
border: 0
}
header, footer, section, aside, article, nav, hgroup, figure, figcaption {
display: block
}
#logo {
text-align: center;
}
</style>
说明:
若出现问题,请尝试转换中文标点为英文的。
之前出现乱码,所以用的utf-8编码。
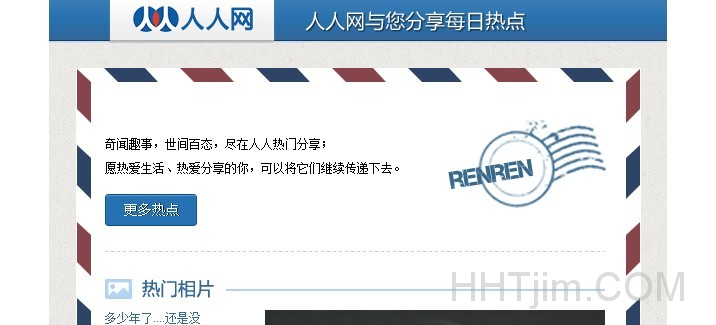
样式来自人人网邮件,
图片素材都打包了,方便以后的本地化:
下载:http://www.400gb.com/file/42884686
http://pan.baidu.com/s/1xjiZ7
参考:http://www.cxsir.com/wordpress-email-style.html
作者:matrix
发布时间:2013 年 12 月 6 日
分类:Wordpress 兼容并蓄
这个主题是之前提到过的NGRO主题,很好看~ freshwp
在NGRO.ORG上看到,绝对是最喜欢的主题,没有之一。可惜NGRO.ORG没有公开,再加上是typecho的更抽了~
不过就算是typecho的,我也愿意为了这主题换博客程序。据说typecho还是超轻型的,比起WordPress好得多。嗯 之后也就到处找此款主题的相关信息,结果是弄到了别人扒下来的皮。不错 很感谢sunhua.me。地址:诡异:TEer扒TE皮NGRO
这主题是由typecho默认主题改过来的,变化很大。想到typecho的轻巧,WordPress又舍不得某些功能 ,纠结。最后妥协于wp的某个JB功能,去找各类关于typecho主题移植到WordPress的方法,结果都是wp到tc的 ,真是恼火。庆幸我的运气不是一般的好,看到winysky.com的 wordpress版本的typecho皮肤 哈哈 有救了。那扒的皮就是源于那tc皮肤,打开一看的确一样的结构设计。这下简单多了,覆盖style,修改简单的css、php代码。一个具有基本功能的wp主题就出现了,哎 我真人才啊,这都鼓捣的出来。还TMD不是学计算机的 ➡ 搞的建筑工程。
这下就整理完善需要的功能到fresh就OK啦,直到这时间才发文。
freshwp:清新-wp
之前用的是自说me话的增强版philna主题(备份下载:http://www.400gb.com/file/40436320)。
后来换的BLUE2.0(七彩之家修改于inv的cms主题),这个相对于以前来还好些。(备份下载:http://www.400gb.com/file/40816608)
这回来就换了这个,小清新 大爱~ 😉
- 1
- 2
- 3
- 4
- 5
- 6
... - 9


