作者:matrix
发布时间:2019 年 9 月 18 日
分类:Linux
环境:
阿里云centos + dnspod.cn
acme.sh项目:https://github.com/Neilpang/acme.sh
安装
$ curl https://get.acme.sh | sh
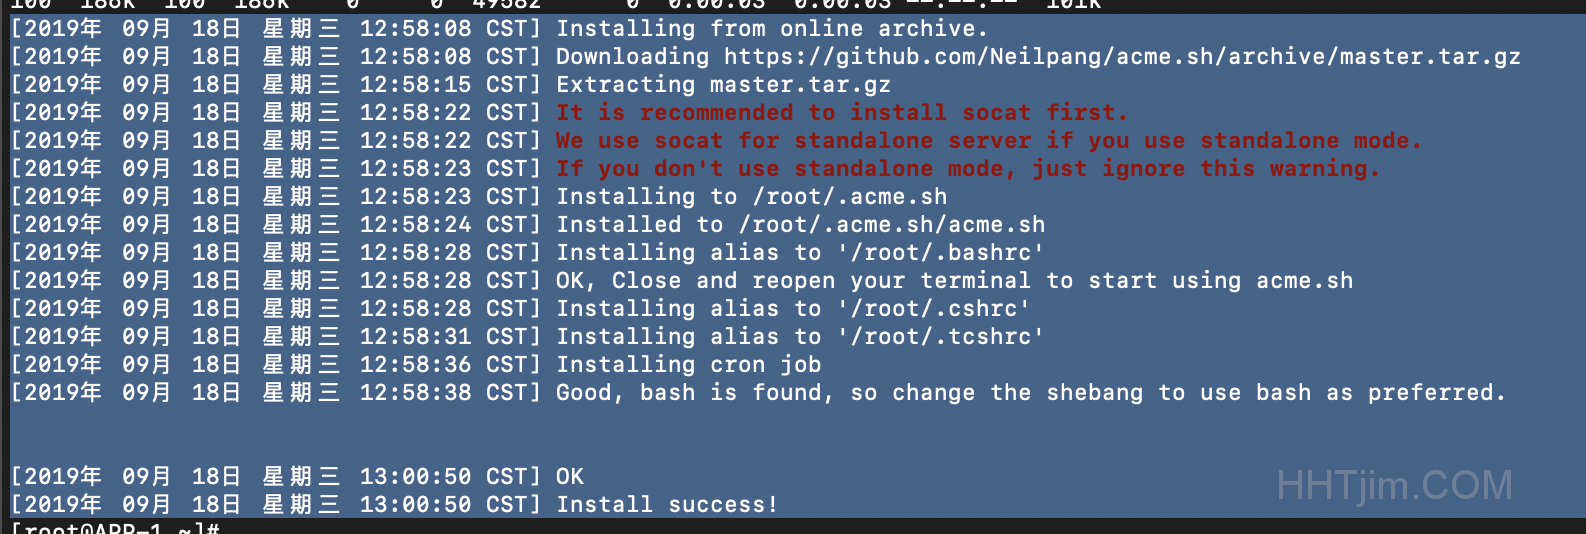
出现Install success!安装成功。
dns验证方式-获取域名dns token
这里使用域名解析服务商的token来进行域名拥有验证
在dnspod.cn上操作申请获取ID和token。
ssh执行命令设置变量,便于后面脚本读取。
$ export DP_Id="000000"
$ export DP_Key="26****************************ed"
阿里云dns:
$ export Ali_Id="000000"
$ export Ali_Key="26****************************ed"
阿里云dns获取api和key:https://usercenter.console.aliyun.com/#/manage/ak 进去申请AccessKey ID与Access Key Secret就好。
其他域名解析商的api token操作:
https://github.com/Neilpang/acme.sh/wiki/dnsapi
申请泛域名证书
为域名hhtjim.com申请证书。
$ source .bashrc #执行资源更新 确保acme.sh别名可用
$ acme.sh --issue --dns dns_dp -d hhtjim.com -d *.hhtjim.com
说明:
dns_dp 为dnspod ,如果是阿里云dns则为 dns_ali
前面-d参数指定根域名,后面-d指定子级泛域名
.hhtjim.com的证书只能支持通配符当前级别的域名,也就是xxx.hhtjim.com
如果要三级子域名就需要单独申请:.xxx.hhtjim.com,参数为-d xxx.hhtjim.com -d *.xxx.hhtjim.com
执行之后等待几分钟出现绿色文字提示key,cer证书所在位置就酸完成了。
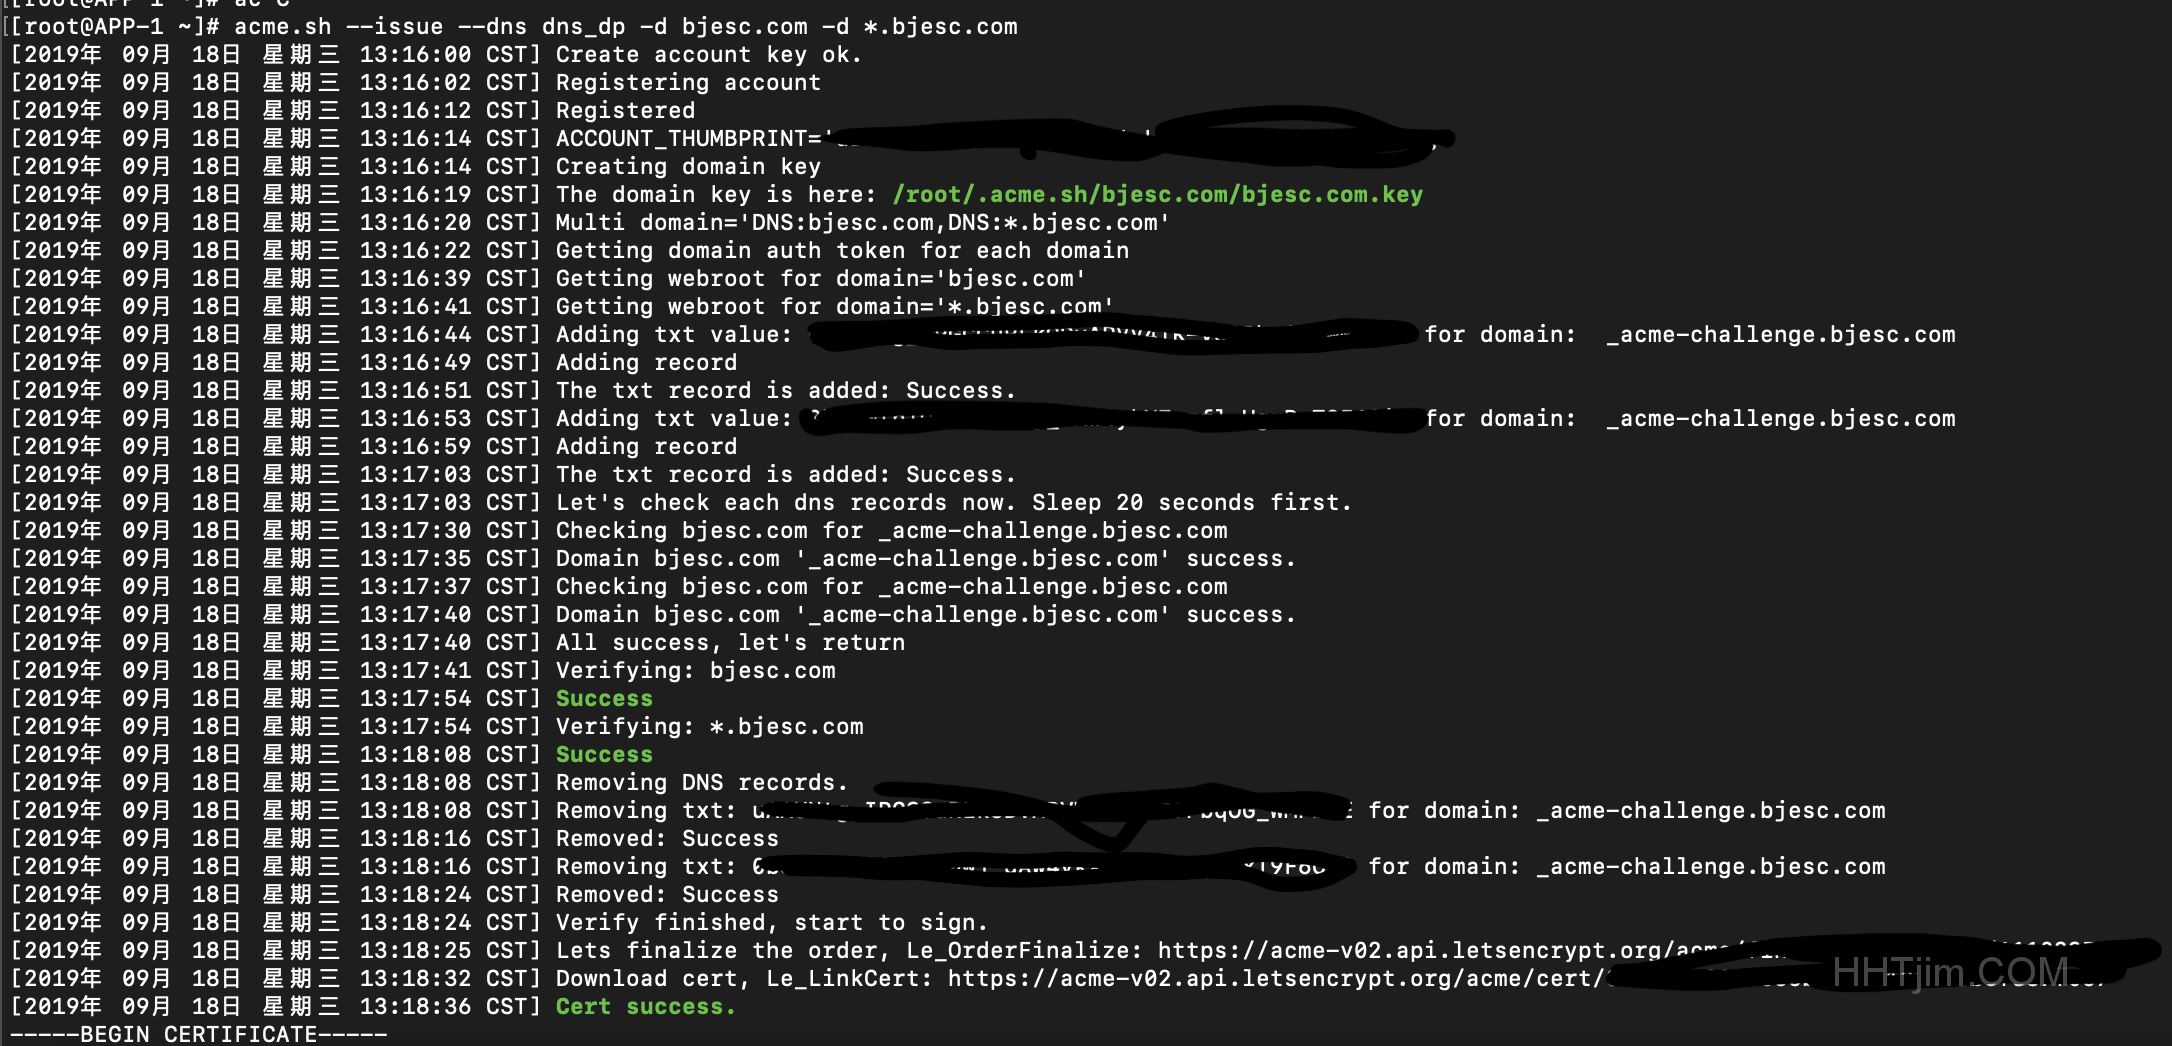
The domain key is here: /root/.acme.sh/hhtjim.com/hhtjim.com.key

Your cert is in  /root/.acme.sh/hhtjim.com/hhtjim.com.cer
Your cert key is in  /root/.acme.sh/hhtjim.com/hhtjim.com.key
The intermediate CA cert is in  /root/.acme.sh/hhtjim.com/ca.cer
And the full chain certs is there:  /root/.acme.sh/hhtjim.com/fullchain.cer
证书生成完成,使用的时候把证书移动到nginx配置相关目录。
nginx证书使用
server {
    listen 443;
    server_name www.hhtjim.com;
    root /htdocs/www.hhtjim.com;
    index index.html index.htm index.php;
    ssl on;

    ssl_certificate /certificate_file_PATH/hhtjim.com/fullchain.cer;
    ssl_certificate_key /certificate_file_PATH/hhtjim.com/hhtjim.com.key;
    ...
ssl_certificate和ssl_certificate_key对应fullchain.cer和域名.key文件即可。
以后的所有子域名都可以使用这个路径的证书。
证书更新
脚本会自行写入crontab
36 0 * * * "/root/.acme.sh"/acme.sh --cron --home "/root/.acme.sh" > /dev/null
每天定时检测过期再更新。
参考:
https://github.com/Neilpang/acme.sh/wiki/%E8%AF%B4%E6%98%8E
https://lnmp.org/faq/letsencrypt-wildcard-ssl.html
https://juejin.im/post/5b6542ed51882519d3468d6d
作者:matrix
发布时间:2019 年 7 月 26 日
分类:Linux
现在应要求需要再服务器端环境安装matlab以进行更好测试达到理想之效果。
测试环境:本地客户端macOS,服务器centOS 需要20GB空余
下载matlab
https://pan.baidu.com/s/1wijZCXIWsNXgz0yYYBXHnQ#提取e8b2
刚开始用mac三方百度客户端进行下载,没有校验文件md5和基本信息就直接对z01,z02进行解压拿到iso镜像文件挂载没问题。浪费时间一上午进行安装出现输入输出错误原因就是iso不完整。
文件哈希:
$ md5sum R2017b_glnxa64.iso
0bbe62e90ba9aaf357c72ef93e81753c  R2017b_glnxa64.iso
若是本地上传到服务器最好使用rsync附加参数-rP --append来进行断点续传,要不然中断之后重新上传简直。。。
开始安装
需要系统有20GB的剩余空间(包含iso文件,mnt挂载空间,程序安装空间)才可安装,我已经尝试过很多遍了😂😂😂
- 挂载镜像文件到
/mnt
$ mount -t iso9660 -o loop R2017b_glnxa64.iso文件路径 /mnt
如果挂载有问题可以考虑直接对iso进行解压缩:
$ sudo yum install p7zip p7zip-plugins
$ 7z x ubuntu-16.10-server-amd64.iso
- 执行安装
若之前安装中断或者失败需要清空之前的安装数据,否则会报错。
删除之前安装的文件:rm -rf /usr/local/MATLAB
还有安装matlab之前java环境不是必须安装,matlab包里面会自带jre。
$ cd /mnt
$ sudo ./install -fileInstallationKey 09806-07443-53955-64350-21751-41297 -agreeToLicense yes -mode silent -activationPropertiesFile  MATLABR2017b_Linux_Crack目录中的license_standalone.lic文件路径
说明:
license_standalone.lic文件路径需自行替换
09806-07443-53955-64350-21751-41297为install_key.txt中的授权码
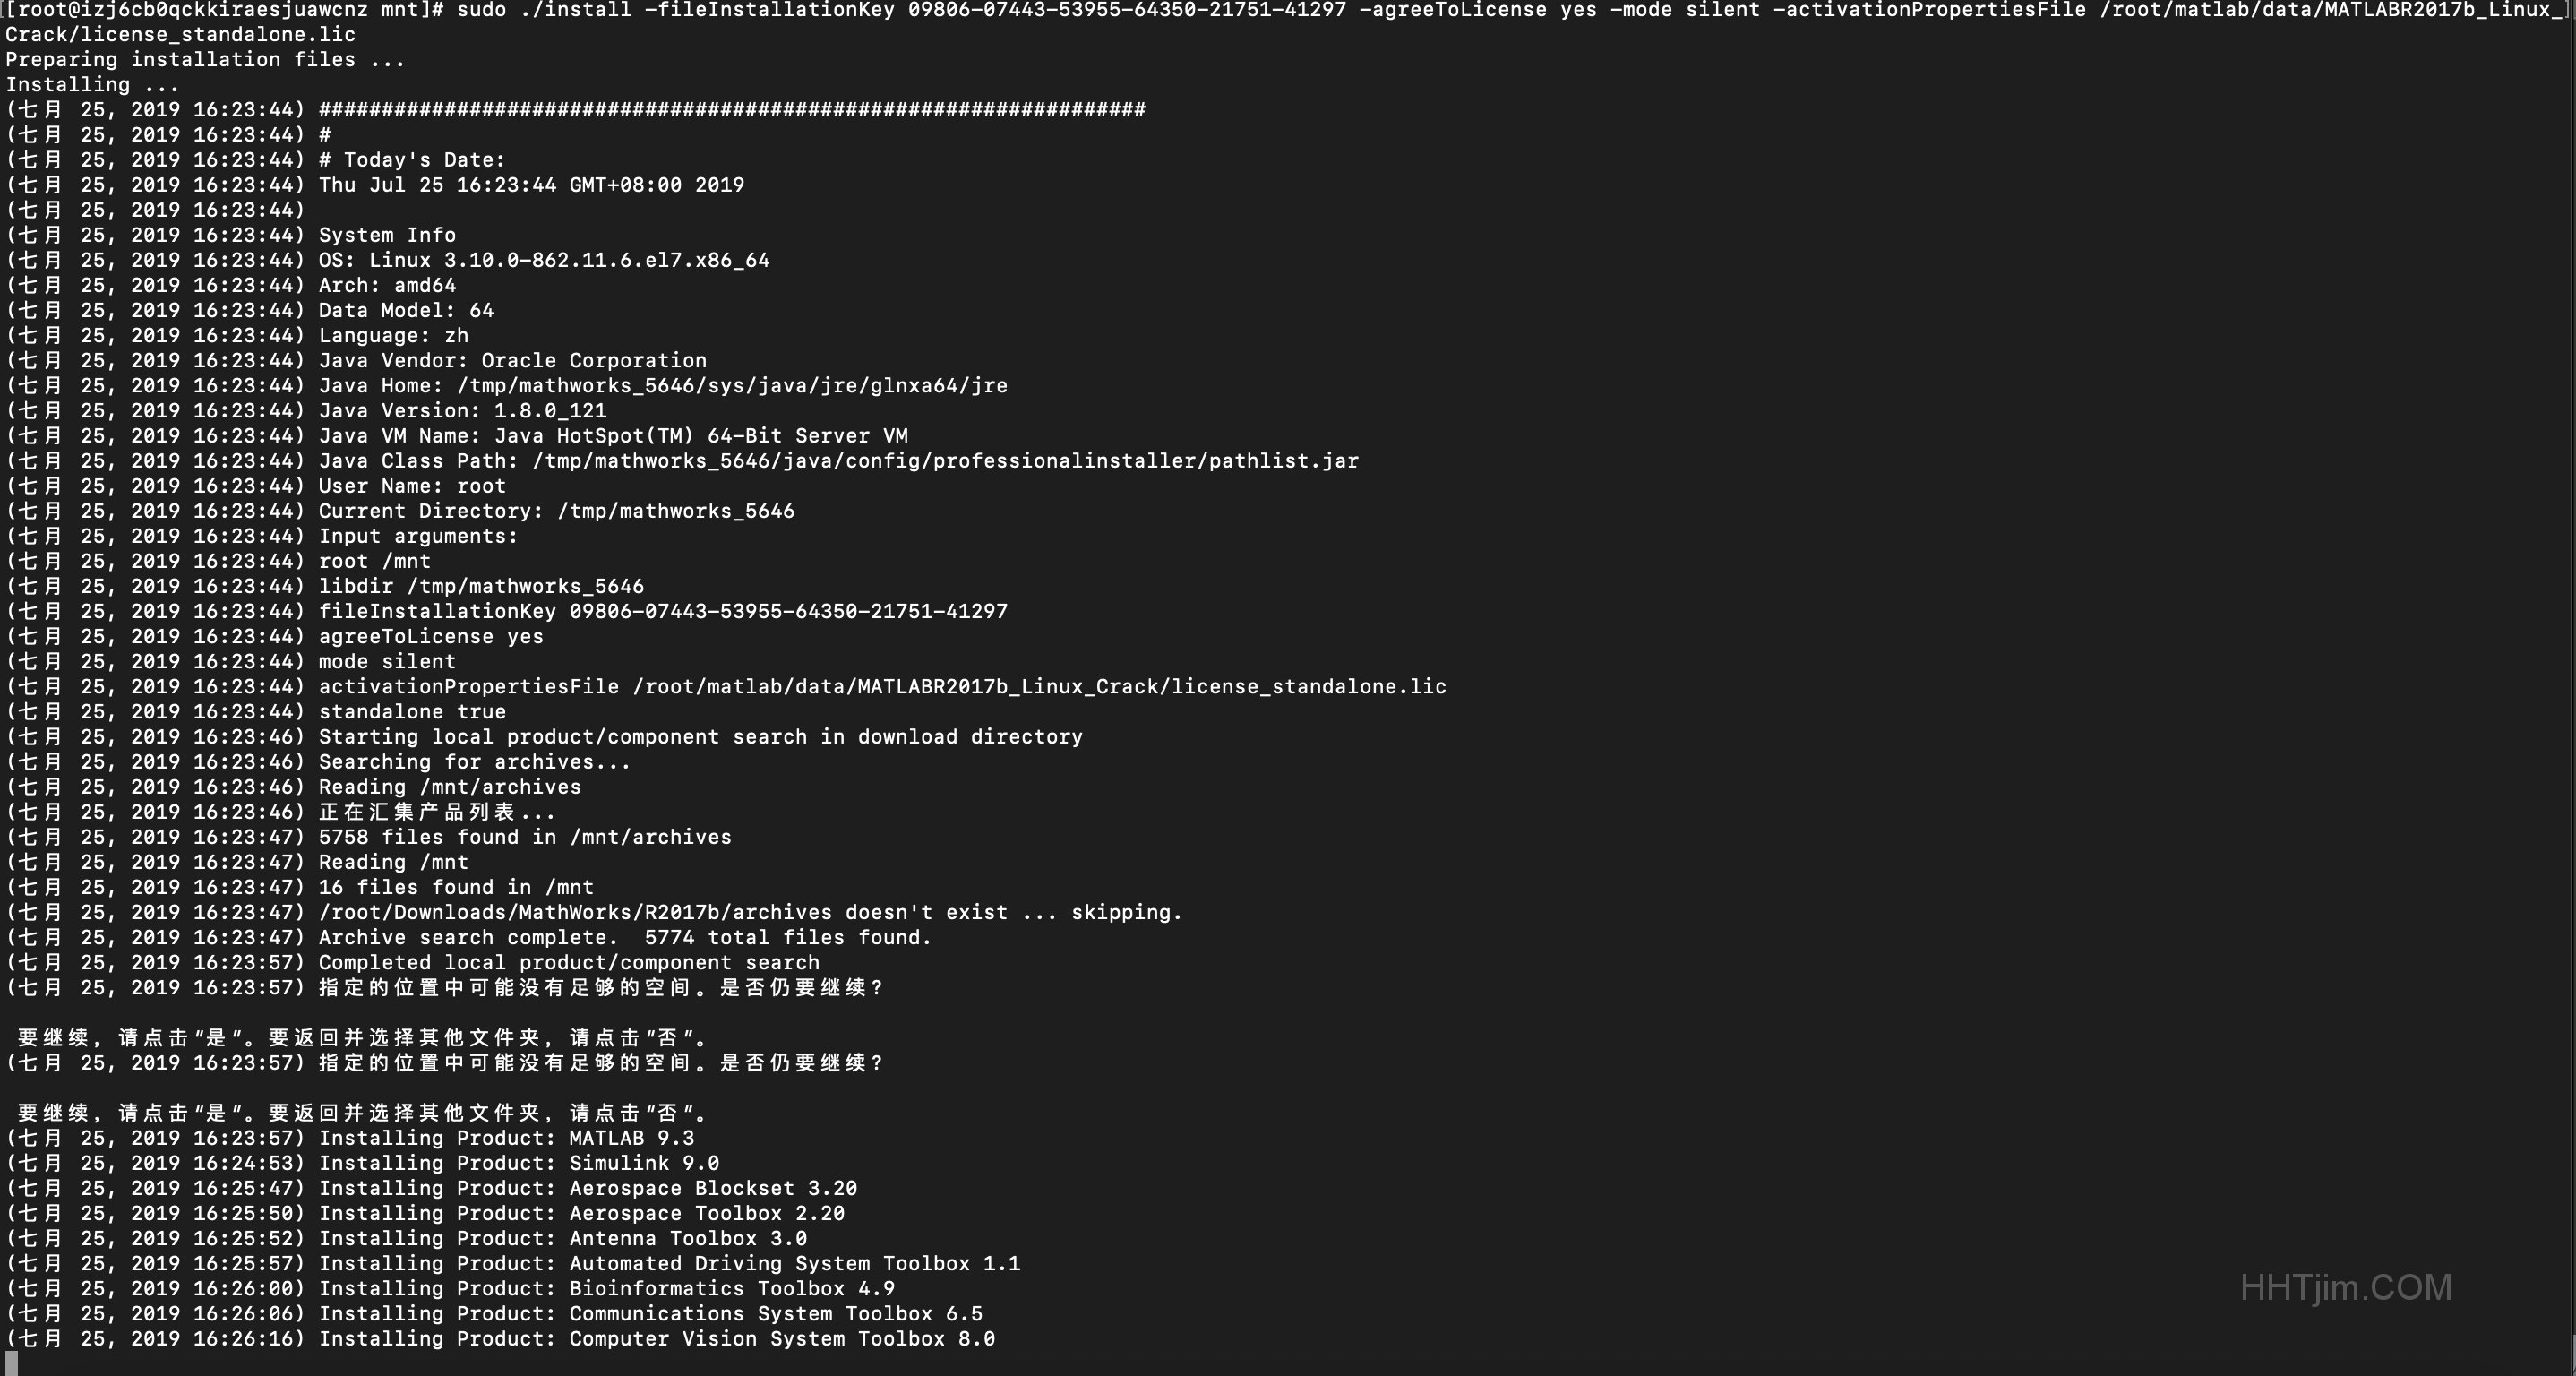
执行之后就等待安装,若显示要继续 请点击″是″。 要返回″否″。是否仍要继续?这些也不用管。
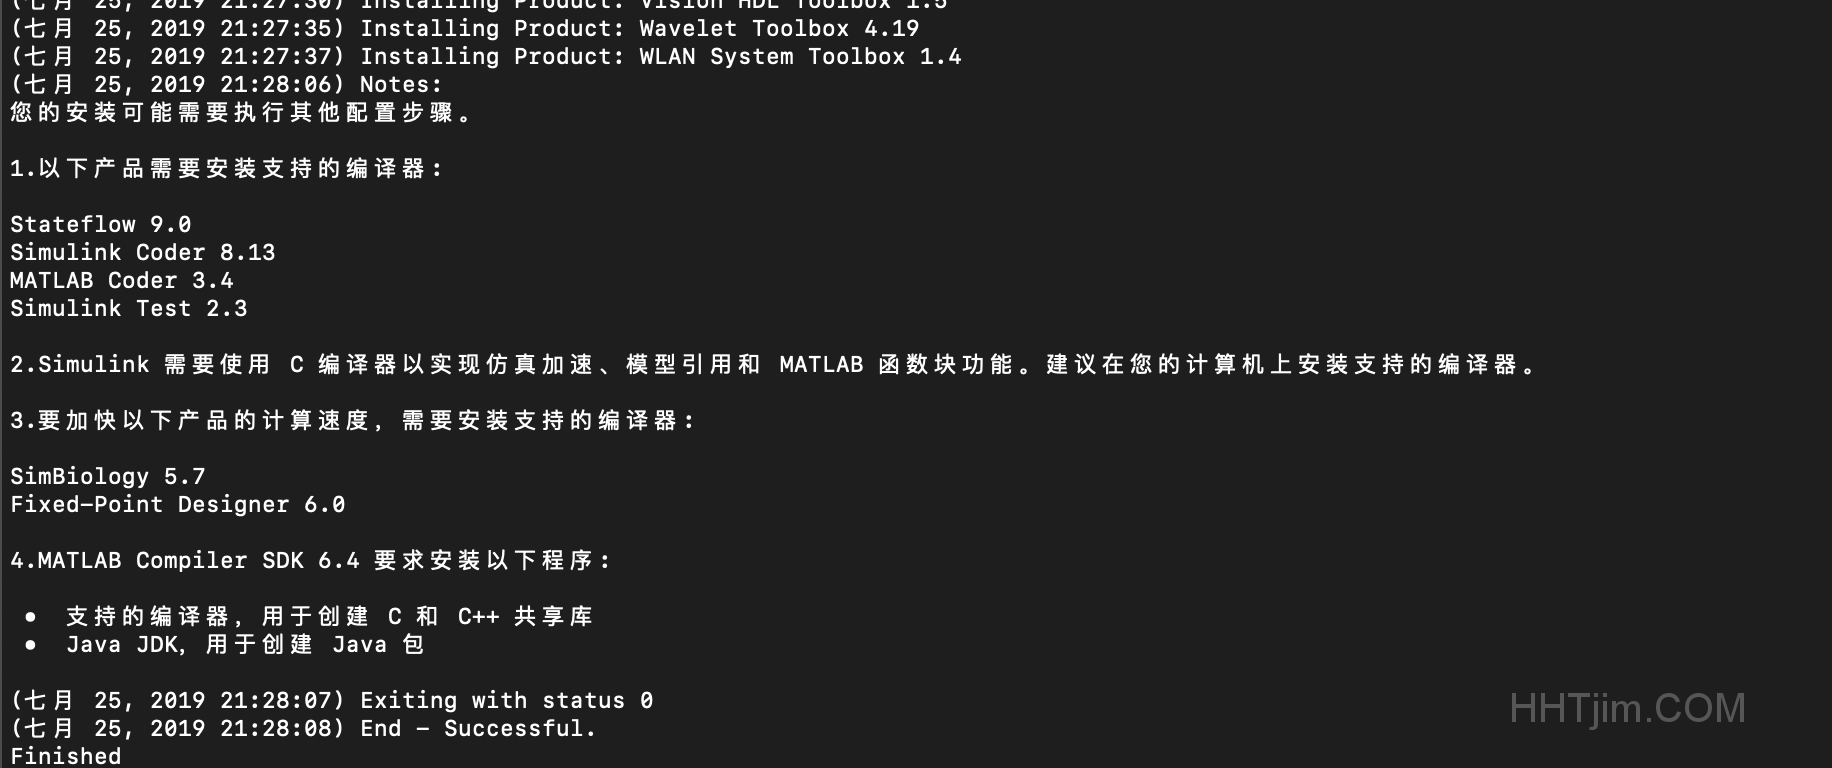
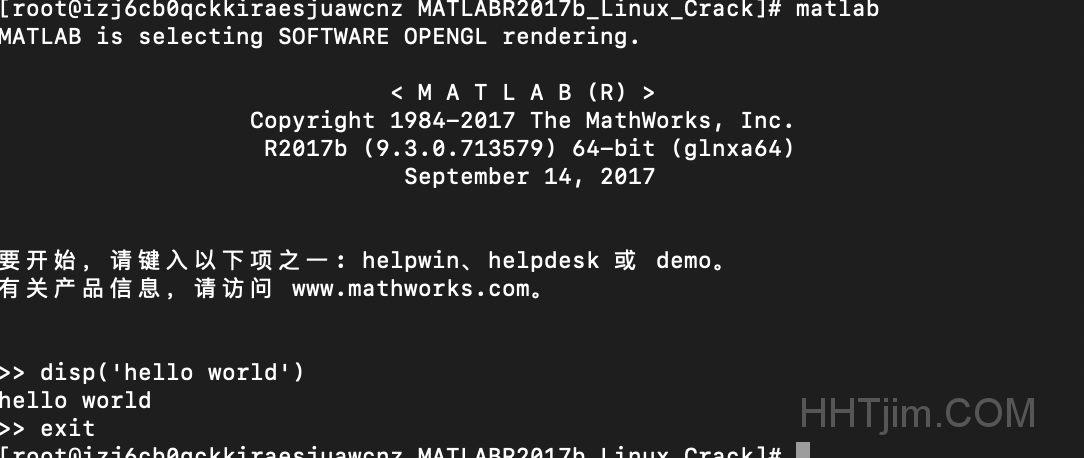
最终等待界面出现End - Successful.Finished即表示安装完成。
破解
安装完成之后执行程序/usr/local/MATLAB/R2017b/bin/matlab显示未激活状态
错误: 激活无法继续。您可能需要执行以下任一操作:
 1.设置 X11 显示,然后重新启动激活过程
 2.使用静默激活功能
 3.使用许可证中心激活
执行激活程序/usr/local/MATLAB/R2017b/bin/activate_matlab.sh -propertiesFile /usr/local/MATLAB/R2017b/activate.ini也没有用。
最后拷贝破解文件解决:
进入破解文件license_standalone.lic,libmwservices.so 所在目录
sudo cp license_standalone.lic /usr/local/MATLAB/R2017b/licenses/
sudo cp libmwservices.so /usr/local/MATLAB/R2017b/bin/glnxa64/
启动matlab
设置环境变量,避免每次执行/usr/local/MATLAB/R2017b/bin/matlab很麻烦
$ echo 'export PATH=/usr/local/MATLAB/R2017b/bin:$PATH' >> /etc/profile
$ source /etc/profile
以后输入matlab就可以启动
卸载之前的iso:umount /mnt
若无法卸载参考https://www.cnblogs.com/sisimi/p/7700309.html来强制推出操作。
后台执行.m脚本
安装服务器版本的最终目的其实就是让其后台运行,但是后面测试的时候发现了很多坑。
比如手动执行nohup matlab -nojvm -nodesktop -nodisplay -nosplash -r test.m > ./logfile &
这样会导致日志输出结果出现大量错误warning的提示,我是直接用supervisord来守护进程,避免手动执行nohup操作。
如果你用nohup matlab -nodesktop -nosplash -nodisplay < test.m >logfile这种<形式来调用脚本那就要小心了,因为会出现更多的错误,像Undefined variable com or class com.mathworks.timer.TimerTask都是小事情,然而我这里是提示语法逻辑错误,感觉是脚本文件加载的时候出现字符问题,原因有很多,我这里没有具体进一步测试。我建议还是不要用<这种形式来执行.m脚本。
参考:https://blog.csdn.net/sethinking/article/details/88375995
还有一个就是执行matlab脚本目录的问题,如果像这样直接-r 'run("/root/test.m");' 执行入口脚本test.m很有可能会找不到其中依赖该目录下的自定义函数。建议-r 'cd /root;test;'这种形式来调用。
最终这样调用:
$ matlab -nodesktop -nodisplay -nosplash -r 'cd /home/script/;main;' >> /root/matlab_log_`date +"%Y%m%d"`.log
说明:
/home/script/main.m为脚本入口
这里没有使用-nojvm参数,也没有进一步测试我的脚本依赖是否可以不启动。
>> /root/matlab_log_date +"%Y%m%d".log为输出日志,名称为日期年月日
报错整理
./install:行269: /bin/glnxa64/install_unix: 输入/输出错误
确保iso镜像文件的完整性,需要知道iso的文件如果缺失一部分也是可以挂载的。😂
建议在Windows端用winrar点击R2017b_glnxa64.zip执行解压拿到R2017b_glnxa64.iso
-
archive is not a ZIP archive那就是空间不足的问题。
-
若非首次安装出现问题确保把之前的安装的文件都清空了
删除之前安装的文件:rm -rf /usr/local/MATLAB
-
出现libXt.so。。。Creating local MVM错误
MATLAB is selecting SOFTWARE OPENGL rendering.
Unrecognized MATLAB option "version".
Fatal Internal Error: Unexpected exception: 'N5boost16exception_detail10clone_implINS0_39current_exception_std_exception_wrapperISt13runtime_errorEEEE: Bundle#2 start failed: libXt.so.6: 无法打开共享对象文件: 没有那个文件或目录' in createMVMAndCallParser phase 'Creating local MVM'
这个问题今天上午才搞定,期间安装了很多包都不起作用。MD!!!
最终执行安装yum install libXt.x86_64才解决。
中间我也查看过libXt.so.6这个鬼玩意的确是有的,后面看到因为matlab都需要32位和64位的包,所以这鬼玩意一直报错。
也有可能再期间安装的一部分包是依赖必须的:
$ yum list  installed |grep libX

libX11.i686                             1.6.5-2.el7                    @base
libX11.x86_64                           1.6.5-2.el7                    @base
libX11-common.noarch                    1.6.5-2.el7                    @base
libX11-devel.x86_64                     1.6.5-2.el7                    @base
libXau.i686                             1.0.8-2.1.el7                  @base
libXau.x86_64                           1.0.8-2.1.el7                  @base
libXau-devel.x86_64                     1.0.8-2.1.el7                  @base
libXdamage.x86_64                       1.1.4-4.1.el7                  @base
libXdamage-devel.x86_64                 1.1.4-4.1.el7                  @base
libXdmcp.i686                           1.1.2-6.el7                    @base
libXext.i686                            1.3.3-3.el7                    @base
libXext.x86_64                          1.3.3-3.el7                    @base
libXext-devel.x86_64                    1.3.3-3.el7                    @base
libXfixes.x86_64                        5.0.3-1.el7                    @base
libXfixes-devel.x86_64                  5.0.3-1.el7                    @base
libXft.x86_64                           2.3.2-2.el7                    @base
libXft-devel.x86_64                     2.3.2-2.el7                    @base
libXi.i686                              1.7.9-1.el7                    @base
libXi.x86_64                            1.7.9-1.el7                    @base
libXmu.i686                             1.1.2-2.el7                    @base
libXp.i686                              1.0.2-2.1.el7                  @base
libXp.x86_64                            1.0.2-2.1.el7                  @base
libXrender.x86_64                       0.9.10-1.el7                   @base
libXrender-devel.x86_64                 0.9.10-1.el7                   @base
libXt.i686                              1.1.5-3.el7                    @base
libXt.x86_64                            1.1.5-3.el7                    @base
libXtst.i686                            1.2.3-1.el7                    @base
libXtst.x86_64                          1.2.3-1.el7                    @base
libXxf86vm.x86_64                       1.1.4-1.el7                    @base
libXxf86vm-devel.x86_64                 1.1.4-1.el7                    @base
这里整理一份本机已安装所有libX开头的包,自行取舍。
-
大量报错信息 Bad file descriptor 和 Warning: "Error reading character from command line"
参照上面后台执行.m脚本修改命令行调用的方式,去除nohup。使用supervisord工具来守护进程,亦或者不要输出日志。
参考:
https://blog.csdn.net/qq_32892383/article/details/79670871
https://ww2.mathworks.cn/matlabcentral/answers/131366-why-do-i-see-i-o-errors-when-installing-matlab-using-the-iso-image
https://ww2.mathworks.cn/matlabcentral/answers/98745-why-do-i-receive-an-error-message-archive-is-not-a-zip-archive-during-matlab-installation-on-Linux
https://www.jianshu.com/p/a10397fcfb1d
https://blog.csdn.net/Xiao_Song_PKU/article/details/82700228
https://www.cnblogs.com/yaoyaoliu/p/6798463.html
https://Linux.cn/article-7992-1.html
https://blog.csdn.net/qq_39187538/article/details/88676283
https://www.cnblogs.com/sisimi/p/7700309.html
https://www.centos.org/forums/viewtopic.php?t=31436
https://ww2.mathworks.cn/matlabcentral/answers/63751-how-do-i-get-matlab-running-in-batch-mode-to-only-output-the-results-of-disp-fprintf-etc-and-no
https://ww2.mathworks.cn/matlabcentral/answers/66793-problem-running-matlab-script-to-background
作者:matrix
发布时间:2019 年 6 月 18 日
分类:Linux
测试环境:ubuntu
客户端连接远程ssh/git服务的时候可以在本地配置SSH config,用于简化多参数使用操作或者修改默认的ssh命令使用的配置。
我这里需要使用gitee的ssh密钥来管理远程仓库代码,方便以后可以免密码提交/更新代码。然而本地已经存在一个~/.ssh/id_rsa私钥,且还设置了用来保护私钥的passphrase密码。如果用之前的私钥连接gitee会造成每次都要求输入passphrase密码,亦或不能单独区分使用。
这个问题可以使用配置文件~/.ssh/config来解决
新建新的密钥对
$ ssh-keygen -t rsa -C "user"
新建的时候设置新密钥的保存路径,避免把之前的覆盖掉
配置
config文件默认是不存在的,直接新建即可
$ vi ~/.ssh/config
使用下面配置:
# gitee账户
Host gitee.com
HostName gitee.com
PreferredAuthentications publickey
IdentityFile ~/.ssh/id_rrsa_gitee
说明:
Host类型昵称,可以简化登录的输入地址,比如Host ccl,则可以用ssh ccl直接连接
HostName表示连接的远程主机地址
IdentityFile表示指定私钥文件路径
还有其他参数
Port指定端口
User指定用户名
这种配置可以让ssh来根据远程host地址来使用不同的私钥,设置了User还可以让ssh工具不同用户名来读取配置,也可以使用相同host地址哟~
比如都是github的不同账户,类似配置:
Host github.com
HostName github.com
PreferredAuthentications publickey
IdentityFile ~/.ssh/user1_rsa
User user1


Host github.com
HostName github.com
PreferredAuthentications publickey
IdentityFile ~/.ssh/user2_rsa
User user2
参考:
https://gitee.com/help/articles/4229
http://vra.github.io/2017/07/09/ssh-config/
https://gitee.com/help/articles/4181
https://daemon369.github.io/ssh/2015/03/21/using-ssh-config-file
PEACE~
作者:matrix
发布时间:2019 年 5 月 28 日
分类:Linux
测试需要S,C两台服务器,我需要C服务器ssh登录到S服务器进行操作。
目的:服务器C端使用命令git pull无密码登录自动从服务器S拉取最新代码。
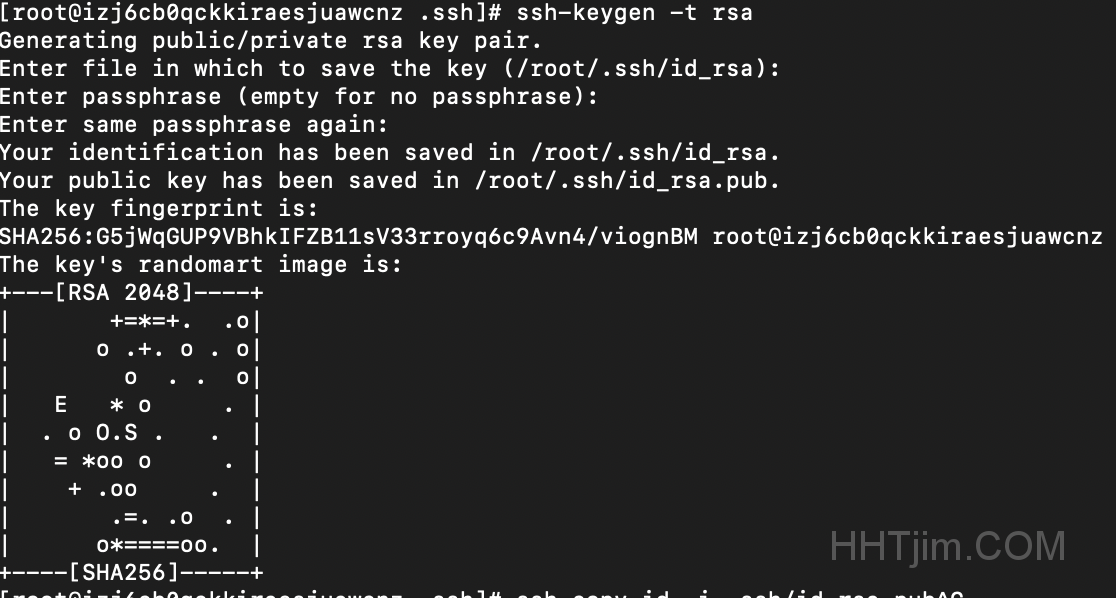
客户端生成RSA密钥
服务器C属于客户端角色,需要生成本地服务器的rsa密钥对,然后价格公钥发送到服务器S。
登录服务器C
$ cd ~
$ ssh-keygen -t rsa
#后面就默认回车
默认会在 ~/.ssh中生成id_rsa.pub,id_rsa这两个密钥对。
发送公钥
我之前是手动尝试把公钥文本打来粘贴到服务器S,然而ssh登录的话还是要密码验证。测试发现最好是使用ssh-copy-id命令进行操作。
还是在服务器C进行操作
$ ssh-copy-id -i ~/.ssh/id_rsa.pub login_user@HOST -p 22
说明:
ssh-copy-id命令可以快速的将公钥复制到远程主机
-i 指定公钥路径
login_user 为登录的用户名
HOST 为登录的远程服务器S的地址,域名/IP均可
-p 指定服务器S的ssh端口号
命令输入后应该会让你输入login_user用户的密码,若出现and check to make sure that only the key(s) you wanted were added.则表示公钥应该添加成功。
以免出现问题,现在可以去服务器S端看看,指定用户名login_user的文件/home/login_user/.ssh/authorized_keys会有客户端的rsa公钥。
登录测试
在服务器C操作
测试登录:
ssh login_user@HOST -p 22
若登录成功 BINGO!
其他问题
如出现还是需要密码的情况:
1.需要确定/etc/ssh/sshd_config配置文件中是否允许RSAAuthentication
RSAAuthentication yes
PubkeyAuthentication yes
AuthorizedKeysFile      .ssh/authorized_keys
2.用户目录权限问题
.ssh父目录的权限是755(我的是/root),.ssh目录权限是700,authorized_keys文件 600
3.确保仓库地址是ssh地址
如果还是https的话就用git remote set-url origin命令修改下:
$ git remote set-url origin git@HOST:user/project.git
参考:
https://blog.csdn.net/alifrank/article/details/48241699
https://blog.csdn.net/chengyuqiang/article/details/78432675
https://blog.csdn.net/b_x_p/article/details/78534423
https://www.cnblogs.com/0xcafebabe/p/5234678.html
作者:matrix
发布时间:2019 年 4 月 29 日
分类:Linux
linux重启守护进程可以使用-HUP参数来发送hang up挂断信号,系统会重启进程进行复位操作重新读取配置文件
There are also different signals that can be sent to both kill commands. What signal you send will be determined by what results you want from the kill command. For instance, you can send the HUP (hang up) signal to the kill command, which will effectively restart the process. This is always a wise choice when you need the process to immediately restart (such as in the case of a daemon). You can get a list of all the signals that can be sent to the kill command by issuing kill -l. You’ll find quite a large number of signals>
usage
指定进程ID 1011:
kill -HUP 1011
使用/var/run查看进程的ID,操作指定进程
kill -HUP `cat /var/run/nginx.pid`
-HUP无法生效参考:
https://docs.oracle.com/cd/E19253-01/819-7842/fhkpa/index.html
参考:
https://www.Linux.com/learn/intro-to-linux/2017/5/how-kill-process-command-line
https://blog.csdn.net/u011350541/article/details/50718085
https://www.cnblogs.com/codingcloud/p/5095066.html
作者:matrix
发布时间:2017 年 2 月 13 日
分类:Linux 零零星星
Linux后台守护进程化有nohup,screen命令可一般解决。但突发崩溃情况就不能很好的保证进程在后台的驻留。
supervisor是一个python脚本编写的工具,可以起到很好的管理、监控进程的作用。
安装
Debian类系统安装:
pip install supervisor #建议使用方式 避免旧版本导致的一系列问题

#或者
sudo apt-get install supervisor
选择y确认操作后即可安装完成。
配置
- 查看supervisord.conf
- supervisord已自动启动
使用 ps -aux|grep supervisord 查看supervisord进程信息,-c参数就是指定使用的配置文件
如图 我这里的配置文件就是/etc/supervisor/supervisord.conf

- supervisord 手动启动
执行supervisord命令即可启动supervisord工具。
默认会读取/etc/supervisord.conf配置文件,若不存在可能就需要自己手动创建:
$ echo_supervisord_conf > /etc/supervisord.conf
文件末尾include位置是定义需要管理的进程配置信息载入路径:
[include]
files = /etc/supervisord.d/*.ini
这里表示supervisord会读取/etc/supervisord.d/目录下的所有ini配置文件;这里支持多个文件列表的传入 用空格隔开即可。如:
[include]
files = /etc/supervisord.d/*.ini /home/supervisord_conf/*.ini
- 创建进程命令配置ini文件
进入/etc/supervisord.d/目录,创建ini文件
e.g. ws.ini:
文件名称可自定
[program:ws]
user=www ;执行进程的用户
command=php /home/wwwroot/chat.hhtjim.com/wsServer.php
autostart=true ;是否随系统自动启动
autorestart=true ;自动重启
startretries=10 ;启动失败时的最多重试次数   默认3
redirect_stderr = true  ; 把 stderr 重定向到 stdout,默认 false
stdout_logfile_maxbytes = 20MB  ; stdout 日志文件大小,默认 50MB
stdout_logfile_backups = 2     ; stdout 日志文件备份数
; stdout 日志文件,需要注意当指定目录不存在时无法正常启动,所以需要手动创建目录(supervisord 会自动创建日志文件)
stdout_logfile = /root/logs/rss2channel_stdout.log
说明:
program 表示自定义的任务名称
command 执行的命令
其他配置官方手册:
http://supervisord.org/configuration.html#program-x-section-values
启动
supervisord -c /etc/supervisord.conf
/etc/supervisord.conf为默认的配置文件,可自定
查看
- cli方式
> supervisorctl #进入命令行
> reload #重新载入配置
> status #状态查看
- web页面方式
supervisord.conf文件中需要配置
[inet_http_server]         ; inet (TCP) server disabled by default
port=127.0.0.1:9001        ; (ip_address:port specifier, *:port for all iface)
username=user              ; (default is no username (open server))
password=123               ; (default is no password (open server))
设置后执行supervisorctl reload重启再访问IP:9001就能监控supervisord的运行状态。
报错
unix:///var/run/supervisor.sock no such file错误
确保已经启动supervisord进程。
ps -aux|grep supervisord #查看是否存在进程
unix:///tmp/supervisor.sock no such file 错误
解决办法:
vi /etc/supervisord.conf
#把sock文件所在tmp目录的配置修改为/var/run目录
主要修改如下配置:
[unix_http_server]
;file=/tmp/supervisor.sock   ; (the path to the socket file)
file=/var/run/supervisor.sock   ;

......

[supervisorctl]
;serverurl=unix:///tmp/supervisor.sock ; use a unix:// URL  for a unix socket
serverurl=unix:///var/run/supervisor.sock ; 修改为 /var/run 目录,避免被系统删除
修改操作参考:
http://www.cashqian.net/blog/001472975510127673ea63db9234c4e8293cf43cefcafde000
最后执行更新:
supervisorctl update
socket.py line: 224错误
如果修改上面tmp目录再更新出现错误:
error: <class 'socket.error'>, [Errno 2] No such file or directory: file: /usr/lib64/python2.7/socket.py line: 224
解决:
先执行启动命令:supervisord再supervisorctl update
如果还是报错,那需要重新安装。因为版本太旧会导致这种问题
uwsgi无法启动
取消或注释uwsgi配置文件中的daemonize
附 使用的supervisord.conf:
; Sample supervisor config file.

[unix_http_server]
file=/var/run/supervisor.sock   ; (the path to the socket file)
;chmod=0700                 ; sockef file mode (default 0700)
;chown=nobody:nogroup       ; socket file uid:gid owner
;username=user              ; (default is no username (open server))
;password=123               ; (default is no password (open server))

;[inet_http_server]         ; inet (TCP) server disabled by default
;port=127.0.0.1:9001        ; (ip_address:port specifier, *:port for all iface)
;username=user              ; (default is no username (open server))
;password=123               ; (default is no password (open server))

[supervisord]
logfile=/var/log/supervisor/supervisord.log  ; (main log file;default $CWD/supervisord.log)
logfile_maxbytes=50MB       ; (max main logfile bytes b4 rotation;default 50MB)
logfile_backups=10          ; (num of main logfile rotation backups;default 10)
loglevel=info               ; (log level;default info; others: debug,warn,trace)
pidfile=/var/run/supervisord.pid ; (supervisord pidfile;default supervisord.pid)
nodaemon=false              ; (start in foreground if true;default false)
minfds=1024                 ; (min. avail startup file descriptors;default 1024)
minprocs=200                ; (min. avail process descriptors;default 200)
;umask=022                  ; (process file creation umask;default 022)
;user=chrism                 ; (default is current user, required if root)
;identifier=supervisor       ; (supervisord identifier, default is 'supervisor')
;directory=/tmp              ; (default is not to cd during start)
;nocleanup=true              ; (don't clean up tempfiles at start;default false)
;childlogdir=/tmp            ; ('AUTO' child log dir, default $TEMP)
;environment=KEY=value       ; (key value pairs to add to environment)
;strip_ansi=false            ; (strip ansi escape codes in logs; def. false)

; the below section must remain in the config file for RPC
; (supervisorctl/web interface) to work, additional interfaces may be
; added by defining them in separate rpcinterface: sections
[rpcinterface:supervisor]
supervisor.rpcinterface_factory = supervisor.rpcinterface:make_main_rpcinterface

[supervisorctl]
serverurl=unix:///var/run/supervisor.sock ; use a unix:// URL  for a unix socket
;serverurl=http://127.0.0.1:9001 ; use an http:// url to specify an inet socket
;username=chris              ; should be same as http_username if set
;password=123                ; should be same as http_password if set
;prompt=mysupervisor         ; cmd line prompt (default "supervisor")
;history_file=~/.sc_history  ; use readline history if available

; The below sample program section shows all possible program subsection values,
; create one or more 'real' program: sections to be able to control them under
; supervisor.

;[program:theprogramname]
;command=/bin/cat              ; the program (relative uses PATH, can take args)
;process_name=%(program_name)s ; process_name expr (default %(program_name)s)
;numprocs=1                    ; number of processes copies to start (def 1)
;directory=/tmp                ; directory to cwd to before exec (def no cwd)
;umask=022                     ; umask for process (default None)
;priority=999                  ; the relative start priority (default 999)
;autostart=true                ; start at supervisord start (default: true)
;autorestart=true              ; retstart at unexpected quit (default: true)
;startsecs=10                  ; number of secs prog must stay running (def. 1)
;startretries=3                ; max # of serial start failures (default 3)
;exitcodes=0,2                 ; 'expected' exit codes for process (default 0,2)
;stopsignal=QUIT               ; signal used to kill process (default TERM)
;stopwaitsecs=10               ; max num secs to wait b4 SIGKILL (default 10)
;user=chrism                   ; setuid to this UNIX account to run the program
;redirect_stderr=true          ; redirect proc stderr to stdout (default false)
;stdout_logfile=/a/path        ; stdout log path, NONE for none; default AUTO
;stdout_logfile_maxbytes=1MB   ; max # logfile bytes b4 rotation (default 50MB)
;stdout_logfile_backups=10     ; # of stdout logfile backups (default 10)
;stdout_capture_maxbytes=1MB   ; number of bytes in 'capturemode' (default 0)
;stdout_events_enabled=false   ; emit events on stdout writes (default false)
;stderr_logfile=/a/path        ; stderr log path, NONE for none; default AUTO
;stderr_logfile_maxbytes=1MB   ; max # logfile bytes b4 rotation (default 50MB)
;stderr_logfile_backups=10     ; # of stderr logfile backups (default 10)
;stderr_capture_maxbytes=1MB   ; number of bytes in 'capturemode' (default 0)
;stderr_events_enabled=false   ; emit events on stderr writes (default false)
;environment=A=1,B=2           ; process environment additions (def no adds)
;serverurl=AUTO                ; override serverurl computation (childutils)

; The below sample eventlistener section shows all possible
; eventlistener subsection values, create one or more 'real'
; eventlistener: sections to be able to handle event notifications
; sent by supervisor.

;[eventlistener:theeventlistenername]
;command=/bin/eventlistener    ; the program (relative uses PATH, can take args)
;process_name=%(program_name)s ; process_name expr (default %(program_name)s)
;numprocs=1                    ; number of processes copies to start (def 1)
;events=EVENT                  ; event notif. types to subscribe to (req'd)
;buffer_size=10                ; event buffer queue size (default 10)
;directory=/tmp                ; directory to cwd to before exec (def no cwd)
;umask=022                     ; umask for process (default None)
;priority=-1                   ; the relative start priority (default -1)
;autostart=true                ; start at supervisord start (default: true)
;autorestart=unexpected        ; restart at unexpected quit (default: unexpected)
;startsecs=10                  ; number of secs prog must stay running (def. 1)
;startretries=3                ; max # of serial start failures (default 3)
;exitcodes=0,2                 ; 'expected' exit codes for process (default 0,2)
;stopsignal=QUIT               ; signal used to kill process (default TERM)
;stopwaitsecs=10               ; max num secs to wait b4 SIGKILL (default 10)
;user=chrism                   ; setuid to this UNIX account to run the program
;redirect_stderr=true          ; redirect proc stderr to stdout (default false)
;stdout_logfile=/a/path        ; stdout log path, NONE for none; default AUTO
;stdout_logfile_maxbytes=1MB   ; max # logfile bytes b4 rotation (default 50MB)
;stdout_logfile_backups=10     ; # of stdout logfile backups (default 10)
;stdout_events_enabled=false   ; emit events on stdout writes (default false)
;stderr_logfile=/a/path        ; stderr log path, NONE for none; default AUTO
;stderr_logfile_maxbytes=1MB   ; max # logfile bytes b4 rotation (default 50MB)
;stderr_logfile_backups        ; # of stderr logfile backups (default 10)
;stderr_events_enabled=false   ; emit events on stderr writes (default false)
;environment=A=1,B=2           ; process environment additions
;serverurl=AUTO                ; override serverurl computation (childutils)

; The below sample group section shows all possible group values,
; create one or more 'real' group: sections to create "heterogeneous"
; process groups.

;[group:thegroupname]
;programs=progname1,progname2  ; each refers to 'x' in [program:x] definitions
;priority=999                  ; the relative start priority (default 999)

; The [include] section can just contain the "files" setting.  This
; setting can list multiple files (separated by whitespace or
; newlines).  It can also contain wildcards.  The filenames are
; interpreted as relative to this file.  Included files *cannot*
; include files themselves.

[include]
files = /etc/supervisord.d/*.ini
环境变量无法读取
本来在/etc/profile文件末尾添加环境变量的声明,也执行了source
## production environment
export RUN_ENV="TEST"
但是今天意外发现进程服务无法读取到环境变量信息。
需要配置supervisord段的environment,让supervisord能正常读取指定环境变量RUN_ENV
[supervisord]
environment=RUN_ENV="%(ENV_RUN_ENV)s"
可以在/etc/supervisord.conf文件中新增supervisord,也可以在/etc/supervisord.d/*.ini中的进程文件中添加
意外FATAL
如果长时间执行有可能会造成意外中断,这里最好做定时检测重启
check.sh
#!/bin/bash

status=`/usr/bin/supervisorctl status rss2channel|awk '{print $2}'`
if [ $status == 'STOPPED' -o $status == 'FATAL' ]; then
        /usr/bin/supervisorctl restart rss2channel >/dev/null 2&>1
fi
检测STOPPED 或者 FATAL状态就执行重启
rss2channel 为配置名称
再配合crontab定时任务 每小时检测
0 */1 * * * /bin/bash /root/check.sh
扩展/修改启动脚本的配置
默认脚本启动目录:/etc/supervisord.d
如果需要新添加启动脚本eth_kline.ini配置而不想重载reload所有。可以先执行reread,再add就可以了
$ supervisorctl reread
>>> eth_kline: available

$ supervisorctl add  eth_kline
>>> eth_kline: added process group
这样即可无痛扩展 不用重启所有已运行的脚本
如果需要修改也差不多 要使用update命令:
$ supervisorctl reread eth_kline
>>> eth_kline: changed

$ supervisorctl update eth_kline
>>> eth_kline: stopped
>>> eth_kline: updated process group
通配符操作
默认supervisorctl操作的名称不支持通配符 但是可以使用awk来达到效果
比如我想重启所有包含_kline关键字的进程脚本名 /usr/bin/supervisorctl restart *_kline ,让它匹配*_kline符合的name进程脚本名,然而supervisorctl不支持。
解决办法:
/usr/bin/supervisorctl restart `/usr/bin/supervisorctl status |awk '{print $1}'|grep -E ".*_kline"`
参考:
http://supervisord.org
http://liyangliang.me/posts/2015/06/using-supervisor/
http://www.tuicool.com/articles/Ejm2u2
http://stackoverflow.com/questions/16171338/supervisord-cant-find-command-in-virtualenv-folder
https://neo1218.github.io/supervisor/
https://blog.csdn.net/qq_27754983/article/details/78782866
https://serverfault.com/questions/511707/supervisord-error-class-socket-error
- 1
- 2


