作者:matrix
发布时间:2017 年 9 月 19 日
分类:零零星星
使用github项目
https://github.com/browserstate/history.js
问题场景
移动端网页列表(上拉加载执行ajax请求)中要在点击item详情页跳转后可返回,且返回页面中需要看到或定位到点击的来源位置。
测试
要实现准确定位,刚开始想的基本原理也就是俩页面之间跳转传递分页数和滚动条位置的数量,想过sessionstorage对象来存储或是用url中hash值、query参数来传递相关状态,列表页面中进行判断请求数据且修改ajax加载的分页起始数,但是url中的参数需要和后台进行协调才可以达到满意的效果,实现起来也麻烦。搜索找到好多方案 貌似history.js兼容各大浏览器,效果应该比较理想。
JQ后加载History的js文件:/history.js/scripts/bundled/html4+html5/jquery.history.js
测试分页使用scrollPagination的JQ插件实现翻页:
var urlscroll   = '';
var p = 1;

//获取缓存数据
//dom数据以及分页起始数
var dom = !!History.getState().data.dom?History.getState().data.dom:'';
var page = !!History.getState().data.p?History.getState().data.p:p;
p = page;
$(".test_list").append(dom);//追加缓存的dom
//end

$('.test_list').scrollPagination({
    'contentPage': urlscroll, // the url you are fetching the results
    'contentData': {'page':p}, // these are the variables you can pass to the request, for example: children().size() to know which page you are
    'scrollTarget': $(window), // who gonna scroll? in this example, the full window
    'heightOffset': 0, // it gonna request when scroll is 10 pixels before the page ends
    'bottomHeight': $('.footer').height(), // it gonna request when scroll is 10 pixels before the page ends
    'beforeLoad': function(){ // before load function, you can display a preloader div
        //$('#loading-pic').show();
        this.flagRequesting = 0;
    },
    'afterLoad': function(elementsLoaded){ // after loading content, you can use this function to animate your new elements

    //记录分页的dom数据
        for (var i = 0; i < elementsLoaded.length; i++) {
            dom += $(elementsLoaded[i]).html();
        }
        if(!!dom) History.pushState({'dom':dom,'p':this.contentData.page+1});//记录最后一次分页加载的dom数据以及下一页的起始数
        //end

        this.contentData.page++;
         $(".test_list").append('<img src="/mobile/img/ads.jpg" class="ads_img">');

        }
    this.flagRequesting = 1;
    }
});
上面代码仅测试,需自行修改。
主要起作用的位置是 记录分页的dom数据和获取缓存数据 两处注释块。
道理还是那样,只是更优化了些。这里缓存了所有ajax分页的DOM数据和请求的最后的页码,当返回到列表页面的时候获取缓存DOM并加载,起始的分页数也会还原。
history.js内部也是使用sessionstorage来缓存相关数据,所以设置state数据的时候需要将DOM对象转换为String字符串数据就可以缓存整个分页数据。
实际使用中会发现个别时候item详情页面中执行history.go(-1)或者点击A标签链接返回到列表页面的时候缓存的分页DOM数据可以正常的显示,但是滚动条定位就没达到想要的效果,所以要完美应该在获取缓存数据的时候添加一个scrollTop滚动条的复位操作,这样应该就巴适了。
嗯~~今天遇到的这个问题还好解决了,感谢开源奉献的人们。
peace~
参考:
http://www.cnblogs.com/songbyjson/p/4886615.html
五种解决方案:http://www.cnblogs.com/snandy/archive/2011/09/18/2180102.html
作者:matrix
发布时间:2017 年 8 月 30 日
分类:零零星星
win10上面安装的phpStudy这些天有时候打不开网页 502,请求一直loading,就算是代码问题我也扶不住,安装个Redis,mongodb都超级麻烦,并且好多都模拟Linux做的东西,最终写出来的代码都要发布到linux的生产环境,倒不如就搞个服务器的克隆环境,有虚拟机+vagrant 简直是巴适。它可以实现文件的共享 从而方便宿主机到虚拟机的文件同步,也就是win上编写代码,虚拟机测试运行,中间无需自行拷贝代码文件到虚拟环境。
PHP一键开发环境到目前用过phpnow phpstudy xampp,前两者仅限win平台,xampp可以跨win和mac平台。网上很多都推荐用vagrant搭建开发环境,可以完全模拟服务器环境,多平台支持 今天试试水。
安装VirtualBox虚拟机
官网:https://www.virtualbox.org/wiki/Downloads
安装vagrant
官网:https://www.vagrantup.com/downloads.html
挂载vagrant的box镜像文件
win下cmd命令进入你需要共享到虚拟环境的文件夹根目录 如:~/dev
阅读剩余部分 »
作者:matrix
发布时间:2017 年 8 月 22 日
分类:零零星星

很多服务器是使用nginx内置的Proxy_cache来缓存资源,防止不必要的后端请求。有时候需要单独清理某个缓存,这就麻烦了。
按照大多数做法是给nginx安装purge模块,但是目前有更加精简的办法使用代码手动删除
道理很简单:获取nginx缓存url的文件路径,然后删除就可以了。
proxy_cache_key缓存的key
nginx 配置了proxy_cache_key的话需要根据自定义的key来获取url的缓存hash值,默认的key一般都是完整的访问url
具体自己的nginx是以什么作为缓存key的,具体随便找个缓存文件vi一下看看,有些设置了upstream负载均衡,就需要替换访问的host为对应主机上的upstream节点名,SO 随便找个缓存文件看看。
缓存路径的拼接
缓存根目录中一般是 单字母/俩字母/32位字符路径作为缓存的文件存储。
首先需要对key进行md5 Hash的计算,取出最后3位字符。
单字母:md5最后一位
双字母:md5最后2,3位
最后再拼接出完整路径,删除就可以了。
缓存根目录是nginx中配置的,默认路径就不清楚了。
PHP代码参考,其他语言还请大牛附言~
//去除服务器nginx缓存
$root = '/var/tmp/Tengine/proxy_cache/';

//之所以替换 使用为nginx服务器设置了反向代理proxy_pass
//具体缓存的key还需查看真实的缓存文件的key值
$map = array(
    'http://www.hhtjim.com/' => 'http://www_hhtjim_com_backend/',
);
$key =  @$args[0];//访问的url链接作为缓存的key
if(empty($key)) die("Please input the cache url eg:http://www.hhtjim.com\n");
$key = str_replace(array_keys($map), array_values($map), $key);
$md5 = md5($key);
$file = sprintf('%s%s/%s/%s', $root, substr($md5, -1), substr($md5, strlen($md5) - 3, 2), $md5);
if (@unlink($file)) {
    echo 'DEL SUCCESS:' . $key."\n";die;
}
echo 'FAILED:'.$file."\n";
最后再访问url看看自己服务器响应头配置的$upstream_cache_status变量X-cache缓存标记为MISS 其他状态参考:
MISS 未命中,请求被传送到后端
HIT 缓存命中
EXPIRED 缓存已经过期请求被传送到后端
UPDATING 正在更新缓存,将使用旧的应答
STALE 后端将得到过期的应答
参考:
http://www.jb51.net/article/74595.htm
缓存命中率:http://www.361way.com/nginx-cache/2665.html
peace
作者:matrix
发布时间:2017 年 4 月 28 日
分类:零零星星
github: https://github.com/luofei614/SocketLog
socketLog是开发api的debug神器,可以在完全不影响客户端调用的时候debug数据,非常NICE.
添加Slog.php文件
下载github项目中的Slog.php到libraries目录
common_helper.php全局函数中添加代码
/**
 * CI框架 socketLog 远程调试
 *
 * 使用:
 * slog($this->db->last_query());
 *
 * chrome安装相关插件之后控制台就能看到相关数据
 *
 * @URL https://github.com/luofei614/SocketLog
 */
use think\org\Slog;
if (!function_exists('slog')) {
    function slog($log, $type = 'log', $css = '')
    {
        require_once APPPATH . 'libraries' . DIRECTORY_SEPARATOR . 'Slog.php'; #注意这里的载入路径,请确保是上一步的操作位置
        if (is_string($type)) {
            $type = preg_replace_callback('/_([a-zA-Z])/', create_function('$matches', 'return strtoupper($matches[1]);'), $type);
            if (method_exists('\think\org\Slog', $type) || in_array($type, Slog::$log_types)) {
                return call_user_func(array('\think\org\Slog', $type), $log, $css);
            }
        }
        if (is_object($type) && 'mysqli' == get_class($type)) {
            return Slog::mysqlilog($log, $type);
        }
        if (is_resource($type) && ('mysql link' == get_resource_type($type) || 'mysql link persistent' == get_resource_type($type))) {
            return Slog::mysqllog($log, $type);
        }
        if (is_object($type) && 'PDO' == get_class($type)) {
            return Slog::pdolog($log, $type);
        }
        throw new Exception($type . ' is not SocketLog method');
    }

    //配置参数加载
    slog(array(
        'enable'=>true,//是否打印日志的开关
        'host'=>'slog.thinkphp.cn',//websocket服务器地址,默认localhost
        'optimize'=>true,//是否显示利于优化的参数,如果运行时间,消耗内存等,默认为false
        'show_included_files'=>true,//是否显示本次程序运行加载了哪些文件,默认为false
        'error_handler'=>false,//是否接管程序错误,将程序错误显示在console中,默认为false
        'force_client_ids'=>array('xxx'),//日志强制记录到配置的client_id,默认为空
        'allow_client_ids'=>array('xxx')//限制允许读取日志的client_id,默认为空,表示所有人都可以获得日志。
    ),'config');
}
配置浏览器以及接收debug的客户端
此工具是TP开发人员编写,已经内置于TP5中。
此项功能需要有服务器提供websocket服务,为了避免不必要的折腾,TP也提供了公共服务:http://slog.thinkphp.cn
- 打开之后获取socketLog帐号的client_id,粘贴到上一步的
配置参数加载中.
-
安装chrome 插件 SocketLog
https://chrome.google.com/webstore/detail/apkmbfpihjhongonfcgdagliaglghcod
-
SocketLog 插件配置
监听地址:ws://slog.thinkphp.cn:1229
Client_ID:上面setup1中复制的id
使用
php代码中需要debug的地方slog('data');
然后chrome任意页面 打开Console,当有请求执行到debug的地方控制台即可看到数据
作者:matrix
发布时间:2017 年 4 月 17 日
分类:零零星星
http2.0早就开始实行了,忽然间才看到其实很多网站都有使用了http2.0协议,aliyun.com都有了,其他巨头是在打瞌睡吗?
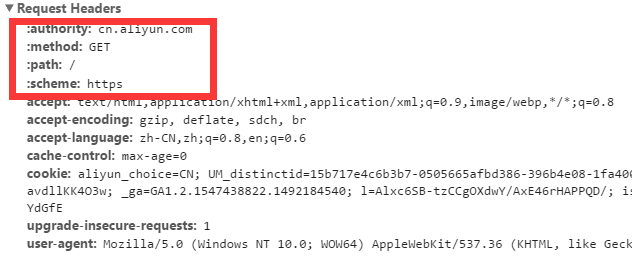
图中显示的Request完全和http1.1的请求完全不同 这,就是高科技!
要求
若想使用http2.0,浏览器和服务器端也都有要求。浏览器用最新版Chrome或其他,服务器端网站配置就麻烦多了。
服务器端OpenSSL库的版本要支持ALPN(1.0.2+ 目前最新为1.1.0e),之前是用SPDY,NPN,后来google只支持ALPN,也就是说未来就是HTTP/2 + ALPN
为什么我们应该尽快支持 ALPN?
需要给网站域名配置证书
nginx版本需要1.9.5+(目前最新版本1.12.0)
若你的服务器openssl或nginx本来就达不到要求,建议都重新安装升级才对。之前只是把openssl升级到最新版本,且Lnmp1.3中的nginx是1.10的版本完全符合要求(其中也有必须的httpv2和ssl模块)就没有给nginx做升级操作,以为可以用http2.0 结果给vhost的conf文件添加了listen 443 ssl http2;重启nginx N次都没有任何反应,最后还是更新nginx才解决。就是因为之前安装nginx的时候openssl没有达到版本要求,就算升级了服务器openssl也没有卵用。
> openssl version  #查看openssl 版本
> nginx -V #查看nginx版本以及模块
服务器配置
环境 ubuntu 14 64bit
LNMP 1.3 NGINX 1.10
升级openSSL库
>openssl version -a #查看openssl 信息 用于升级
>cd #进入默认目录
>wget https://www.openssl.org/source/openssl-1.1.0e.tar.gz
>tar -zxvf ./openssl-1.1.0e.tar.gz
>cd openssl-1.1.0e/
>./config --prefix=/usr/lib/ssl --openssldir=/usr/lib/ssl
#注意--prefix=/usr/lib/ssl为之前openSSL的安装目录,--openssldir表示安装目录 默认值就为/usr/lib/ssl
>make && make install
>mv /usr/bin/openssl /usr/bin/openssl-old
>mv /usr/include/openssl /usr/include/openssl-old
>ln -s /usr/lib/ssl/bin/openssl /usr/bin/openssl
>ln -s  /usr/lib/ssl/include/openssl /usr/include/openssl
>echo "/usr/lib/ssl/lib">>/etc/ld.so.conf
>ldconfig
#现在看看版本号就是最新的了
参考:https://www.douban.com/note/563948878/
若升级openssl导致ss服务无法使用参考:
更新OpenSSL库至最新版本导致sss服务无法启动
配置证书
不详细说明,之前有方法安装Let’s Encrypt证书
安装&升级nginx
最新版本1.12.0
本来是使用lnmp安装目录中自带的upgrade.sh进行自动升级操作,后来发现有问题,升级时出现openssl library not found,不过就算是自动升级也不敢保证LNMP编译nginx的时候是否使用的最新版本openssl库,还是手动升级操作。
>wget -O nginx-ct.zip -c https://github.com/grahamedgecombe/nginx-ct/archive/v1.3.2.zip
>unzip nginx-ct.zip
>cd lnmp nginx-1.12.0
>./configure --add-module=../ngx_brotli --add-module=../nginx-ct-1.3.2 --with-openssl=../openssl-1.1.0e --with-http_v2_module --with-http_ssl_module --with-http_gzip_static_module --with-http_stub_status_module
#这里http_v2_module,http_ssl_module,with-openssl才是必须要配置的,其他module看个人实际安装情况
>cd /usr/local/nginx/sbin
>cp nginx nginx.old  #备份旧版nginx
>cd ~/nginx-1.12.0
>make upgrade #升级操作
修改vhost中域名配置文件
文件位置:/usr/local/nginx/conf/vhost
修改对应域名的配置文件,在server段中添加listen 443 ssl http2;就可以了
参考 hhtjim.com:
server
    {
        listen 80;
    listen 443 ssl http2;
        #listen [::]:80;
    ssl on;
    ssl_certificate /etc/letsencrypt/live/hhtjim.com/fullchain.pem;
    ssl_certificate_key /etc/letsencrypt/live/hhtjim.com/privkey.pem;

        ssl_protocols TLSv1 TLSv1.1 TLSv1.2;
    ssl_ciphers EECDH+CHACHA20:EECDH+AES128:RSA+AES128:EECDH+AES256:RSA+AES256:EECDH+3DES:RSA+3DES:!MD5; #加密算法(CloudFlare 推荐的加密套件组)
    ssl_prefer_server_ciphers on; #优化 SSL 加密套件
    ssl_session_timeout 10m; #客户端会话缓存时间
    ssl_session_cache builtin:1000 shared:SSL:10m; #SSL 会话缓存类型和大小
    ssl_buffer_size 1400;
    add_header X-UA-Compatible "IE=edge,chrome=1"; #IE 用最新内核渲染页面

    server_name hhtjim.com www.hhtjim.com;
        index index.html index.htm index.php default.html default.htm default.php;
        root  /home/wwwroot/hhtjim.com;

        include other.conf;
        #error_page   404   /404.html;
        include enable-php.conf;
        include wordpress.conf;

        if ($http_host !~ "^www.hhtjim.com$"){
                rewrite  ^(.*)    https://www.hhtjim.com$1 permanent;
            }
        if ($scheme = "http"){
            rewrite ^(.*)$  https://$host$1 permanent;
        }

        location ~ .*\.(gif|jpg|jpeg|png|bmp|swf)$
        {
            expires      30d;
        }

        location ~ .*\.(js|css)?$
        {
            expires      12h;
        }

        location ~ /\.
        {
            deny all;
        }

        access_log  /home/wwwlogs/hhtjim.com.log;
    }
重启nginx
>lnmp nginx restart
之后再访问就可以看到使用http2.0协议了
FAQ
若安装失败,请参照 Nginx 配置之完整篇
参考:
https://imququ.com/post/my-nginx-conf.html
http://www.cnblogs.com/shiv/p/5271711.html
http://www.jb51.net/article/47755.htm
作者:matrix
发布时间:2017 年 4 月 16 日
分类:零零星星
ubuntu升级openssl库到openssl 1.1.0e版本,过程倒还好,到底还是成功了。但是reboot重启系统之后发现ss服务无法打开,这可是目前我唯一的科学电梯啊。
不过还好找到报错信息有解决办法。
>ssserver --version
shadowsocks 2.8.2 版本

报错:
root@root-VM:/usr/local/bin# ./ssserver  -c /etc/shadowsocks.json -d start
INFO: loading config from /etc/shadowsocks.json
2017-04-16 19:05:10 INFO     loading libcrypto from libcrypto.so.1.1
Traceback (most recent call last):
  File "./ssserver", line 9, in <module>
    load_entry_point('shadowsocks==2.8.2', 'console_scripts', 'ssserver')()
  File "/usr/local/lib/python2.7/dist-packages/shadowsocks/server.py", line 34, in main
    config = shell.get_config(False)
  File "/usr/local/lib/python2.7/dist-packages/shadowsocks/shell.py", line 262, in get_config
    check_config(config, is_local)
  File "/usr/local/lib/python2.7/dist-packages/shadowsocks/shell.py", line 124, in check_config
    encrypt.try_cipher(config['password'], config['method'])
  File "/usr/local/lib/python2.7/dist-packages/shadowsocks/encrypt.py", line 44, in try_cipher
    Encryptor(key, method)
  File "/usr/local/lib/python2.7/dist-packages/shadowsocks/encrypt.py", line 83, in __init__
    random_string(self._method_info[1]))
  File "/usr/local/lib/python2.7/dist-packages/shadowsocks/encrypt.py", line 109, in get_cipher
    return m[2](method, key, iv, op)
  File "/usr/local/lib/python2.7/dist-packages/shadowsocks/crypto/openssl.py", line 76, in __init__
    load_openssl()
  File "/usr/local/lib/python2.7/dist-packages/shadowsocks/crypto/openssl.py", line 52, in load_openssl
    libcrypto.EVP_CIPHER_CTX_cleanup.argtypes = (c_void_p,)
  File "/usr/lib/python2.7/ctypes/__init__.py", line 378, in __getattr__
    func = self.__getitem__(name)
  File "/usr/lib/python2.7/ctypes/__init__.py", line 383, in __getitem__
    func = self._FuncPtr((name_or_ordinal, self))
AttributeError: /usr/lib/ssl/lib/libcrypto.so.1.1: undefined symbol: EVP_CIPHER_CTX_cleanup
说到底都是升级openssl导致无法使用,旧版EVP_CIPHER_CTX_cleanup函数被弃用改为EVP_CIPHER_CTX_reset
办法
定位到/usr/local/lib/python2.7/dist-packages/shadowsocks/crypto/openssl.py文件:
修改52,111行处的EVP_CIPHER_CTX_cleanup为EVP_CIPHER_CTX_reset 重启服务,解决。
实际情况根据自己的ss版本查找修改相关文件
参考:http://blog.csdn.net/blackfrog_unique/article/details/60320737
PEACE
作者:matrix
发布时间:2017 年 4 月 2 日
分类:零零星星
官网
https://telegram.org/
聊天软件Telegram来历不小,CEO是俄罗斯最大社交网站创始人,什么什么两兄弟。
软件好像15年就有了,只是我现在才知道。里面真的是好多内容,包括政治,H网等等。很好奇,自然也进去玩玩。
软件开发的初衷就是为了隐私信息安全,信息加密。
https://livc.io/177
好了。我的目的是除了书签之外再留一份TG群的链接。
各种群以及聊天频道
http://120.77.47.131/telegram.html
http://www.telegram.url.tw/index.html
机器人store:https://storebot.me/top/news
或者通过资源机器人Bot: @GroupHub
还没玩过的朋友不妨试试,很Nice. 反正ISIS这类的恐怖组织在用。
现在最新版本V3.18支持免费打电话,使用过程需要梯子科学上网,且无中文,不过这个单词量真心不大。
参考:
https://livc.io/177
PEACE
作者:matrix
发布时间:2017 年 2 月 15 日
分类:零零星星
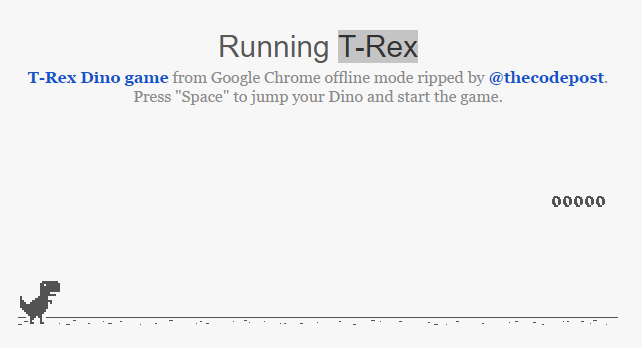
断网的时候chrome中会出现恐龙小游戏T-Rex/Dino。
来自 @thecodepost
试玩
html
http://www.hhtjim.com/wp-content/uploads/2017/02/T-RexGame.html
参考:http://www.thecodepost.org/internet/play-hidden-t-rex-game-offline-chrome/
http://www.cnblogs.com/undefined000/p/trex_8.html
- 1
... - 4
- 5
- 6
- 7
- 8
- 9
- 10
- 11
- 12
... - 23


