作者:matrix
发布时间:2024 年 3 月 26 日
分类:零零星星
最近几年总是黄推泛滥,不管你有没有关注总会在评论区看到😂
网页刷推时要是看到就很尴尬了,索性把所有图片全部打码,鼠标悬浮才显示。
完美解决🍺🍺🍺

安装地址
https://greasyfork.org/zh-CN/scripts/492051-twitter-safeview-auto-blur-with-hover-reveal
脚本代码
// ==UserScript==
// @name         Twitter SafeView: Auto-Blur with Hover Reveal
// @namespace    http://hhtjim.com/
// @version      1.0
// @description  自动模糊所有图片,悬停时才显示完整清晰图像。Automatically blurs all images and displays full clear images only when hovering.
// @author       You
// @match        https://twitter.com/*
// @grant        none
// ==/UserScript==

(function() {
    'use strict';

    const debounceDelay = 100; // milliseconds

    // Debounce function to limit the rate of execution
    function debounce(func, delay) {
        let debounceTimer;
        return function() {
            const context = this;
            const args = arguments;
            clearTimeout(debounceTimer);
            debounceTimer = setTimeout(() => func.apply(context, args), delay);
        };
    }


    let mouseX = 0, mouseY = 0;

    document.addEventListener('mousemove', debounce(function(e) {
        mouseX = e.clientX;
        mouseY = e.clientY;
        updateImageBlur();
    }, debounceDelay));


    document.addEventListener('scroll', debounce(function(e) {
        updateImageBlur();
    }, debounceDelay));


    // Function to check if the mouse is over the element
    function isMouseOverElement(element) {
        const rect = element.getBoundingClientRect();
        return mouseX > rect.left && mouseX < rect.right && mouseY > rect.top && mouseY < rect.bottom;
    }

    // Function to update image blur
    function updateImageBlur() {
        // console.log('updateImageBlur')
        //列表
        document.querySelectorAll('article[data-testid="tweet"]').forEach(function(tweetDiv) {
            // Apply or remove blur based on mouse position
            if (isMouseOverElement(tweetDiv)) {
                closeBlur(tweetDiv)
            } else {
                applyBlur(tweetDiv)
            }

        });
    }

    // Apply blur to the div and nested img
    const applyBlur = (document) => {
        // 推文
        document.querySelectorAll('div[data-testid="tweetPhoto"], div[data-testid="card.layoutLarge.media"]').forEach(function(div) {
            div.style.filter = 'blur(8px)';
            const img = div.querySelector('img');
            if (img) img.style.filter = 'blur(8px)';
        });
    };
    const closeBlur = (document) => {
        document.querySelectorAll('div[data-testid="tweetPhoto"], div[data-testid="card.layoutLarge.media"]').forEach(function(div) {
            div.style.filter = '';
            const img = div.querySelector('img');
            if (img) img.style.filter = '';
        });
    };

    // Observe for changes in the document
    const observer = new MutationObserver(debounce(function() {
            updateImageBlur();
        },debounceDelay));


    // Configuration of the observer
    const config = { childList: true, subtree: true };

    // var target = document.querySelector('section[aria-labelledby="accessible-list-1"]')
    var target = document.body

    // Start observing the target node for configured mutations
    if(target){
        observer.observe(target, config);
    }

    // Initial application of blur to images
    updateImageBlur();
})();
作者:matrix
发布时间:2024 年 1 月 31 日
分类:零零星星
服务器配置
配置文件的目录
/root/hysteria
自签证书key crt生成
openssl req -x509 -nodes -newkey ec:<(openssl ecparam -name prime256v1) -keyout /root/hysteria/server.key -out /root/hysteria/server.crt -subj "/CN=bing.com" -days 36500

# sudo chown hysteria /root/hysteria/server.key
# sudo chown hysteria /root/hysteria/server.crt
新建hysteria2.yaml文件
listen: :443 #监听端口

#使用CA证书
#acme:
#  domains:
#    - hhtjim.com #你的域名,需要先解析到服务器ip
#  email: test@hhtjim.com

#使用自签证书
tls:
  cert: /app/server.crt
  key: /app/server.key

auth:
  type: password
  password: 999999 #设置认证密码

masquerade:
  type: proxy
  proxy:
    url: https://www.baidu.com #伪装网址
    rewriteHost: true
最终需要的三个文件
hysteria2.yaml
server.crt
server.key
启动服务
docker run -v /root/hysteria:/app/ --net=host --rm -it tobyxdd/hysteria server -c /app/hysteria2.yaml
客户端使用
新建配置文件hysteria2-client.yaml
# 服务器信息及端口
server: server.hhtjim.com:443
auth: 999999

# 根据本地带宽设置上下行
bandwidth:
  up: 20 mbps
  down: 300 mbps

tls:
  insecure: true #使用自签时需要改成true

socks5:
  listen: 127.0.0.1:1084
http:
  listen: 127.0.0.1:8084
启动
docker run -v $(pwd)/hysteria2-client.yaml:/app/hysteria2.yaml --net=host --name=hysteria2-client -d tobyxdd/hysteria client -c /app/hysteria2.yaml
参考:
https://vpsxb.net/5008/
https://raw.githubusercontent.com/chika0801/hysteria-install/main/config_server.yaml
https://bulianglin.com/archives/hysteria2.html
部署Docker版Hysteria服务端
作者:matrix
发布时间:2023 年 12 月 5 日
分类:零零星星

Parsec
https://Parsec.app/
Parsec是专门针对游戏玩家的远程桌面工具,有很好的低延迟体验。
我用Parsec的Mac端连接PC端来远程玩游戏,完全可替代微软的Microsoft Remote Desktop。MRD虽然可以稍微优化下网络延迟($ sysctl net.inet.tcp.delayed_ack=0),但是效果还是差强人意,MRD远程时拖拽窗口和游戏的高频操作依然能感受到明显延迟。不过MRD在作为办公远程方面还是不错的,毕竟什么粘贴复制那些还是方便。
注册
登录注册需要有外网访问能力,免费版本的个人使用完全够用。
https://dash.parsec.app/signup/
按照官网提示流程操作即可,这里不打算手把手截图了
安装
widnows: https://builds.parsec.app/package/parsec-windows.exe
mac: https://builds.parsec.app/package/parsec-macos.pkg
软件安装后需要重启,如果没接显示器内部会虚拟出显示器,然后GPU压缩视频流P2P传输数据
登录
mac控制端,Windows被控端 各自登录同一个账号。如果出现登录-800的错误码则是网络问题,你需要自己配置代理
Parsec代理配置文件路径:
#Windows
#Per User installation 方式:
%appdata%\Parsec\config.txt

#Shared installation 方式:
%programdata%\Parsec\config.txt

# macOS / Linux / Raspberry Pi
~/.parsec/config.txt
config.txt代理配置内容
# 代理地址
app_proxy_address = 127.0.0.1
# 代理协议 http / https
app_proxy_scheme = http
app_proxy = true
# 代理端口
app_proxy_port = 1087
官方代理配置参考:
https://support.parsec.app/hc/en-us/articles/5805484240269-Configure-App-Level-HTTP-Proxy
远程

打开被控端,本地主机Computers下面出现当前机器名称。点击分享Share后复制链接到 mac控制端浏览器,打开后点击连接就可以了
游戏体验很跟手~
参考:
https://zhuanlan.zhihu.com/p/557637085
https://www.bilibili.com/read/cv16988873/
https://www.pjkui.com/98/title/macOS使用windows远程桌面RDP反应速度很慢解决方案
作者:matrix
发布时间:2023 年 6 月 23 日
分类:零零星星
https://github.com/Hootrix/keyword_alert_bot
针对keyword_alert_bot项目早就有添加docker镜像的想法,这次趁着有机会就完成这个feature,也算是使用下GitHub的CI/CD。
我的想法是利用github action功能,推送代码更新后自动打包docker镜像且安装所有依赖。打包的时候把最新版本号写入到代码中(当前日期作为版本号)。使用者把docker镜像pull后可以轻松运行整个bot。
流水线配置
项目的 .github/workflows/main.yml路径下新建文件:
name: CI/CD Pipeline

on:
  push:

    # 指定分支push操作触发流水线
    branches:
      # - dev.20230419 # debug
      - master

jobs:

  # 自定义job流水线名字
  build-and-push:

    # 指定运行环境 ubuntu最新版本
    runs-on: ubuntu-latest

    # 设计流水线阶段
    steps:

    # 名称
    - name: Check out code
      # 使用预先定义好的action。actions/checkout@v2 是 GitHub 官方提供,目的是将代码检出(checkout)到运行器上
      uses: actions/checkout@v2
      with: # 配置参数
        fetch-depth: 2 # 表示只获取最新的两个commit提交记录

    # 设置python3.7环境
    - name: Set up Python 3.7
      uses: actions/setup-python@v3
      with:
        python-version: 3.7

    # 安装pipenv依赖管理
    - name: Install pipenv
      run: |
        python -m pip install --upgrade pip
        python -m pip install pipenv

    # 标记是否存在py文件的更新,用于后续docker镜像打包的判断
    - name: Check for file changes
      id: file_check
      run: |
        if git diff --name-only HEAD^ | grep -q ".py$"; then
          echo "::set-output name=updated::true"
        else
          echo "::set-output name=updated::false"
        fi

    # 安装项目依赖
    - name: Install dependencies and lock
      if: steps.file_check.outputs.updated == 'true'
      run: |
        pipenv install --dev
        pipenv lock

    # 设置最新版本号 如 20230520.91a4ca1
    - name: Create version file
      run: |
        COMMIT_ID=$(git rev-parse --short HEAD)
        # 写入版本信息到指定文件
        echo "__version__ = '$(TZ='Asia/Shanghai' date +'%Y%m%d').$COMMIT_ID'" > utils/__version__.py


    # 登录DockerHub
    - name: Login to DockerHub
      uses: docker/login-action@v1
      with:
        username: ${{ secrets.DOCKER_HUB_USERNAME }}
        password: ${{ secrets.DOCKER_HUB_ACCESS_TOKEN }}

    # 存在更新条件 则推送到指定docker镜像仓库 tag为latest
    - name: Build and push Docker image
      if: steps.file_check.outputs.updated == 'true'
      uses: docker/build-push-action@v2
      with:
        context: .
        push: true

        # 推送到指定仓库镜像地址
        tags: yha8897/keyword_alert_bot:latest

    # 使用gh命令创建github release 执行版本发布
    - name: Create release
      env:
        GITHUB_TOKEN: ${{ secrets.GITHUB_TOKEN }}
      run: |
        # 读取指定文件的版本号。根据自己项目设置
        VERSION=$(python -c "from utils.__version__ import __version__; print(__version__)")
        echo $VERSION
        # 执行版本发布
        gh release create $VERSION
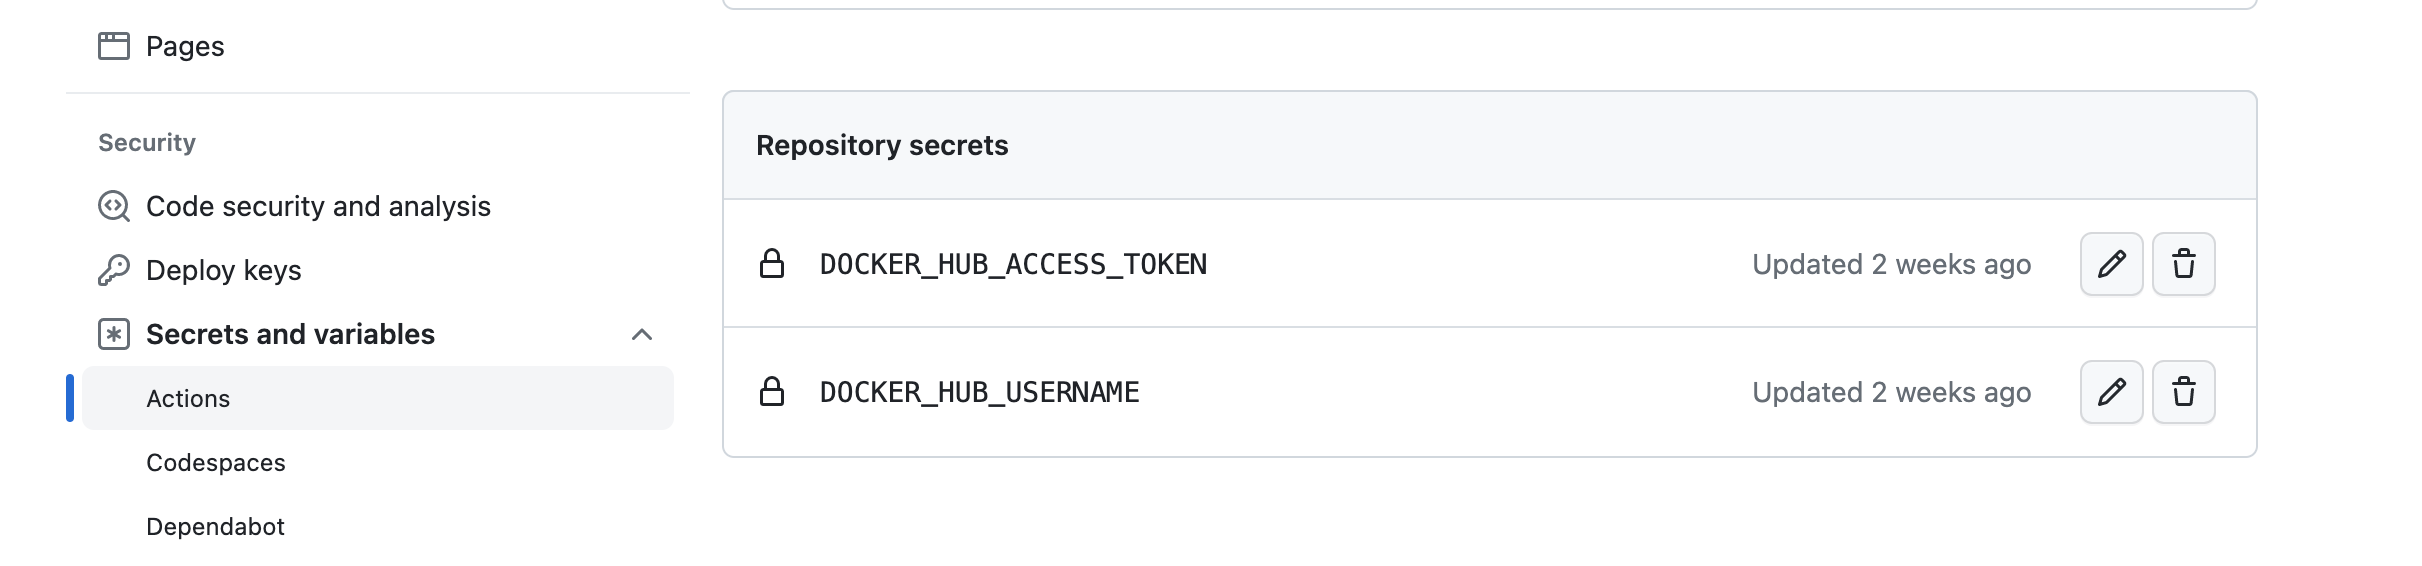
说明:
注意上面配置中的${{ secrets.DOCKER_HUB_USERNAME }},${{ secrets.DOCKER_HUB_ACCESS_TOKEN }} 表示github action自动读取环境变量中的DOCKER_HUB_USERNAME,DOCKER_HUB_ACCESS_TOKEN 即 docker hub的登录名和密码
DOCKER_HUB_ACCESS_TOKEN 需要自己生成>>,权限设置Read & Write即可。
之后打开github项目页面的settings >> Secrets and variables >> Actions >> New repository secret按钮
TOKEN配置
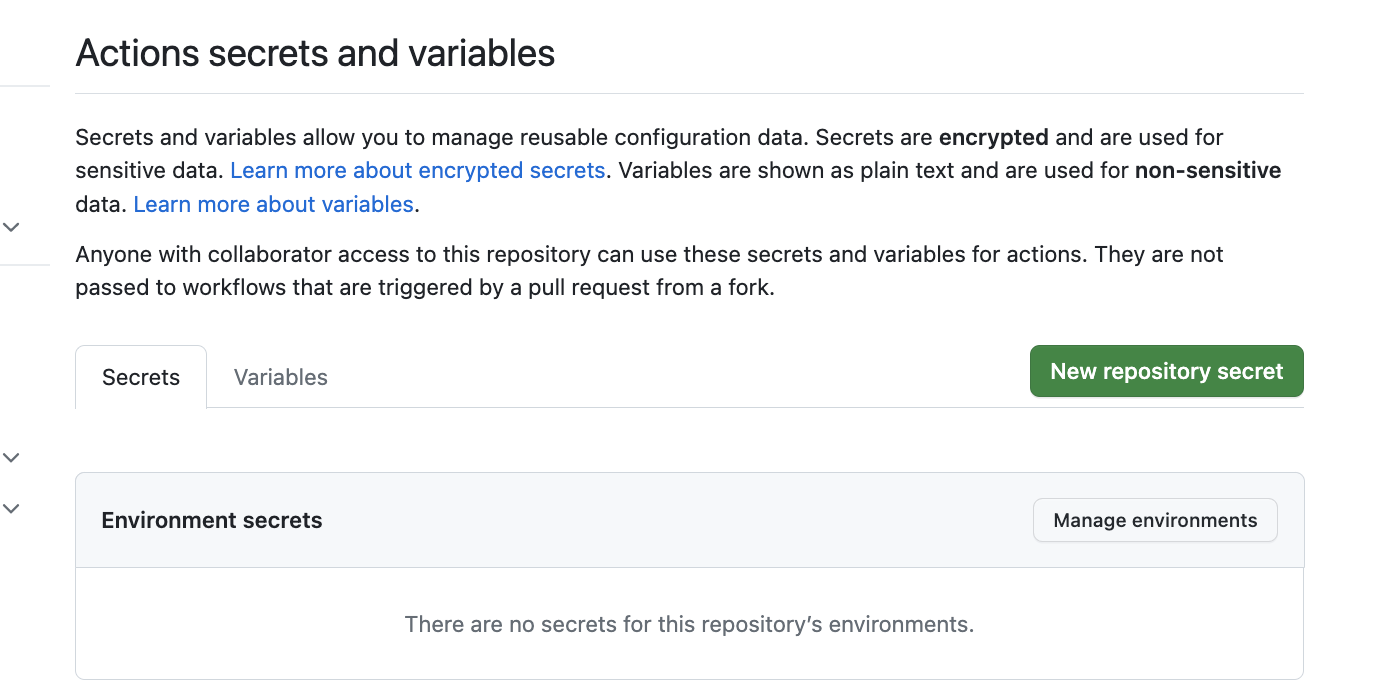
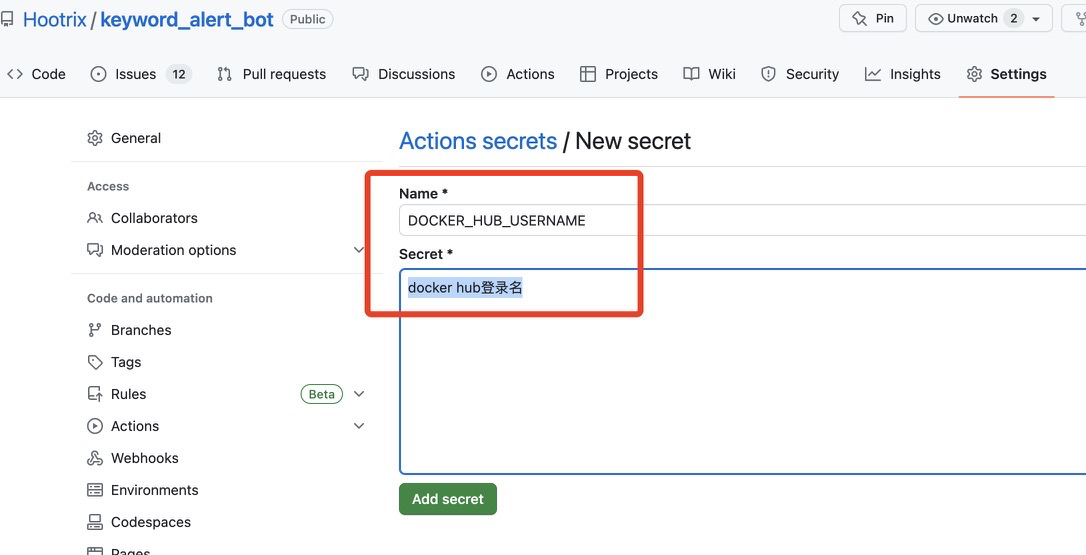
填写你的docker hub的对应值。
${{ secrets.GITHUB_TOKEN }} 属于特殊环境变量(GITHUB_开头的都算),会自动读取你账户运行的权限,不需要自己单独设置。
触发流水线
配置完成后,提交或者合入代码到上面👆「branches」指定的master分支就能自动出发CI/CD

docker镜像会自动推送
参考:
https://raw.githubusercontent.com/Hootrix/keyword_alert_bot/master/.github/workflows/main.yml
https://docs.github.com/zh/actions/using-workflows/using-github-cli-in-workflows
https://zhuanlan.zhihu.com/p/526696611
作者:matrix
发布时间:2022 年 12 月 31 日
分类:零零星星
很多时候需要搭建简单的socket代理或者其他中转隧道,方便学习开发。
gost是用golang实现的隧道代理工具,功能强大,也有docker环境可以快速使用。
github
https://github.com/go-gost/gost
docker镜像
ginuerzh/gost
gogost/gost
两个docker镜像应该都可信,来源于作者/官方
前置条件
外网服务器 + 中转服务器(可选) + 域名 + 域名SSL证书
下面用中转/直连方案实现隧道代理,记录下~
服务端(outside server)
外网落地服务器
a. 直连方案配置
$   docker run --rm -it \
    --net=host \
    -v /etc/letsencrypt:/etc/letsencrypt:ro \
    ginuerzh/gost -L "mwss://USERNAME:PASSWORD@:443?cert=/etc/letsencrypt/live/wwww.hhtjim.com/fullchain.pem&key=/etc/letsencrypt/live/wwww.hhtjim.com/privkey.pem"
b. 中转方案配置
$   docker run --rm -it \
    --net=host \
    -v /etc/letsencrypt:/etc/letsencrypt:ro \
    ginuerzh/gost -L "relay+mwss://USERNAME:PASSWORD@:443?cert=/etc/letsencrypt/live/wwww.hhtjim.com/fullchain.pem&key=/etc/letsencrypt/live/wwww.hhtjim.com/privkey.pem"
说明:
用户名和密码
USERNAME:PASSWORD
SSL证书
/etc/letsencrypt/live/wwww.hhtjim.com/fullchain.pem
/etc/letsencrypt/live/wwww.hhtjim.com/privkey.pem
中转服务端(inside server)
inside中转服务器,仅b.中转方案需要
目的:将服务端的relay+mwss中转为ss协议
$ docker run -p 8081:8081 -it -d --name gost-client gogost/gost -L ss://aes-256-cfb:PASSWORD2@:8081 -F "relay+mwss://USERNAME:PASSWORD@wwww.hhtjim.com:443"
说明:
8081为中转服务器本地启用的隧道端口
本地客户端
a. 直连方案
$ docker run -p 9898:9898 --rm gogost/gost -L ":9898" -F "mwss://USERNAME:PASSWORD@wwww.hhtjim.com:443"
说明:
9898为转发到本地的socket5端口
本地连接socket5://127.0.0.1:9898即可
b. 中转方案
普通客户端直连国内中转ip的ss协议
按照自己配置的中转方案参数,连接ss即可
测试
$ curl --proxy http://127.0.0.1:9898 -X GET 'https://ipinfo.io'

$ curl -v "https://www.google.com" --proxy "http://127.0.0.1:9898"
参考:
https://latest.gost.run/
https://v2.gost.run/port-forwarding/
https://github.com/haoel/haoel.github.io
https://ednovas.xyz/2021/02/24/mtproxy/#gost%E4%B8%AD%E8%BD%AC
https://telegra.ph/socks5%E5%8F%8AMTProto%E4%BB%A3%E7%90%86%E8%AE%BE%E7%BD%AE%E8%84%9A%E6%9C%AC-05-31
作者:matrix
发布时间:2022 年 10 月 18 日
分类:零零星星
环境:
Mac + vscode + docker
创建项目和容器镜像
基于nodejs的docker镜像安装tailwindcss,daisyui
新建目录tailwind-project
$ mkdir -p ./tailwind-project/src/   ./tailwind-project/dist/

$ cd ./tailwind-project/

$ docker run -it --rm -v $(pwd):/data -w /data node:latest  sh -c 'npm install -D tailwindcss tailwindcss-cli ;npm i daisyui;npx tailwindcss-cli init;bash'
install -D 参数表示dev
daisyui为组件库 可取消
显示「Created Tailwind css config file: tailwind.config.js」 即创建成功
安装成功的npm包:
root@4e27e6ae691b:/data# npm list

data@ /data
+-- daisyui@2.31.0
+-- tailwindcss-cli@0.1.2
`-- tailwindcss@3.1.8
配置tailwind.config.js
找到tailwind-project目录的tailwind.config.js文件。
参考配置如下:
// 下面配置为tailwindcss 3.0+版本
// 旧版本配置参数名可能不同
/** @type {import('tailwindcss').Config} */
module.exports = {
  content: ["./src/**/*.{html,js}"],
  theme: {
    extend: {},
  },
  plugins: [
    require("daisyui"),

  ],

  daisyui: {
    themes: ["emerald"],
  },
}
content:待监听的html/js/vue文件路径(Tailwind会自动读取使用的class,输出到output css)
plugins:配置加载UI插件daisyui
daisyui.themes : 设置daisyui的默认主题为emerald
热更新监听
使用tailwindcss命令监听html文件变更,自动输出class的css代码到output.css
npx tailwindcss -o ./dist/output.css --minify --watch
-o参数定义output css输出文件路径
--minify参数启用css压缩
--watch参数启用热加载更新文件
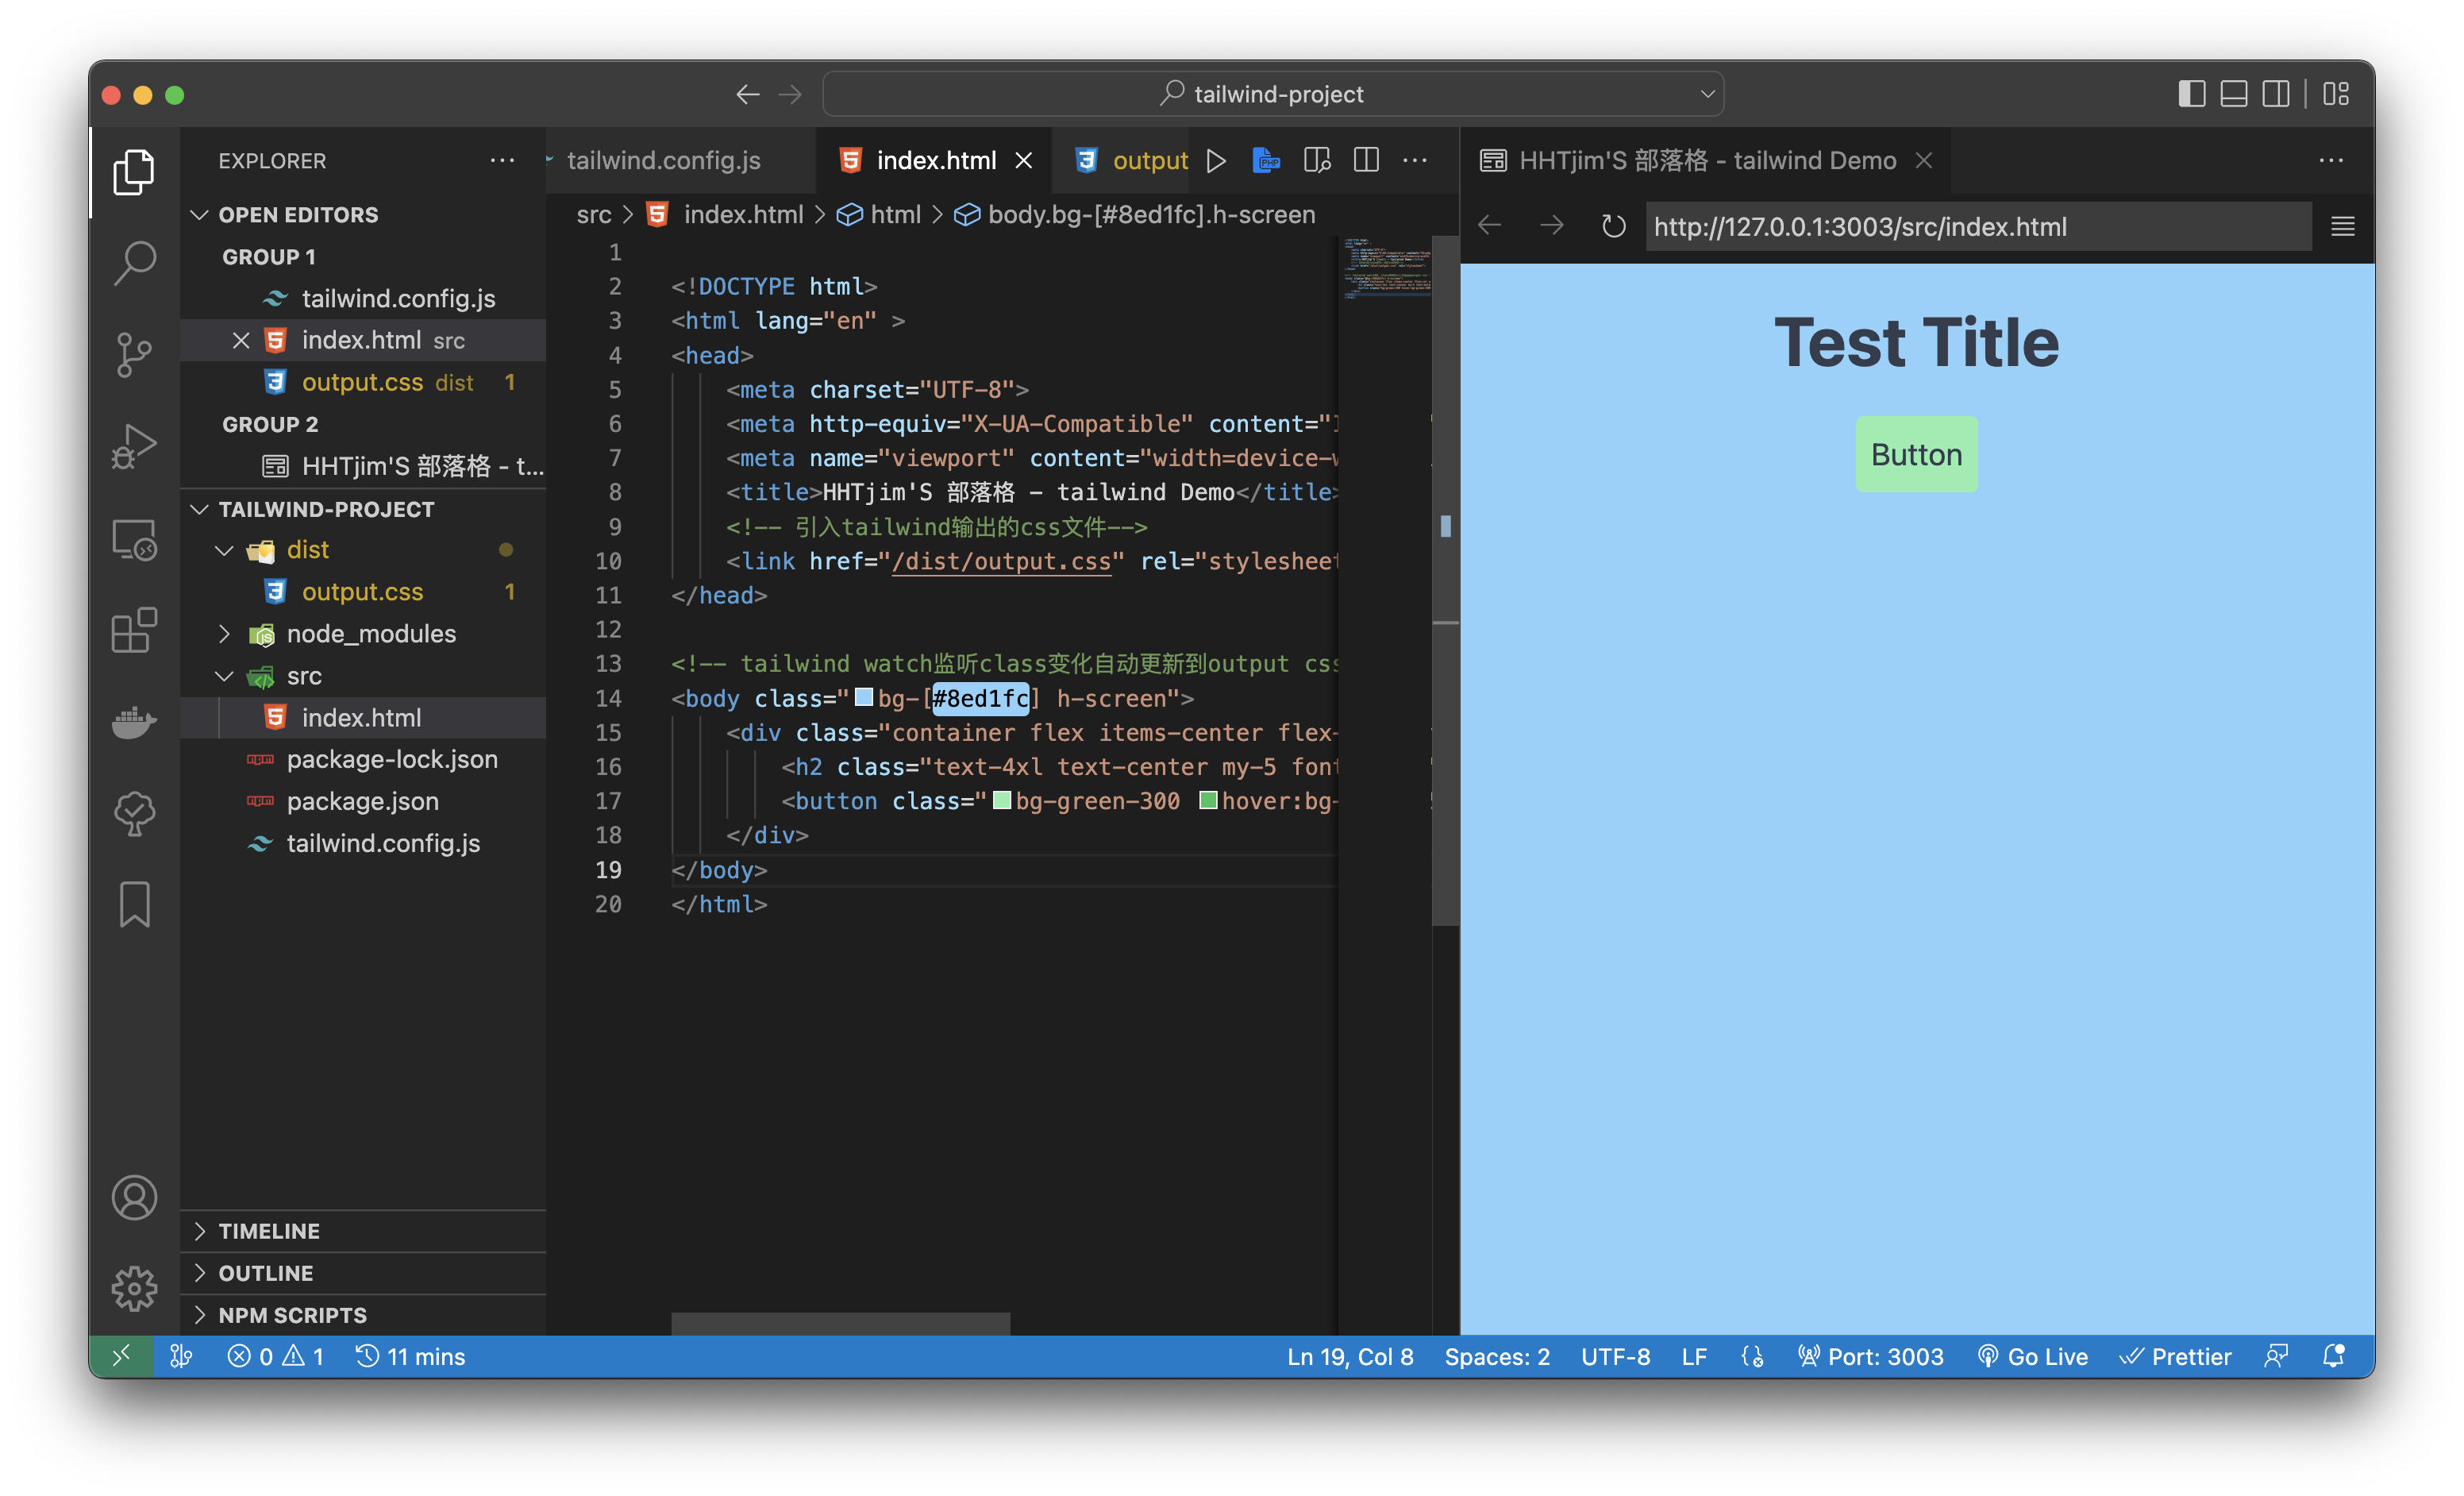
编辑你的html
编辑./src/index.html文件,开始尝试tailwind啦...
<!DOCTYPE html>
<html lang="en" >
<head>
    <meta charset="UTF-8">
    <meta http-equiv="X-UA-Compatible" content="IE=edge">
    <meta name="viewport" content="width=device-width, initial-scale=1">
    <title>HHTjim'S 部落格 - tailwind Demo</title>
    <!-- 引入tailwind输出的css文件-->
    <link href="/dist/output.css" rel="stylesheet">
</head>

<!-- tailwind watch监听class变化自动更新到output css -->
<body class="bg-[#8ed1fc] h-screen">
    <div class="container flex items-center flex-col w-full">
        <h2 class="text-4xl text-center my-5 font-bold " >Test Title</h2>
        <button class="bg-green-300 hover:bg-green-500 rounded px-2 py-2">Button</button>
    </div>
</body>
</html>
vscode插件
tailwindcss官方提供了vscode的开发插件,便于提示class name
https://marketplace.visualstudio.com/items?itemName=bradlc.vscode-tailwindcss
tailwindcss用法要多多参考官方手册了,不过有daisyui也可以更快的输出你想要的控件样式
参考:
https://tailwindcss.com/docs/installation
https://daisyui.com/
https://github.com/komavideo/LearnTailwindCSS/tree/main/Lesson02
作者:matrix
发布时间:2022 年 10 月 2 日
分类:零零星星
SLA探活的需求很广泛,简单的可以自己实现。但是专门独立的探活工具倒是极少~
EaseProbe由GO编写,不需要其他依赖支持直接使用二进制程序运行。
这几天测试用来给api接口、ssl证书、web 200探活,好用~
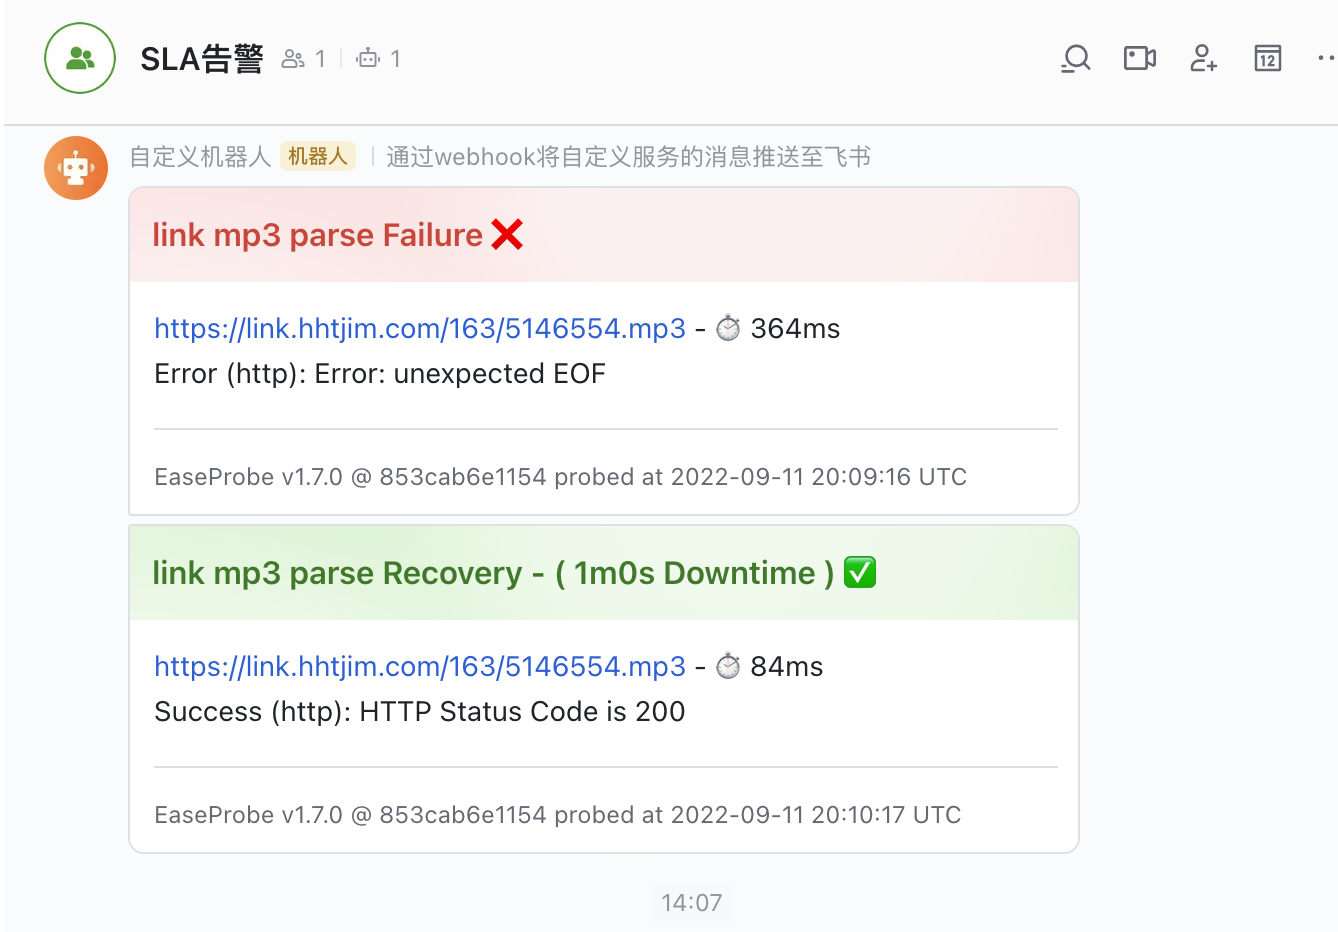
github仓库
https://github.com/megaease/EaseProbe
支持HTTP、TCP、SSH、SSL证书、各种数据库/消息中间件服务探活,和email、Slack、Discord、Telegram、飞书...的通知。还支持消息通知和定时发送报表,可以自定义分类告警渠道
配置config.yaml
参照官方配置,新建文件config.yaml
配置SSL证书过期检测、WEB HTTP200检测、接口HTTP状态检测:
http: # http探活

    # 默认监控网页HTTP是否为200OK
  - name: "HHTJIM.COM OK"
    url: https://www.hhtjim.com
  - name: "LINK.HHTJIM.COM OK"
    url: https://www.hhtjim.com

    # 监控接口是否返回指定状态码
  - name: link mp3 parse
    url: https://link.hhtjim.com/163/5146554.mp3
    method: GET
    insecure: true
    success_code:
        # 配置允许的状态码范围
      - [200,206] # the code >=200 and <= 206
      - [300,308] # the code >=300 and <= 308
    timeout: 1s # default is 30 seconds

tls: # SSL证书探活

    # 监控网页证书是否临近过期(24小时内触发告警)
  - name: "www.hhtjim.com SSL EXPIRED"
    host: www.hhtjim.com:443
    insecure_skip_verify: true # dont check cert validity
    expire_skip_verify: false # dont check cert expire date
    alert_expire_before: 24h # alert if cert expire date is before X, the value is a Duration, see https://pkg.go.dev/time#ParseDuration. example: 1h, 1m, 1s. expire_skip_verify must be false to use this feature.

    # 监控网页证书是否临近过期(7天内触发告警)
  - name: "link.hhtjim.com SSL EXPIRED"
    host: link.hhtjim.com:443
    insecure_skip_verify: true
    expire_skip_verify: false
    alert_expire_before: 168h

notify: # 告警通知方式

  lark:
    - name: "lark alert service"

        # 配置飞书通知机器人的webhook
      webhook: "https://open.feishu.cn/open-apis/bot/v2/hook/00000-10b1-000000-8949-00000000"

# 全局配置
settings:
  probe:
    timeout: 30s # the time out for all probes
    interval: 1m # probe every minute for all probes
说明:
参照上面注释可自由配置,我这里使用的是飞书通知。也可以其他方式告警~
探活配置参数:
https://github.com/megaease/easeprobe/blob/main/docs/Manual.md#1-probe
告警通知配置参数:
https://github.com/megaease/easeprobe/blob/main/docs/Manual.md#2-notification
开启监控
EaseProbe已经有docker镜像,可以直接一键启停。
# 首次启动
$ docker run -d  -p 8181:8181 --name sla -v $(pwd)/config.yaml:/opt/config.yaml megaease/easeprobe


# 重启
$ docker restart sla


# 关闭
$ docker stop sla
查看状态
访问http://HOST:8181`就能看到web监控面板,且支持api接口http://HOST:8181/api/v1/sla`

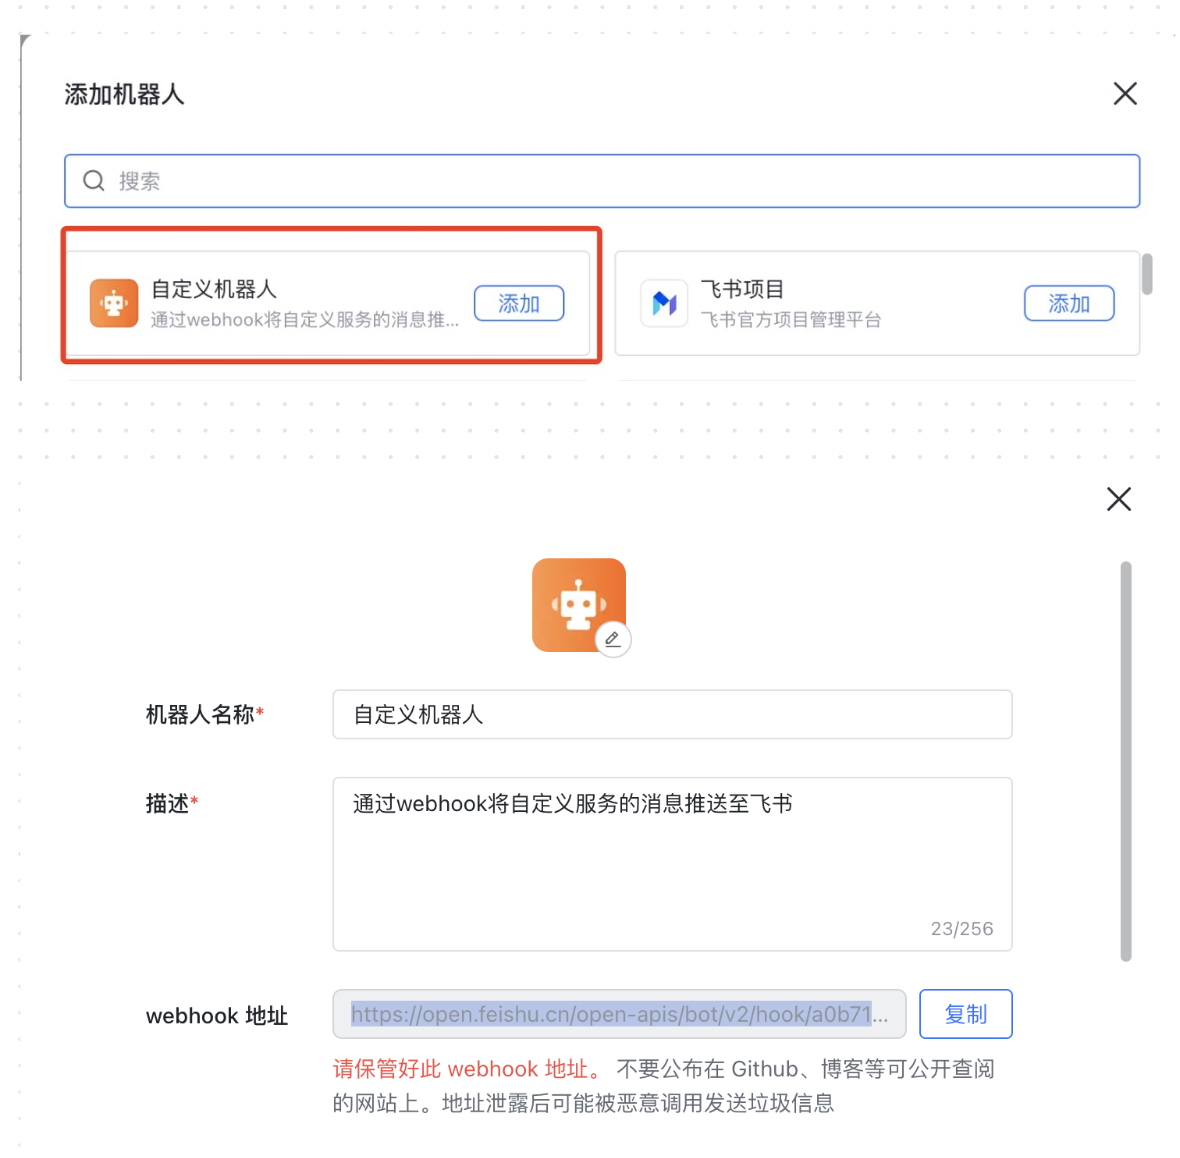
附. 飞书BOT创建
这里的告警通知使用的是群自定义机器人webhook,需要使用飞书客户端创建(web端没有找到入口)

参考:
https://mp.weixin.qq.com/s/c73ZPBGOMbqjT-xbRiCJ3g
https://github.com/megaease/easeprobe/blob/main/docs/Manual.md
https://open.feishu.cn/document/ukTMukTMukTM/ucTM5YjL3ETO24yNxkjN?lang=zh-CN
作者:matrix
发布时间:2022 年 9 月 12 日
分类:零零星星
配置快捷键运行多条命令,目前没有看到官方的解决方案,使用三方插件支持
测试环境:
Mac vscode 默认语言
multi-command插件
https://marketplace.visualstudio.com/items?itemName=ryuta46.multi-command
先安装multi-command~
打开配置页
打开vscode命令面板按F1或者command + shift + p
搜索 open keyboard shortcuts,选择Open Keyboard Shortcuts (JSON)

我之前有次修改过cmd-k快捷键,目的是清空code-runner插件运行的命令行信息(清屏)。
vscode默认的cmd-k执行场景有限,当初是把触发条件when修改为终端或者编辑器获取焦点就行。
...
{
"key": "cmd+k",
"command": "workbench.action.terminal.clear",
"when": "terminalFocus && terminalProcessSupported || editorFocus"
}
...
但是现在需要terminal和output都执行清空,也就是执行两条命令。我尝试了多次都失败了,最后也只好乖乖安装插件搞定。
自定义快捷键
按照上面操作,正常打开keybindings.json文件,
或者自己打开配置文件默认路径:
~/Library/Application Support/Code/User/keybindings.json
我需要执行多个消息清空的命令,按下面配置即可
// 将键绑定放在此文件中以覆盖默认值auto[]
[
//...
{
"key": "cmd+k",
"command": "extension.multiCommand.execute",
"args": {
"sequence": [
"workbench.action.terminal.clear",
"workbench.output.action.clearOutput",
]
},
"when": "terminalFocus && terminalProcessSupported || editorFocus"
},
//...
]
说明:
command参数执行插件入口命令extension.multiCommand.execute
sequence参数配置需要执行的命令(按序执行)
when参数控制触发条件
配置完成之后,会立即生效~ 这样就可以了
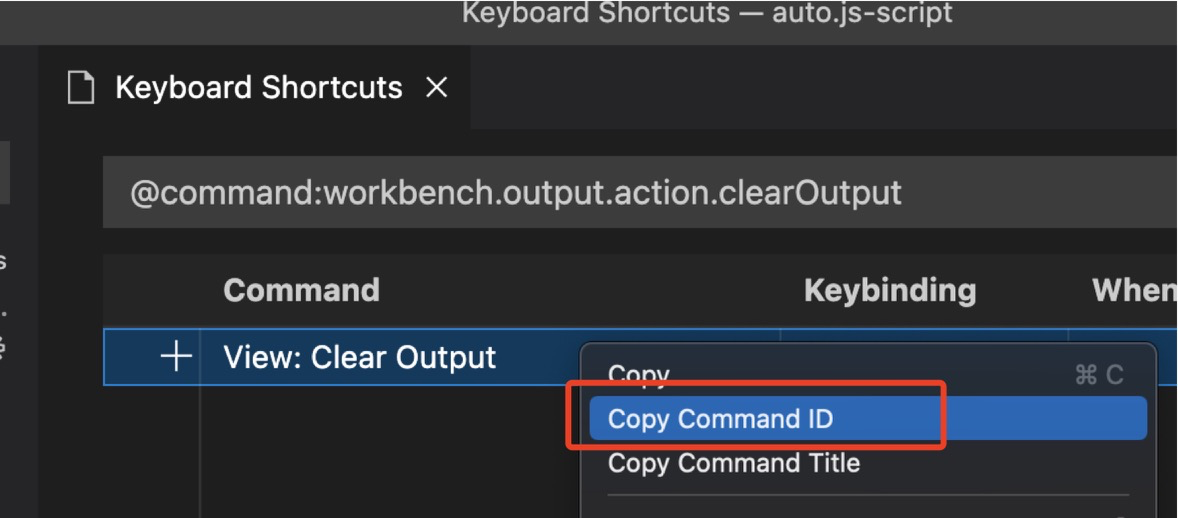
找到自己的command
你自定义的快捷键可能会用到vscode的其他命令,可以使用下面方法找到完整command命令
- 打开vscode命令面板按
F1或者command + shift + p
-
搜索命令关键字
-
点击右侧设置按钮

参考:
when参数可用context:
https://code.visualstudio.com/api/references/when-clause-contexts
不使用插件的方法:
VS Code: bind one key to multiple commands without an extension
- 1
- 2
- 3
- 4
- 5
... - 23


